Pressure Cooker Pot Roast and Potatoes

pot roast platedsmall

I know it’s summer, but despite the season, I was in the mood for beefy comfort food last night, specifically: pot roast. However, time got away from us yesterday and we got home way too late to prepare a traditional roast. I then remembered a recipe for a pressure-cooked version in Pressure Cooker Perfection from America’s Test Kitchen.

It’s a four-step recipe that yields a perfectly cooked pot roast in 30 minutes under high pressure. With releasing pressure and skimming the sauce, I had the roast on the table in a little more than an hour from start to finish.

The key to this recipe is a “secret ingredient,” something that you’ll probably never find in a gourmet store or even in the fine-foods section of a grocery. It’s not imported and it sells for under $2.00. It’s condensed French onion soup. I used Campbell’s; I don’t know of any other.

If the thought of using this ingredient turns you off, the recipe may still win you over with its use of dried porcini. It yields an aromatic, juicy roast with creamy, flavor-infused potatoes. Granted you may not want to make this roast this summer, but when fall approaches, you may want to give it a try.

Note: Before attempting this recipe, be sure you are thoroughly familiar with your pressure cooker. Read the manual to know its capacity and to understand how to lock the lid, the cooker’s high-pressure indicator, the methods of releasing (natural and quick release), and the like.

Weeknight Pot Roast and Potatoes Adapted from Pressure Cooker Perfection by America’s Test Kitchen

Ingredients
1 ounce dried porcini mushrooms (the original recipe calls for 1/2 ounce)
1 can (10.5 oz) condensed French onion soup
2 tablespoons tomato paste (I recommend the double concentrate from a tube.)
1/4 teaspoon ground cumin (not in the original recipe)
2.5 – 3 pound boneless beef chuck-eye roast, trimmed and cut across the grain into 1 inch slices
2 pounds small or medium Yukon Gold potatoes, washed

1 – In a small bowl, rehydrate the mushrooms in 1/2 cup warm water for about 20 minutes; remove the mushrooms from the water, squeezing any excess water back into the bowl. Strain the soaking water through a coffee filter or strainer lined with cheesecloth to remove any grit and reserve. Mince the mushrooms.

2 – Whisk soup, tomato paste, mushrooms, and their strained soaking water in the pressure cooker pot. Lay the sliced meat over the mixture. Season with ground cumin. Place the potatoes on top of the meat. Lock the pressure-cooker lid in place and bring to high pressure over medium-high heat. As soon as pressure cooker reaches high pressure, reduce the heat to medium-low and cook for 30 minutes, adjusting heat as needed to maintain high pressure.

3 – Remove the pressure cooker from the heat and allow the pressure to release naturally for 15 minutes. Quick release any remaining pressure, then carefully remove the lid, allowing steam to escape away from you.

4 – Transfer meat and potatoes to a warmed platter. Using a large spoon, skim excess fat from the surface of the sauce. Serve the meat and potatoes with the sauce.

Wine Pairing: Cabernet Sauvignon

Pepper and Onion Frittata

frittataplatedsmall

After several heavy meals, I like to prepare something simple, light, and quick. Such was the case last night, when we came home after 7PM from a day of errands and shopping and wanted to have dinner before 8. The answer was a a frittata made from onions, peppers, eggs, Pecorino, Romano, and flat leaf parsley.

I learned to make frittatas as I was growing up from watching my aunt at the stove. Unlike a French omelette, which should take about a minute to cook, a frittata takes cooks slowly on a low flame. And rather than rolled liked it French counterpart, it’s flipped over to finish cooking.

It’s great served hot, room temperature, and yes, even cold.

3-4 Tablespoons extra virgin olive oil
1 large garlic clove, peeled
1.5 pounds bell peppers (red, yellow, orange; I don’t like the taste of green) sliced thin
1 large Vidalia onion, sliced thin
10 extra large eggs
2 Tablespoons milk
1/3 cup Pecorino Romano, grated
1/4 cup, Italian parsley, chopped
Salt and Fresh ground black pepper, to taste

Peppers and onions uncooked

In a large sauté pan heat the oil and the garlic clove until shimmering. Add the peppers and onions and sauté over medium high heat, tossing frequently until browned. Remove the garlic clove before it gets brown. Set aside.


Browned peppers and onion

In a large bowl, beat the eggs, milk, cheese, parsley, salt and pepper, until thoroughly mixed.

Egg mixture
Egg mixture

In a 10 inch non-stick pan, transfer the peppers and onions from the sauté pan being sure to capture any remaining olive oil that’s in the pan.

Heat over a low flame and when hot, add the egg mixture. Stir the eggs and the vegetables to combine. Still over a low flame, as the eggs set around the edge, push the set portion into the center and allow the wet potion of the egg mixture to flow into the sides of the pan. Continue to do this, until most of the eggs are set.

frittata4small
Eggs setting on first side

When the eggs are almost fully set yet slightly wet on the top, remove from the heat, and then cover with a round pizza pan or plate large enough to cover the pan and flip onto the pizza pan or plate, using oven mitts.

Slide the frittata back into the pan and continue to cook, still over low flame, until lightly browned, about 2 to 3 minutes.

Finished frittata on cutting board

Slip the cooked frittata onto a cutting board, slice and serve.

Wine Pairing: Pinot Grigio, Trebbiano d’Abruzzo, Sangiovese


Linguine alle Vongole

clams platedsmall

Last night, we enjoyed our favorite seafood pasta: linguine alle vongole, linguine with white clam sauce. It’s a relatively quick and easy dish to prepare, but it does require attention to detail: slow poaching of the garlic in the olive oil to extract optimal flavor, just a pinch of Calabrian red pepper flakes, a final addition of finely minced fresh garlic and lemon zest at the end to add brightness.

As with most Italian cooking, the primary ingredients must be of the highest quality. For this reason, sometimes you have to adjust a recipe by what’s available in the market. Such was the case yesterday. Typically I use either Manila or small littlenecks for this dish. However, yesterday, there were none of the former and the latter were just too big. But I did find some wonderfully fresh cockles, which I find a tad sweeter than clams.

2 large cloves of garlic, minced
1/4 cup olive oil
1/8 teaspoon Calabrian red pepper flakes
2 pounds small clams (littleneck, Manila, or cockles), scrubbed if necessary and rinsed. Inspect the clams discarding any that are cracked or that are open and do not close when pinched.
1/3 cup of dry white wine
1/2 cup Italian (flat leaf) parsley, chopped fine
8 oz linguine
zest of 1/2 lemon
1 tablespoon, unsalted butter
Freshly ground black pepper

In a large pot, bring 6 quarts of water to a boil.

Meanwhile, in a large sauté pan, starting from room temperature, poach 3/4 of the garlic and the pepper flakes in the olive oil over a low flame until aromatic. Add a pinch of the parsley for the final minute of sautéing. The garlic should take on only the lightest hint of gold color.

Sautéed garlic awaiting the clams

At this point, liberally salt the water (add the salt slowly to avoid boiling over) and start cooking the pasta. Cook the pasta following package directions for 1 minute less than al dente

Add the clams, wine, and 3/4 of the parsley to the sauté pan, raise the heat and bring to a high simmer over medium high heat. Cover the pan tightly and shaking occasionally, cook the clams until they open. About 6 minutes.

Clams just opened
Clams just opened

Remove the clams with a slotted spoon, discarding any that do not open, sprinkle them with the lemon zest. Raise the flame to high and bring the sauce remaining in the pan to a boil. Add the butter. Using tongs or a pasta fork, immediately transfer the cooked pasta to the sauté pan and toss for about a minute to coat the pasta. If too dry, add a couple of tablespoons of the pasta water. At this point, the pasta will be the perfect al dente

Transfer the pasta and sauce to a bowl, add the clams, the remaining 1/4 of the minced garlic, and sprinkle with the remaining parsley. Serve on warmed plates with a few grinds of fresh black pepper if desired.

Wine Pairing: Soave, Pinot Grigio, Sauvignon Blanc

Roast Halibut with Artichokes

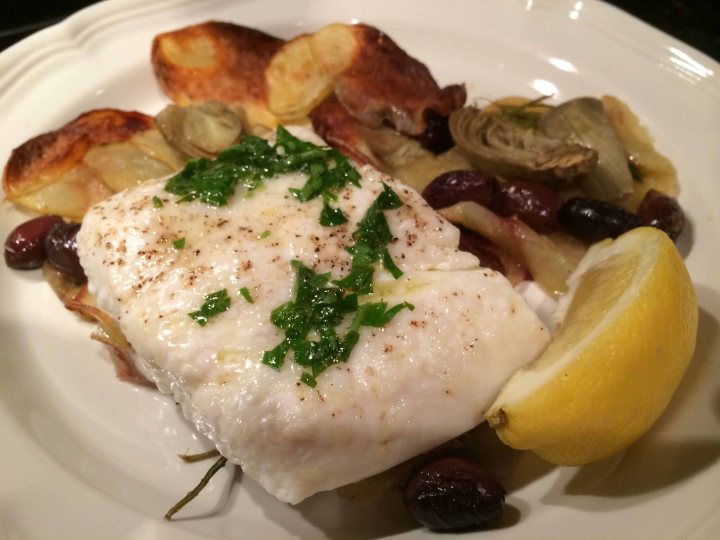
halibutplatedsmall

It seems that cooking magazines are always arriving in the mail and it’s hard to keep up with them. Once in a while, I go on a binge read, tearing out the recipes I want to make and filing them for future use. When I choose to prepare one of these recipes, I feel my subscriptions are justified—especially when, as last night, it turns out so good.

This recipe comes from the December 2013 issue of Food Network Magazine. It calls for cod, but when I went to the fish market, the halibut looked much better. It worked perfectly; the flavor is similar to cod, but the texture is richer.

The bed of crisp and creamy potatoes, earthy roasted artichoke hearts, and salty Kalamata olives provided the perfect background for the mildly sweet flavors of the halibut.

Recipe adapted from Food Network Magazine December 2013
Ingredients

1 pound Yukon gold potatoes, thinly sliced (I used a mandolin for uniform 1/8 inch thick potatoes)
1 9 -ounce box frozen artichoke hearts, thawed
1/2 cup pitted kalamata olives
1 tablespoon fresh rosemary leaves
1/4 cup extra-virgin olive oil
Kosher salt and freshly ground pepper
4 6 -ounce cod fillets (I substituted halibut.)
Juice of 1/2 lemon
1 tablespoon chopped fresh parsley
Lemon wedges for serving

Directions
Preheat the oven to 450 degrees F. Combine the potato slices, artichokes, olives, rosemary, 2 tablespoons olive oil, 1 teaspoon salt and a few grinds of pepper in a large bowl. Spread the mixture evenly on a parchment-lined baking sheet; bake until the vegetables are tender and lightly browned, about 20 minutes.

Vegetables before roasting

Brush the fish with 1 tablespoon olive oil and season with 1 teaspoon salt and a few grinds of pepper. Remove the baking sheet from the oven and set the fish on top of the vegetables. Return to the oven and continue baking until the fish is opaque and the vegetables are golden brown, about 10 minutes.

Fish before roasting

Mix the lemon juice, the remaining 1 tablespoon olive oil, and the parsley and drizzle over the fish. Serve with lemon wedges.

Read more at: Food Network

Meat Pie “Pizza” Style

piecookedsmall

Somehow the day got away from me yesterday and I needed to get dinner on the table in a hurry, or at least in under an hour. Once again I turned to Giuliano Hazan’s Every Night Italian for his recipe for an exquisite Meat Pie “Pizza” Style. This is the second time, I’ve prepared this dish. I’ve made some modifications to the original recipe, adding a little nutmeg, increasing the amount of mozzarella, and adding a few minutes to the original cooking time.

This “pizza” consists of beef, pancetta, pecorino Romano, bread, eggs, seasoning and is topped with mozzarella, basil, and oregano. It’s essentially a meatloaf topped like a pizza Margherita. A wonderful supper in 35 minutes about from start to finish. In case you didn’t know, Giuliano is the son of Victor and Marcella Hazan.

Meat Pie, “Pizza” Style Adapted from Every Night Italian by Giuliano Hazan
INGREDIENTS
2 slices white bread, trimmed of crusts
2 tablespoons whole milk
1 pound ground beef 85% lean
1/2 cup pecorino Romano cheese, freshly grated
2 tablespoons plain fine bread crumbs
2 eggs
2 ounces pancetta, thinly sliced and chopped
1/8 tsp freshly ground nutmeg
Salt
Freshly ground black pepper
Butter (for greasing the baking dish)
2 tablespoons fresh basil leaves, shredded
3/4 cup canned whole peeled tomatoes drained of juice, coarsely chopped
4 to 5 ounces fresh mozzarella cheese
1/2 teaspoon dried whole oregano leaves crushed between thumbs
Olive oil for drizzling

DIRECTIONS
1. Preheat the oven to 425°.

2. Put the trimmed bread and the milk in a small bowl and mash it with your hands until you get a smooth pasty mixture. Transfer it to a large mixing bowl and add the beef, the grated pecorino, the bread crumbs, the eggs, the chopped pancetta, and ground nutmeg.

3. Season lightly with salt and pepper, then mix everything together thoroughly with your hands.

4. Grease the bottom and sides of a round pie dish approximately 10 inches in diameter. Put in the ground beef mixture and push it down with your hands until it is evenly spread out. Cover with the tomatoes. Cut the mozzarella into strips and arrange them over the tomatoes. Sprinkle the shredded basil and dried oregano on top, drizzle lightly with olive oil, and bake in the preheated oven for 20 to 25 minutes.

piepresmall
Before baking

Let the “pizza” settle for about 5 minutes after you take it out of the oven, then transfer it with two spatulas to a serving plate. Serve it hot or lukewarm.

Plated
Plated

Wine Pairing: Chianti, Zinfandel


Roast Chicken

chickplatedsmall

Roast chicken has to be one of my favorite poultry dishes. However, for a weeknight dinner roasting a whole bird may be a little too time consuming. That’s one of the reasons why I use Dave Lieberman’s recipe “Dad’s Roast Chicken My Way.” Lieberman somehow disappeared from the Food Network, but his easygoing approach to cooking was a welcome alternative to some of the network’s more flamboyant stars.

Over the years, I’ve tweaked this recipe adding a little ground cumin to the seasoning, upping the amount of herbs, and sprinkling the skin with some paprika for added color. But my major change is substituting skin-on, bone-in thighs for the chicken pieces. In my opinion, thighs are the tastiest parts of the chicken.

I like to serve this dish with roasted broccoli.

Also, take the time to make the olive oil drizzle. Just a little adds a lot of flavor to the chicken, especially if you don’t enjoy eating the skin.

Dad’s Roast Chicken My Way Adapted from The Food Network

Ingredients
For the chicken:
1 (3 1/2-pound) chicken cut in 8 serving pieces (I use thighs.)
Kosher salt and freshly ground black pepper
Ground cumin
5 sprigs fresh rosemary
5 sprigs fresh thyme
Olive oil, for drizzling
Zest of 1 lemon
Paprika

For the parsley drizzle:
1/2 bunch parsley
1/2 cup extra-virgin olive oil
1/2 lemon, juiced
Kosher salt and freshly ground black pepper

Directions
Preheat the oven to 400 degree F.

Trim off any excess skin or fat from the chicken. Cut off and discard the wing tips. Place the chicken pieces in an 11 by 13-inch baking pan lined with foil, or any pan that that they fit in without crowding.

Season the chicken pieces generously with salt, pepper, cumin olive oil, the herbs, and the lemon zest. Toss through all the seasonings and then arrange the chicken piece skin side up in the pan. Allow to marinate for 30 minutes at room temperature. (You can season the chicken pieces and set them up in the roaster up to a day before you cook them. Cover the pan with plastic wrap and refrigerate.)

Chicken marinating
Chicken marinating

Roast until the skin is nicely browned and there is no pink near the thigh bone and the juices run clear, about 35 to 40 minutes. Check both white meat and dark meat. If the white meat is done before the dark meat, take it out and set it on the serving plate until the dark meat is done.

For the parsley drizzle, wash and dry the parsley. Remove the leaves from the stems and chop the leaves finely. Combine the remaining ingredients in a bowl and use immediately to garnish the roast chicken.

Wine Pairing: Chablis, un-oaked Chardonnay, Pinot Noir


Pizza Margherita Redux

pmsundaysmall

Last night saw another pizza Margherita from my kitchen. On a quest to improve what’s already a good pizza, I keep trying different flours, kneading times, cook times, and the like. Yesterday’s attempt involved a change of ovens.

For quite some time now, I’ve been relying on my Breville Smart Oven for baking pizza. It does a very good job, especially with the help of a pizza stone. But the more I read on the subject, I’m finding that cooking temperature plays a key role. Every pizza enthusiast dreams of having a wood-burning oven that can reach an ideal temperature between 700°F to 750°F; but for most of us having one will more than likely only remain a dream.

Before baking
Before baking

So last night, following my favorite pizza recipe from Lynne Rossetto Kasper’s The Italian Country Table, I used the lowest shelf of my oven with a pizza stone and baked the pizza at 500°F. The higher temp made a difference not only in the cooking time, but in the texture of the dough. The cooking time was reduced by 5 minutes and the dough definitely had more chew.

What I’m looking for now is more height to the pizza, those “bubbles” in the crust that you get from cooking in a wood-burning oven. If any of you have any suggestions, please let me know.

Here’s a link to the Pizza Recipe.

Wine Pairing: Montepulciano d’Abruzzo

Barbecued Baby Back Ribs

ribsplatedsmall

For us, Friday often means “Margarita Madness.” Consequently, frozen margaritas dictate the menu, which often means something other than Italian and, more than likely, something along the lines of grilled meat, Tex-Mex or, as we enjoyed last night, barbecue.

I wanted pork ribs with meat falling off the bones, which meant either slow-cooking or pressure-cooking. Given my schedule, I opted for the latter. One of my go-to books for pressure cooking is Pressure Cooker Perfectionfrom America’s Test Kitchen, which is where I found a great recipe for Barbecued Baby Back Ribs.

When I went to the butcher, he was actually butchering a pig. He said he could only provide me with a small rack of baby backs so I opted for standard pork spare ribs to have enough for our party.

ribsrawsmall
Local sourced pork ribs

One gripe I have with the book I used is their highlighting the pressure cooking time in the recipe, which was 30 minutes. It leads one to believe that it’s a 30-minute recipe, when in fact it’s more like a 60 minute one. Lesson learned, at least for now: READ THE ENTIRE RECIPE BEFORE STARTING TO COOK!

When I cook, I like to have all the prep completed. I’ve therefore modified the book recipe to follow my style of cooking.

This recipe yielded some of the most mouth-watering ribs I’ve ever had, with a sauce that was the perfect balance of sweet, spicy, and savory. Neither the generous dry nor and the ketchup-molasses sauce overpowered the succulence of these local sourced ribs.

Unbuttered corn on the cob was the side.

Barbecued Baby Back Ribs Adapted from Pressure Cooker Perfection

Ingredients
3 tablespoons paprika
2 tablespoons packed brown sugar
2 teaspoons chili powder
Salt and pepper
1/4 teaspoon cayenne pepper
2 (1 1/2-to 2-pound) racks baby back ribs, cut into 2-rib sections
1 tablespoon vegetable oil
1 onion, chopped fine
2 garlic cloves, minced
1 cup ketchup
1/2 cup water
1/4 cup molasses
2 tablespoons cider vinegar
2 tablespoons Dijon mustard

1. Prepare Dry Rub: Combine paprika, sugar, chili powder, 1 teaspoon salt, 2 teaspoons pepper, and cayenne, then rub mixture evenly over ribs.

2. Prepare Sauce: Combine ketchup, water, molasses, vinegar, and mustard. Measure out and reserve 1 cup sauce.

3. Heat oil in pressure-cooker pot over medium heat until shimmering. Add onion and cook until softened, about 5 minutes. Stir in garlic and cook until fragrant, about 30 seconds. Add the sauce, except for the reserved cup, and stir.

4. Arrange ribs upright in pot with meaty sides facing outward, then pour reserved sauce over ribs.

5. Lock pressure-cooker lid in place and bring to high pressure over medium-high heat. As soon as pot reaches high pressure, reduce heat to medium-low and cook for 30 minutes, adjusting heat as needed to maintain high pressure.

6. Remove pot from heat and allow pressure to release naturally for 15 minutes. Quick release any remaining pressure, then carefully remove lid, allowing steam to escape away from you.

ribscookedsmall
Ribs right after cooking

7. Adjust over rack 6 inches from broiler element and heat broiler. Place wire rack inside aluminum foil-lined rimmed backing sheet and spray with vegetable oil spray. Transfer ribs, meaty side up, to prepared baking sheet. Using large spoon, skim excess fat from surface of sauce. Bring sauce to simmer and cook until thickened and measures 2 cups, about 10 minutes. Brush ribs with some of the sauce, then broil until browned and sticky, 10 to 15 minutes, flipping and brushing with additional sauce every few minutes. Serve ribs with remaining sauce.

ribsglazedsmall
Ribs sauced before going under the broiler

Farfalle with Sun-Dried Tomatoes and Arugula

farfalletom1small

I needed a pasta course last night that would be perfect for dining al fresco. Wanted something light yet flavorful. My search led me to Molto Bataliby Mario Batali, where I found the recipe below for Farfalle with Sun-Dried Tomatoes and Arugula.

Farfalle with Sun-Dried Tomatoes and Arugula Adapted from Molto Mario.

1/4 cup extra virgin olive oil
6 garlic cloves, thinly sliced
10 oil-packed sun-dried tomato halves, thinly sliced
1/4 cup dry white wine
2 tablespoons salt
1 1/2 pounds farfalle pasta
4 cups (about 5 ounces) baby arugula, trimmed

Bring 8 quarts of water to boil in a large pasta pot.

While the water is heating, heat the olive oil in a 14-inch sauté pan over medium heat. Add the garlic and cook until light golden brown. (I added my thinly sliced garlic to the cold oil. I watched it carefully, stirring occasionally so that the garlic would cook slowly and not get overly browned. If your garlic should burn, start over.)

Add the sliced sun-dried tomatoes and the wine to the oil and garlic, and bring to a boil to create your sauce. Remove from the heat.

Add the salt to the boiling water. Drop the farfalle into the boiling water and cook for 1 minute less that the package instructions indicate. Just before the pasta is done, carefully ladle 1/4 cup of the pasta water into the sauté pan containing the sauce.

Drain the pasta in a colander and add it to the pan containing the sauce. Add the arugula and toss well. Over medium heat, toss again for about 30 seconds, until the pasta is nicely coated, and then pour into a warmed serving bowl.

Serve immediately.

This recipe serves up to 10 as a first course or 6 as a main. If you are only making only a pound of pasta, I would not reduce the ingredients for the sauce.

farfallecheesesmall

We ended our meal with the some fresh cherries and Pecorino Romano Genuino. The term “genuino” can only be used for Romano produced in Lazio, the province of Rome. I find it a bit milder and more flavorful than other types of pecorino Romano.

Our dinner wine was a delicious chilled Chiaretto Valtenesi from producer Pasini San Giovanni, a blend of Groppello, Marzemino, Barbera and Sangiovese.

Wine Pairing:  Dry Rosé.

Grilled Steak

steak6192small

I’m a steak lover: sirloin, flank, t-bone, skirt, NY-strip, almost any cut will make me happy. In my wanton middle age, I used to indulge in steak several times a week. Now, in my sixties, it’s maybe once a week. Alas, I’ve grown heath conscious.

I cook my steaks simply. Rarely do I use marinades or rubs, and when I do, it’s only for a flank or skirt steak. I also prefer to use locally raised beef and, when possible, go for grass fed. Granted, in NYC “locally” may be farther away than in other locations.

Limited to a small outdoor electric grill on the terrace, I prefer to use a two-burner grill pan. I take the steaks out of the fridge about an hour before cooking and let them come to room temperature.

While heating the grill pan, I dry the steaks with paper towels and season them liberally on one side with coarse salt and freshly ground black pepper, followed by a drizzle of olive oil.

When it’s hot, I lightly oil the grill and place the steaks, seasoned side down, near the center of the pan so that they are not directly over the burners. I press down firmly on the steaks to ensure that they are in full contact with the grill and get some grill marks. Note that this is the only time I press on the meat. At this point, I season the other side as I did the first with coarse salt and black pepper.

steak6193small

I cook the steaks for about 1 minute on high to sear them and then reduce the flame to medium. I do not move the steaks at all during cooking. Let the grill do its work.

After 6 or 7 minutes for a 1.25” strip, aiming for medium rare, I turn the steaks and return the heat to high for one minute. I then reduce the heat to medium and continue to cook for about another 6 or 7 minutes, using the last minute to brown the fat on the side of the steaks. Of course, grilling times will vary depending on the thickness of the steaks and the desired level of doneness.

steak6191small

I remove the steaks from the grill, place them on heated plates, tent with foil and let them rest for about 3 minutes.

That’s it. I eschew making or using any sauce for steak since I find that it masks the true flavor of good local raised beef. I do, however, drizzle the steaks with a high quality extra virgin olive oil, for a touch of unctuousness.

For sides as well, I keep them as simple as possible. Baked potato with olive oil and lemon; maybe some steamed spinach. A lightly dressed arugula salad finishes the meal.

Wine Pairing: Cabernet Sauvignon, Syrah, Valpolicella Ripasso