I love it when friends and family pass along recipes that they’ve read about and think of me. Sometimes, however, they may over estimate my culinary capabilities and propose dishes that are far beyond my skills and sometimes even my budget.
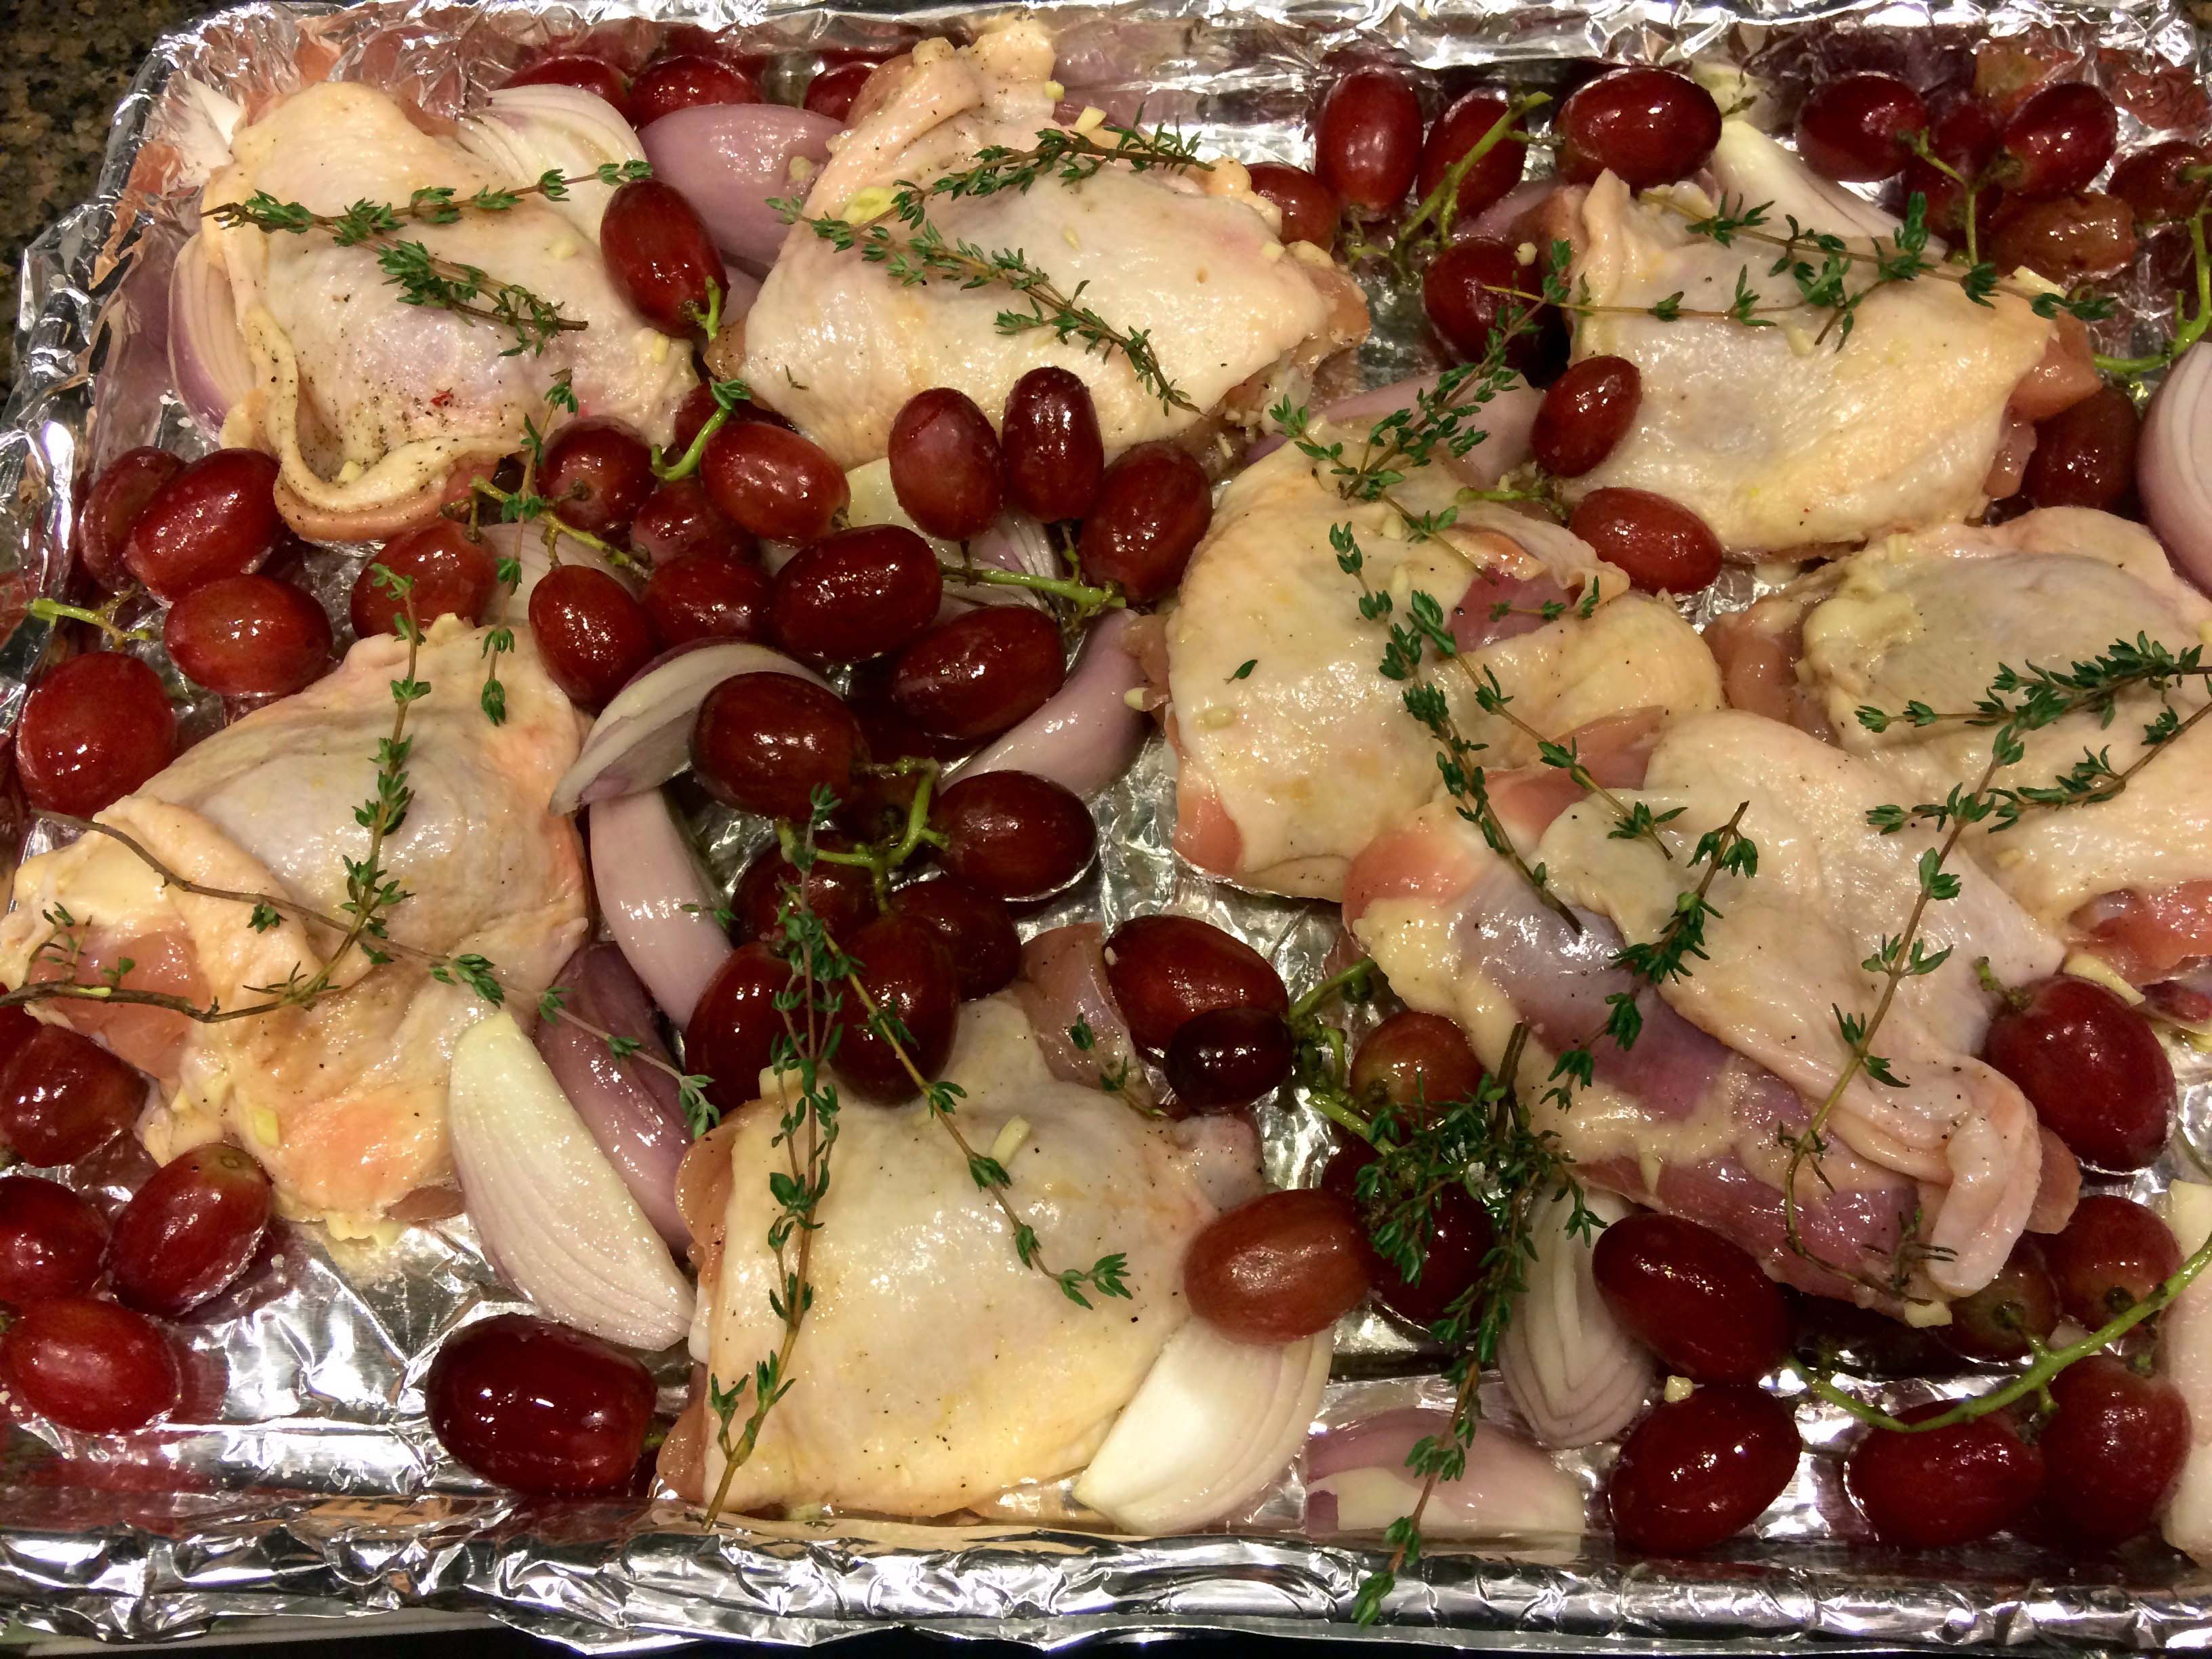
But recently a close friend from back home sent me a link to a New York Timesrecipe for sheet-pan chicken thighs with shallots and grapes. When I first saw the recipe’s photo, I thought I had already made it, but soon realized that I had only made a similar sheet-pan supper but with sausages.
This is an easy recipe and perfect for a mid-week dinner. The flavors of the shallots and grapes blend beautifully and provide the perfect complement to the crispy chicken.
Unfortunately, I was unable to find the za’atar, a Middle Eastern spice mix, which I think would have added more complexity to the dish. I also found the recipe’s cooking time a tad too short to render the chicken as brown and crispy as I like it. I cooked mine for about 40 to 45 minutes, followed by two to three additional minutes under the broiler.
Finally, don’t forget the recommended flaked salt for serving. It adds a lot to the final dish.
Ingredients
Ingredients
2 ½ to 3 pounds bone-in, skin-on chicken thighs, patted dry
3 tablespoons olive oil
2 garlic cloves, finely chopped
1 tablespoon za’atar (optional)
Kosher salt and black pepper
6 medium to large shallots, peeled and quartered root to stem
8 ounces seedless red or green grapes, or a combination of both, broken into small clusters on the vine
4 to 5 sprigs thyme, plus 2 teaspoons finely chopped thyme
Flaky salt, for serving
Preparation
Heat the oven to 425 degrees. In a large bowl, toss together the chicken with 1 tablespoon olive oil, garlic and za’atar, if using. Season well with salt and pepper.
Place the shallots and the grapes on the sheet pan and gently toss with the remaining olive oil and season well with salt.
Oiled grapes and shallots
Nestle the chicken skin side up in between the shallots and grapes and lay the thyme sprigs on top of the mixture.
Nestled chicken thighs
Roast for 25 to 30 minutes until the chicken is cooked through and the shallots and grapes begin to soften and caramelize around the edges of the pan.
Turn the oven to broil and move the oven rack to sit right below it. Remove and discard the thyme sprigs and broil the chicken for 1 to 2 minutes until the skin of the chicken is crispy and golden. Scatter with chopped thyme and season with flaky salt.
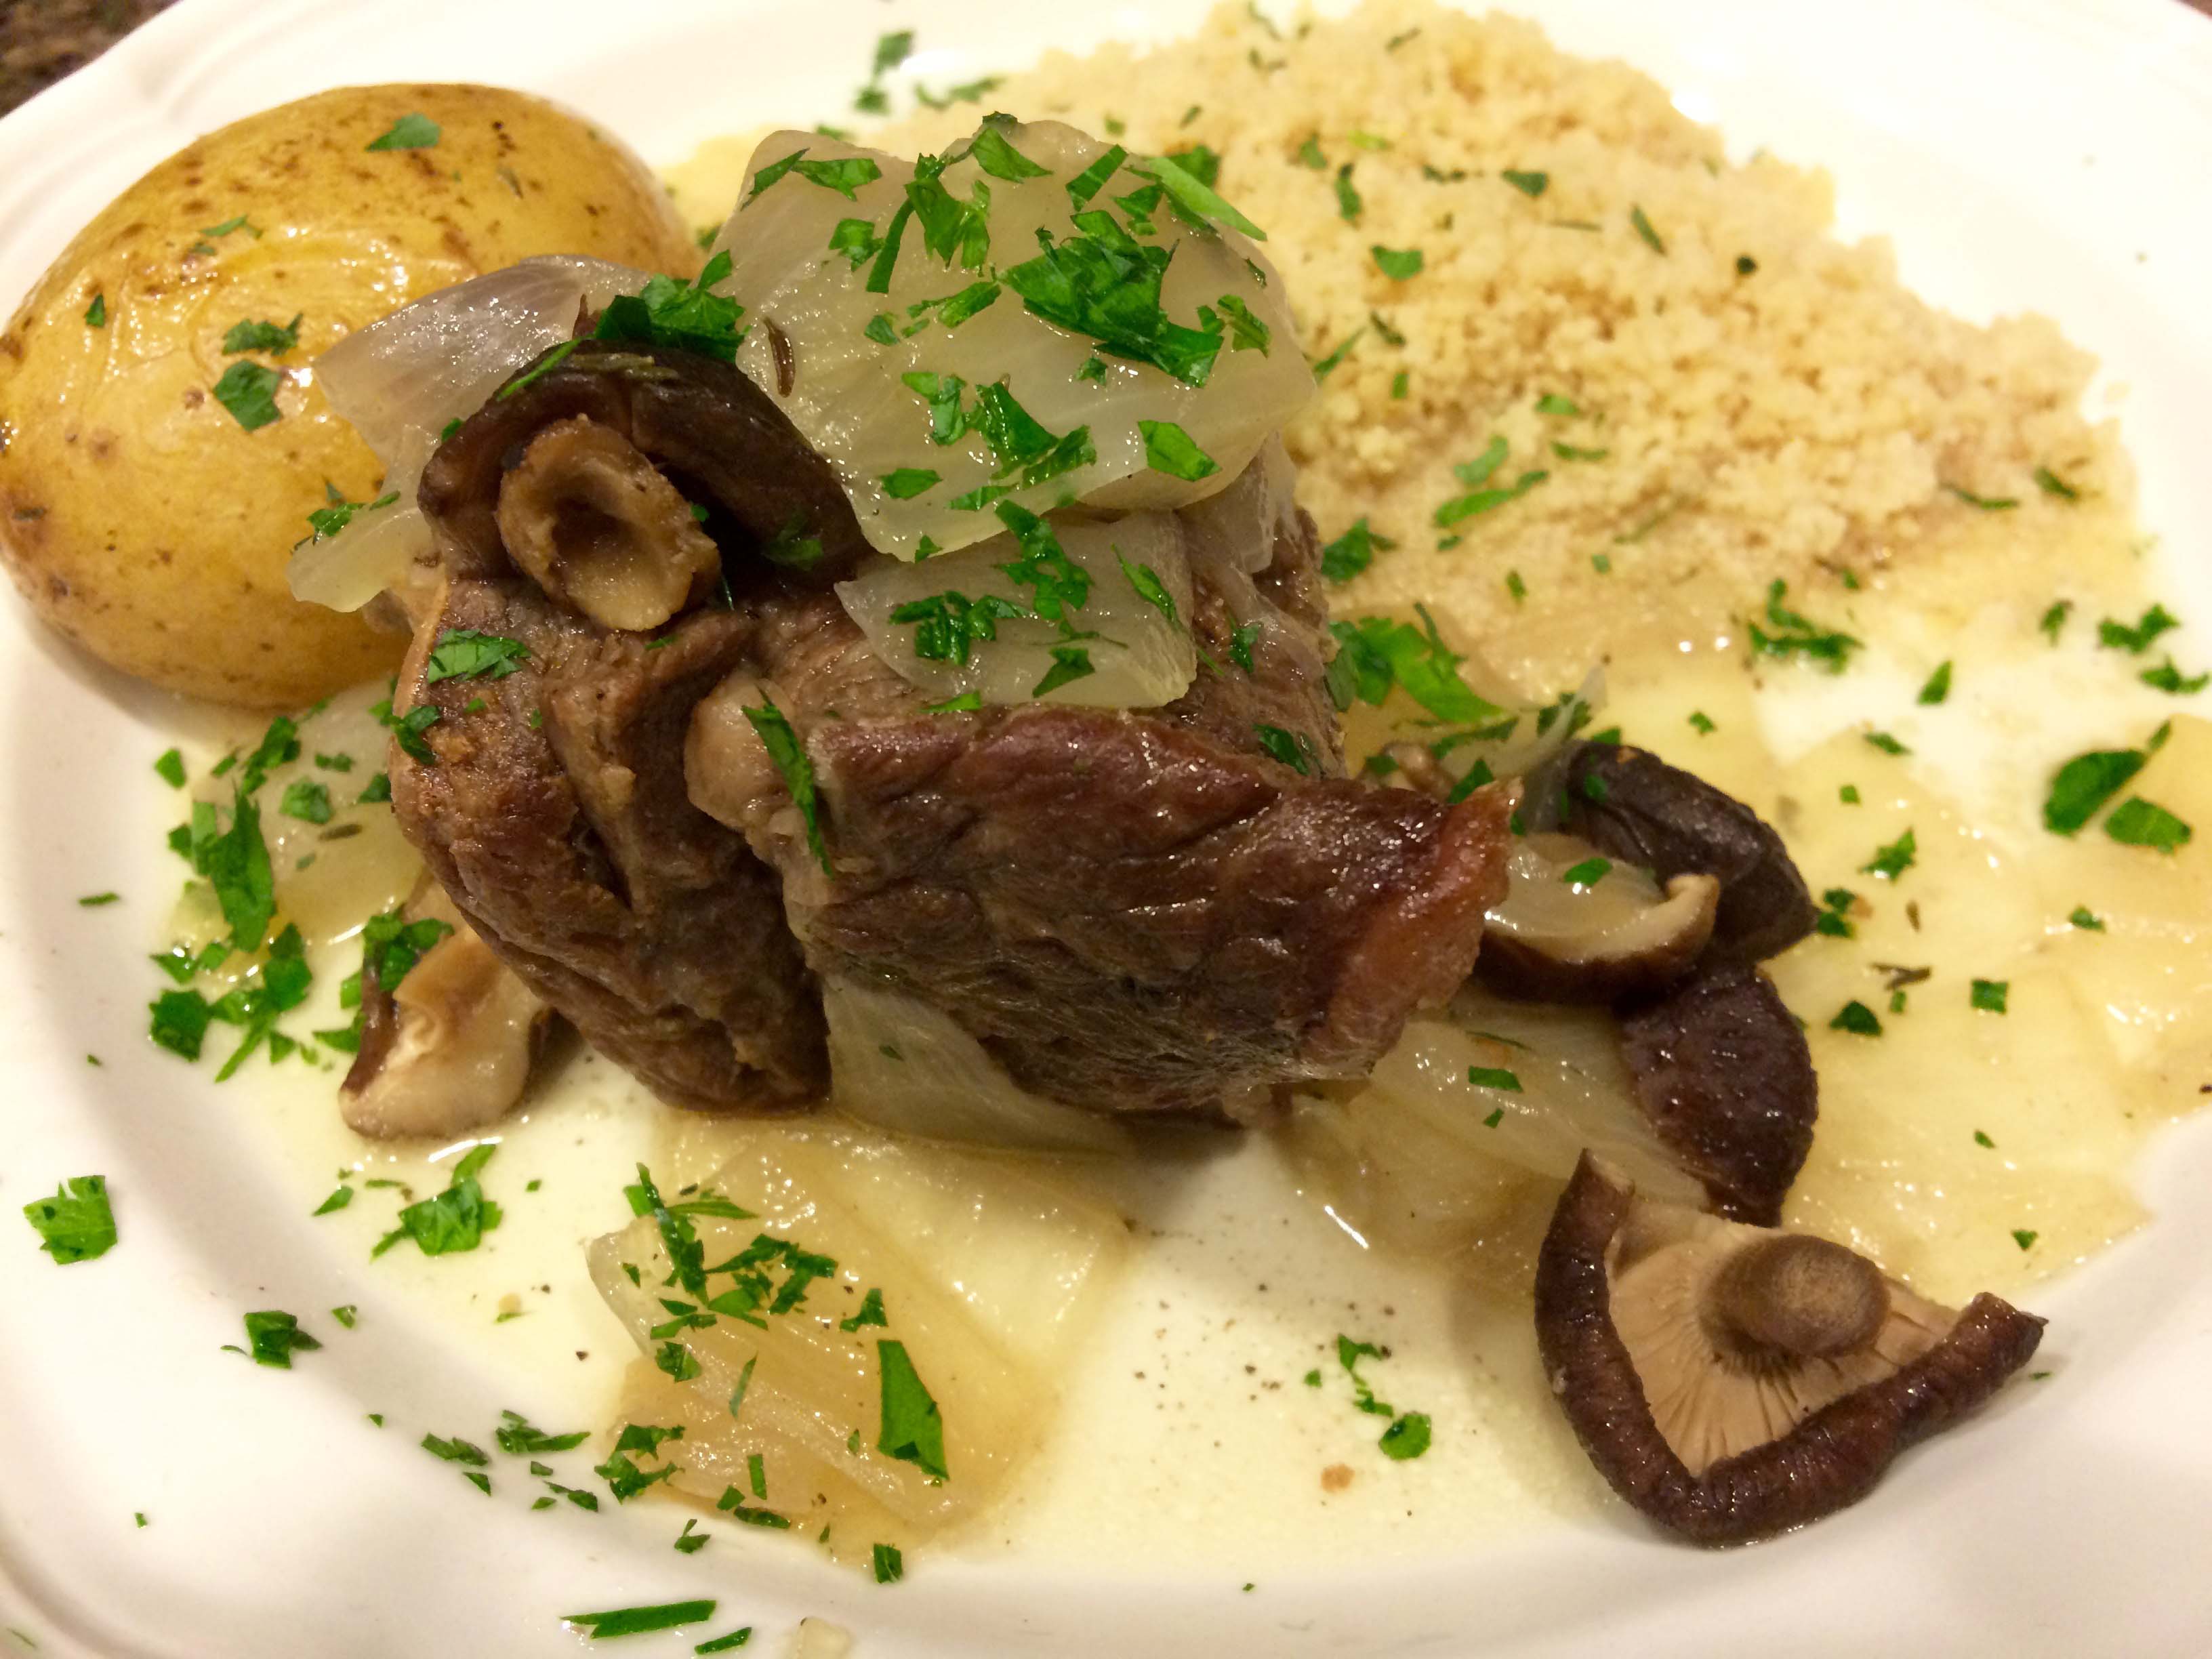
Inspired by a recent post on Diane Darrow’s blog, Another Year in Recipes, last night I prepared its featured recipe, Braised Lamb Shanks with Rosemary. Because I had by accident left my rosemary at the market, I substituted fresh chopped thyme, supplemented by some herbes-de-Provence infused sea salt. Nevertheless, the dish turned out splendidly. The lamb was the proverbial fall-off-the bone tender and was smothered in silky, buttery onions. The deeply flavored braising juices were deliciously soaked up by some whole-wheat couscous.
Owing to time constraints, we didn’t take any photos until after the lamb was cooked. However, the photos we took come close to conveying exactly how good this braise was.
Just out of the oven
At the end of her post, Darrow wondered why lamb has become so unpopular in the US. Indeed, since the early 60s, when per-person lamb consumption was about 4.5 pounds per year, today it hovers around 1 pound. In the comments section, readers suggested several reasons ranging from lamb’s gamey flavors to its high price and even to its limited availability.
Like Darrow, I too am puzzled about lamb’s decline in popularity here. Growing up in the 50s and 60s, at home I was served more lamb than beef. A roast leg of lamb was often the main course of a Sunday supper; broiled lamb chops with lemon wedges were a frequent weeknight meal; and one of my favorites was my aunt’s lamb breast stuffed with eggs, cheese, and herbs.
Maybe with the arrival of the more affordable New Zealand lamb in our supermarkets we may see an increase in consumption. In any event, I’ll be posting plenty of lamb dishes here.
Keeping with my seasonal-cooking bent, I chose on Sunday to make a stew of beef short ribs, mushrooms, and potatoes from Jacques Pepin’s Fast Food My Way. I selected this particular recipe for two reasons: 1) it’s fall, the perfect time for short ribs; 2) the shortened cooking time made possible by the pressure cooker.
Fortunately, I was able to find some beautiful, thick, and relatively lean bone-in short ribs at my local market. The recipe called for 2 pounds of meat (4 ribs) “as lean and meaty as possible.” Mine weighed about 2.4 pounds. The other ingredients were similarly easy to find, even the dried shiitake mushrooms, which were surprisingly small. I was off to a good start.
The prep was also straightforward: trimming the meat, chopping the onion and the parsley, breaking the mushrooms in half and removing the stems, washing the potatoes, etc. Next was browning the meat, a simple task in an electric pressure cooker. All that was left was to add the remaining ingredients to the pot, lock the lid, set the cooker to high-pressure for 30 minutes.
Of course, as with any pressure-cooker recipe, there’s the wait time for the cooker to reach full pressure. So altogether the cooking time was 45 or 50 minutes, during which time the aroma from the stew whetted our appetites. Because I was craving carbs, I also prepared some whole-wheat couscous as a side even though the stew had plenty of potatoes.
The timer went off; I released the pressure, carefully lifted the lid, and wow everything looked perfect.
The mushrooms, which as directed by the recipe had not been soaked, were wonderfully chewy and packed with flavor; the potatoes were smooth and silky and had absorbed the cooking juices; the ribs. . .Well, that’s another story.
After taking his first bite of the meat, my husband shot me a glance that immediately let me know something wasn’t right. So I took a bite and yep; something was definitely wrong. The flavor was exceptional, beefy and woodsy from the mushrooms; but the texture was tough, far from tender.
The First Time Around
I’m not sure what went wrong; maybe the ribs were too thick; perhaps I should have extended the cooking time by another 15 minutes. Not being an expert with the pressure cooker, I’m not certain. Most of the cookbooks I checked afterwards seemed to agree with Pepin’s 30 minutes.
Thankfully, we had two ribs with loads of sauce, mushrooms, and potatoes left over. I was determined to get a better meal the next time around. So yesterday, Monday, I decided to reheat the stew in a small enameled cast-iron Dutch oven, covered and placed on a very low flame for an hour. To provide some moisture, I added a good splash of the same white wine I had used the night before.
I’m happy to report that this time the meat was perfectly tender and, as is often the case with left-over stew, even more richly flavored. I’ll definitely make this recipe again, but more than likely, I’ll forego the pressure cooker in favor of my dependable cast-iron Dutch oven—even if it takes 4 times as long to cook.
Ingredients
Ingredients
2 pounds beef short ribs (4 ribs) as lean and meaty as possible (I used about 2.4 pounds.)
1 tablespoon canola oil
8 dried shiitake mushrooms, stems removed, and caps broken in half
12 small Yukon Gold potatoes (about 1 pound total) peeled or unpeeled
8 dried shiitake mushrooms, stems removed and caps broken in half (Do not soak; becuase mine were so small, I used 12.)
1 1/2 cups chopped (1 inch) onions
3 garlic cloves, peeled
2 bay leaves
2 sprigs fresh thyme
1 1/2 teaspoons salt
1/2 teaspoon freshly ground black pepper
1 cup dry white wine
1/2 cup water
1 tablespoon chopped fresh parsley
Directions
1-Remove any surface fat and sinews from the short ribs. Place them in a pressure cooker with oil and brown over high heat for about 8 minutes, turning occasionally, until well browned on all sides. Remove from the heat and pour off any fat.
Browned Ribs
2-Add the mushrooms, then the remaining ingredients, except the parsley, and cover tightly with the pressure-cooker lid. Cook over high heat until the gauge indicates that the stew is cooking on high pressure. Reduce the heat to maintain the pressure and cook for 30 minutes.
Everything in the pot
3-Decompress the pressure cooker according to the manufacturer’s instructions. Open the pressure cooker and taste for seasonings, adding additional salt and pepper if needed. Divide the stew among four warmed soup plates, sprinkle with parsley, and serve immediately.
As with any pressure-cooker recipe, be sure to follow the instructions of your cooker’s manufacturer.
Sometimes recipes just don’t work out the way you hoped. Take, for example, my recent version of a chicken fricassee with lemon juice: Pan-roasted-chicken-with-lemon-juice.
Although it was quite tasty, its appearance left a lot to be desired.
Pan-Roasted Chicken with Lemon Juice
Other times, they work out even better than you had expected. As a case in point, take this version of almost the same dish by the same author, Marcella Hazan, that I prepared over four years ago: Chicken-fricassee-with-lemon-and-rosemary.
Not only was it better in appearance, but the flavor was richer and more concentrated.
From this recent experience, I’ve realized that you have to trust your instincts when a recipe just doesn’t seem right and tweak it the way you think it needs to be changed–even if it’s from a highly respected author. Remember, it’s your kitchen.
Having now lived in San Diego for just over a year, I’ve come to accept as a given that we really don’t have the typical four seasons here. Sure there are some changes as the year goes by, but the variations in weather are never as dramatic as in New York. Recently, when our local weather reporter announced that fall had arrived, she claimed there was a “chill in the air.” “Chill!” I shouted back at the television, “It’s 69 degrees and sunny.”
Despite Mother Nature’s lack of cooperation here, I’m determined to keep seasonality in my kitchen throughout the year by cooking the same seasonal dishes here that I did in New York.
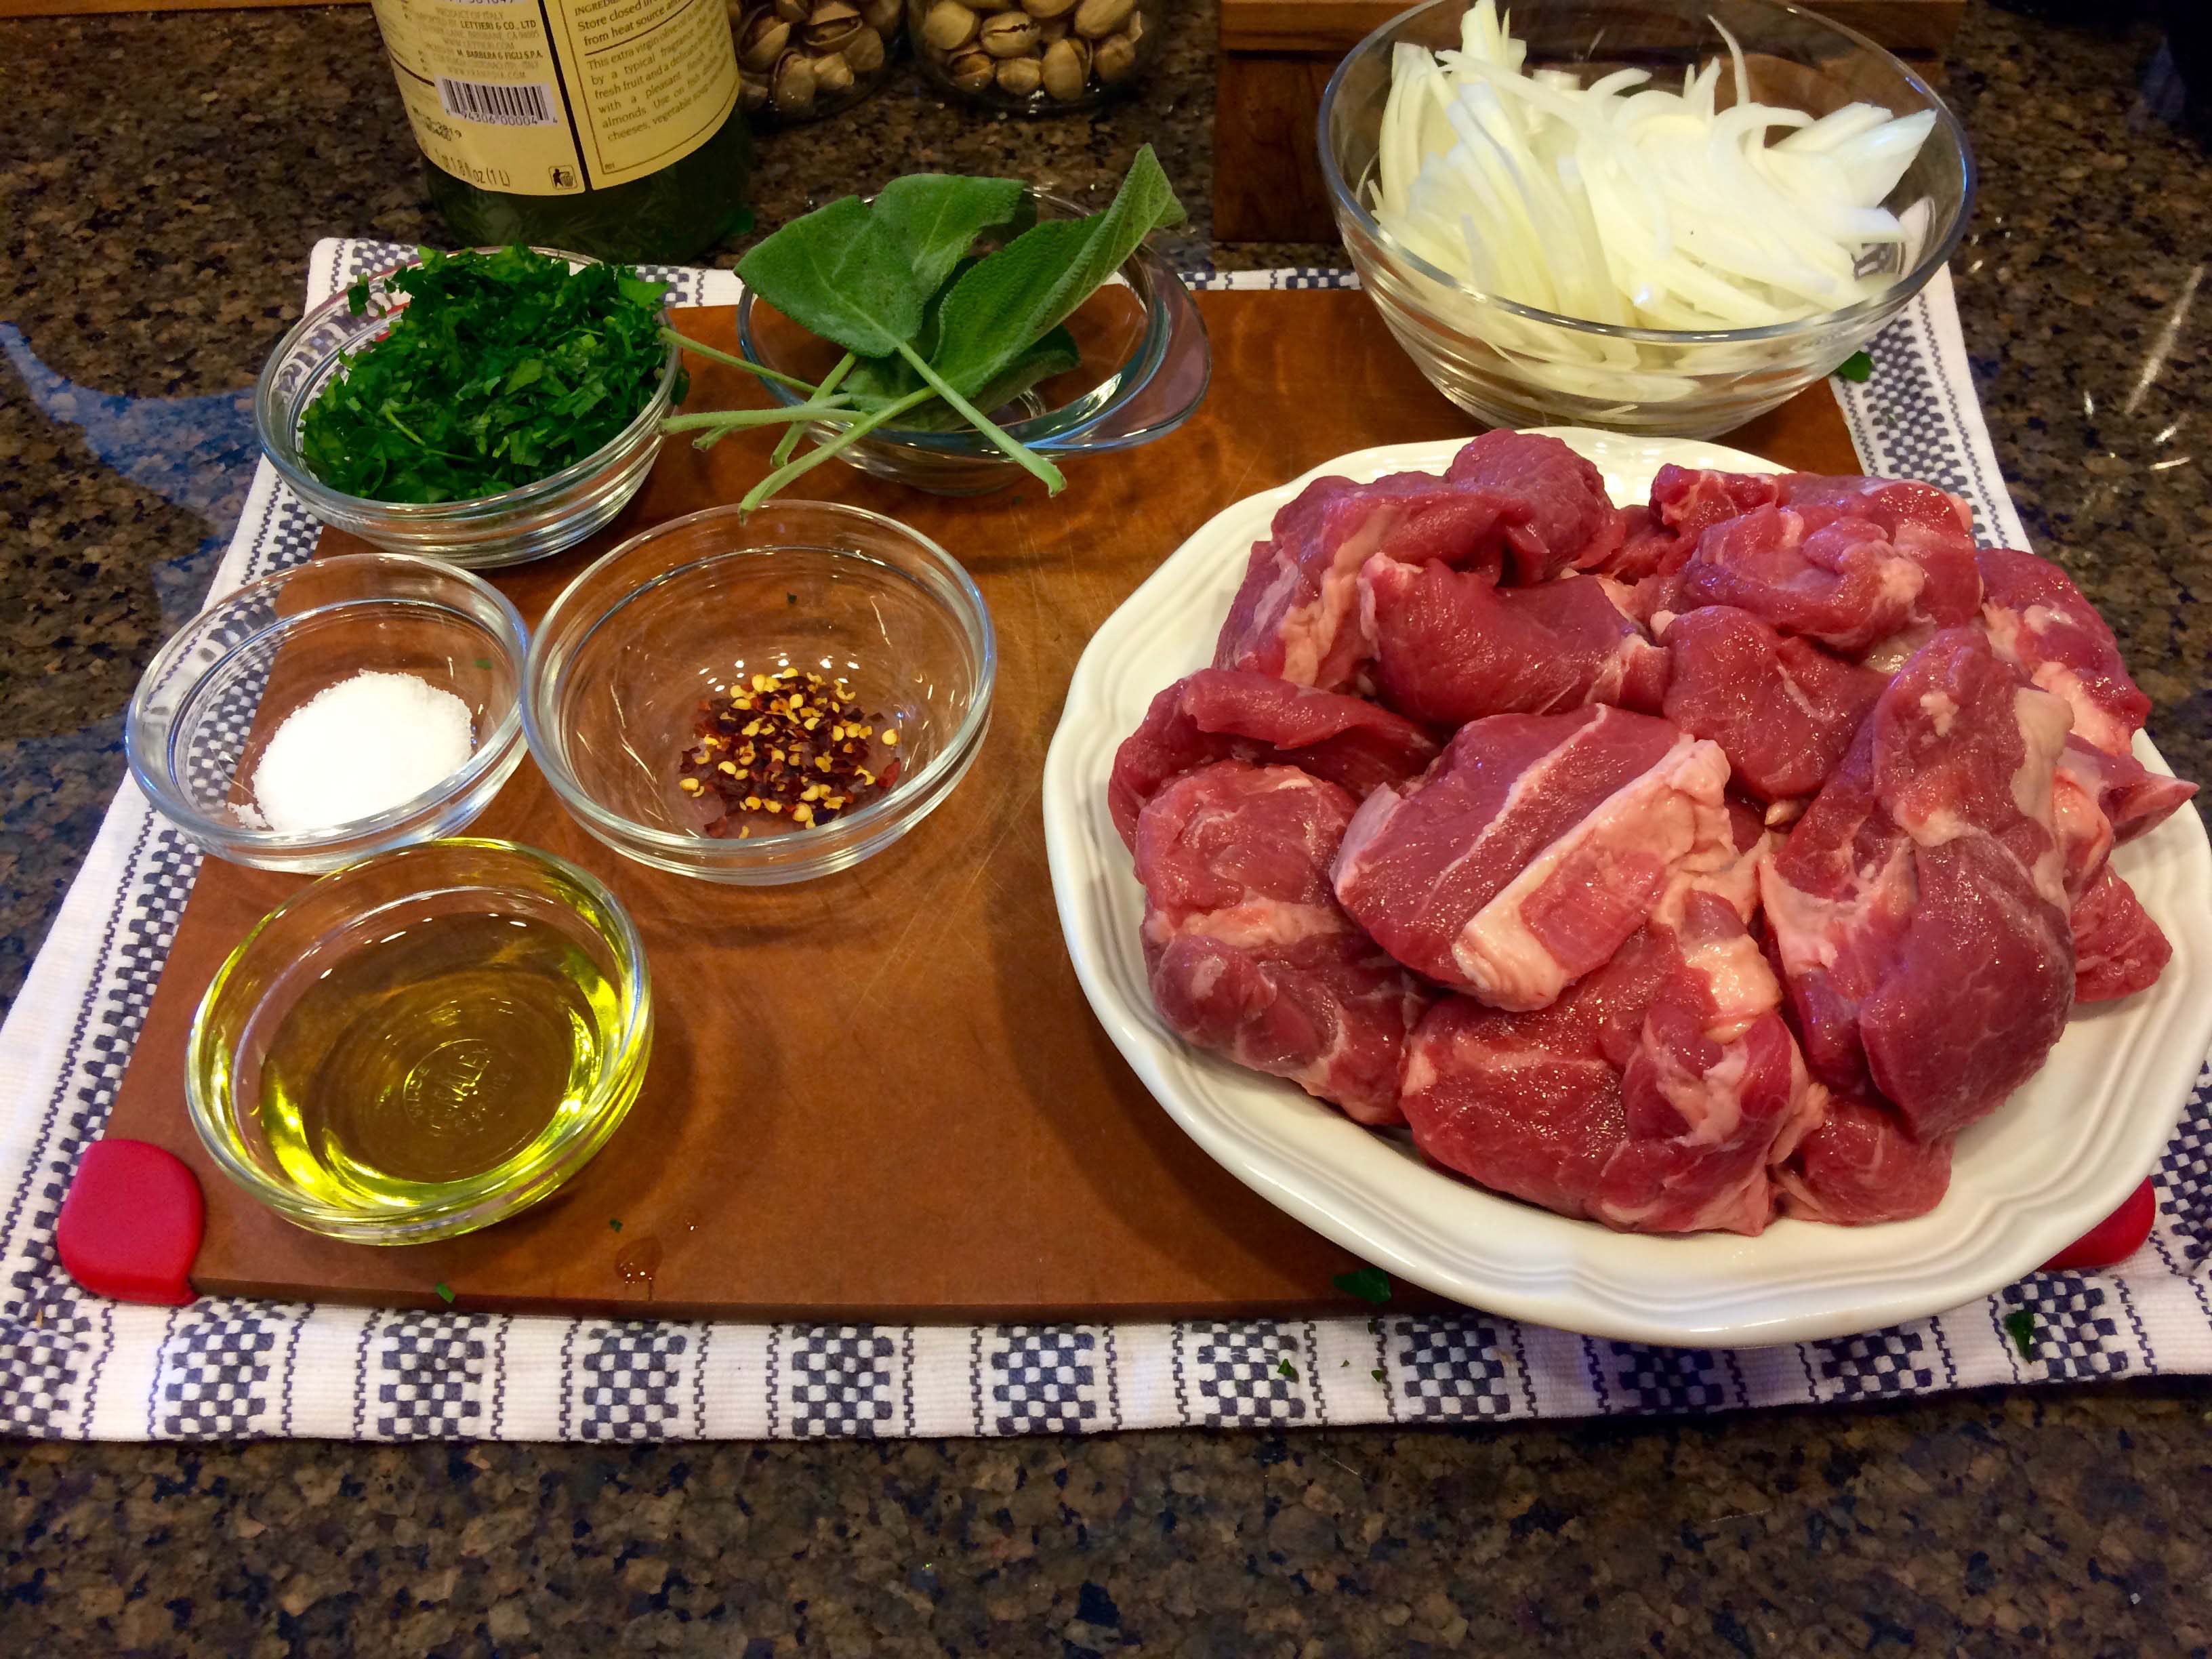
Such was the case last night, when I chose to prepare an Abruzzese lamb stew from a recipe I found in the “Fall” section of Diane Darrow and Tom Maresca’s The Seasons of the Italian Kitchen. (The book is now available in a Kindle version on Amazon.)
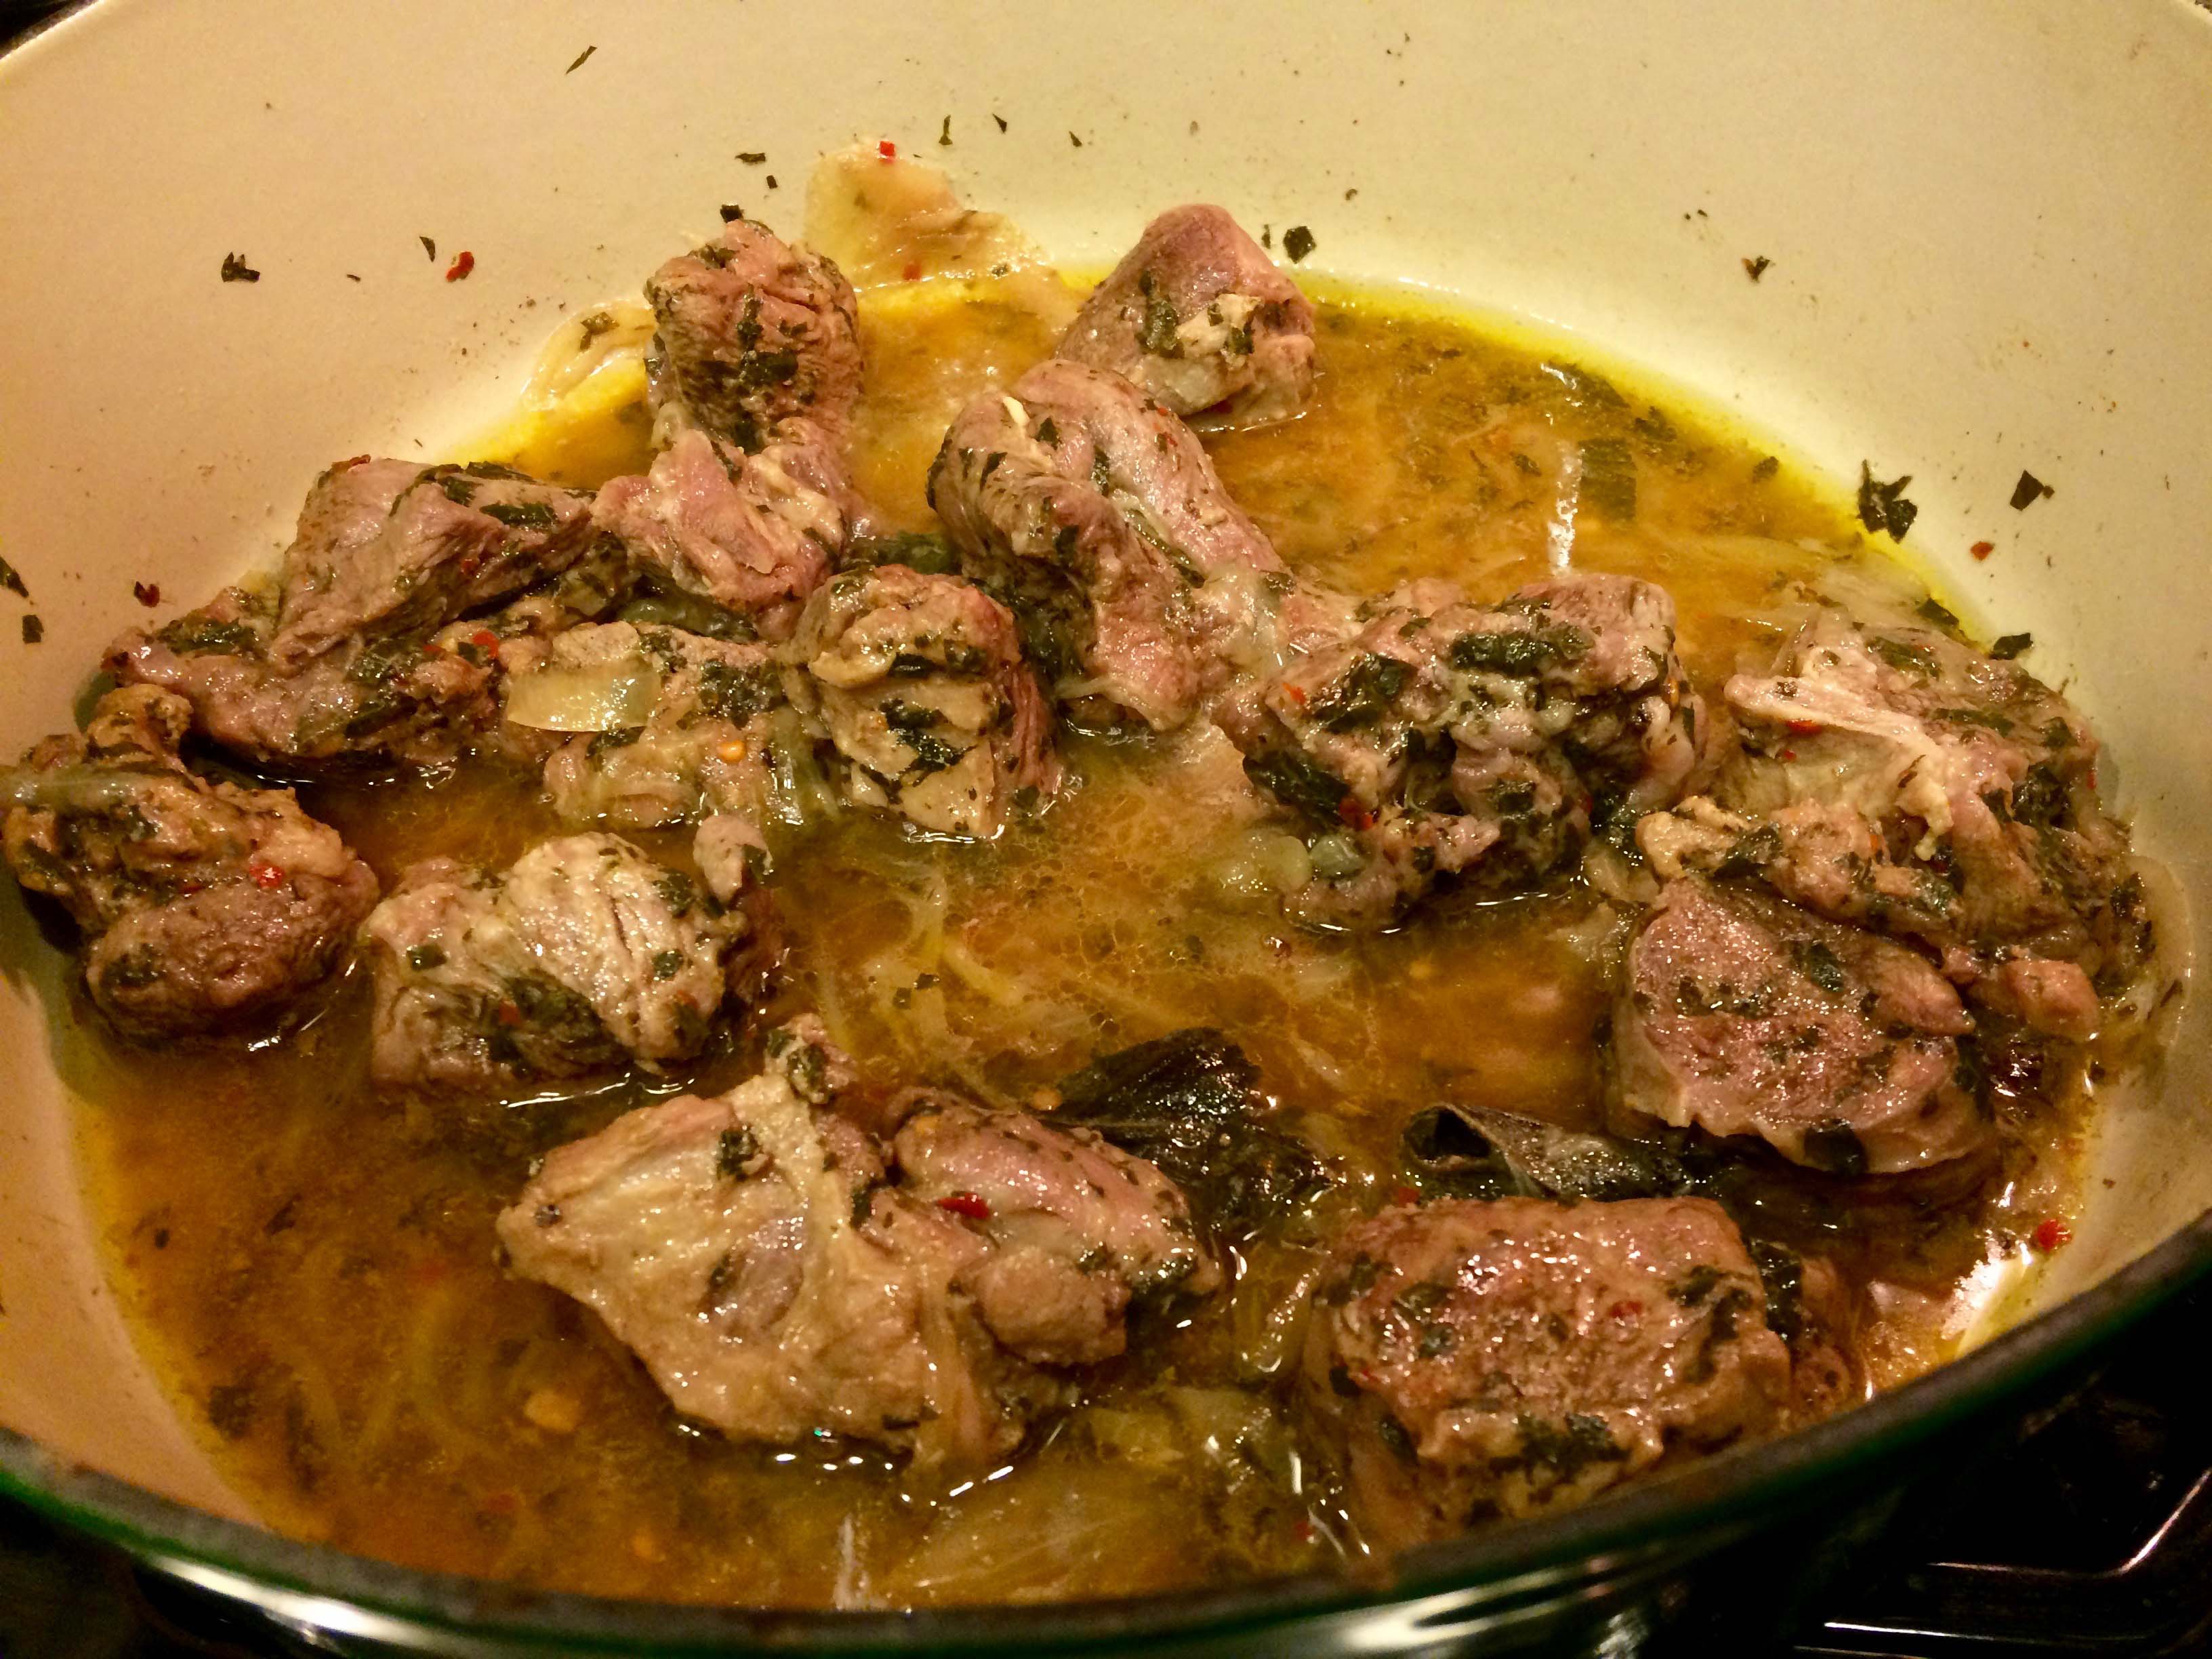
Like many authentic Italian recipes, it uses only a few ingredients and requires minimal preparation. In fact, the only work I had to do was to slice some onion, chop some parsley, and toss it into a heavy-bottomed casserole together with a little olive oil, a few sage leaves, and a couple of pinches of salt and crushed red pepper flakes. Stir everything together, cover, and set over low heat for 2 hours, stirring occasionally. That was it.
I must admit, however, that the recipe caused me some concern. I read it several times. Where. I thought, was the cooking liquid? No wine? No stock? Not even water? No browning of the meat? The authors did say it was “close to effortless,” so I took them at their word. I decided that if things didn’t look right after the first 30 minutes of cooking, I’d add some wine to the pot.
But after the first half hour of cooking, I was happy to find that the lamb had started to exude what looked like an adequate amount of its juices and the thinly sliced onions had softened. To maintain a moist cooking environment, I limited my stirring to every 30 minutes. Each time I uncovered the pot, everything looked right; the meat was browner, the juices a little darker and more concentrated, and the aroma. . . ah . .We couldn’t wait to sit down to dinner.
I followed the recipe pretty closely; however, because I was unable to get bone-in stew meat or a peperoncino rosso, I settled for boneless lamb chunks and substituted crushed red pepper flakes. Moreover, since I was cooking only for two, I reduced the amount of meat from 3 pounds to 2; also given the size of my casserole, I added an extra tablespoon of oil. I also thought that the dish could use a little more salt than the recipe called for, but that’s always a matter of individual taste. Finally, I opted for polenta to capture the dish’s sauce rather than toasted bread.
Ultimately, this had to be one of the best lamb dishes I’ve ever made. With so few ingredients, the flavors of the lamb were robust and were nicely complemented by the sweetness of the onion and the heat of the red pepper. The rich sauce was deeply flavored and went perfectly with a simple polenta.
Abruzzese Lamb Stew (Adapted from The Seasons of the Italian Kitchen by Diane Darrow and Tom Maresca.)
Ingredients
Ingredients
3 tablespoons extra virgin olive oil
2 pounds boneless lamb stew meat (do not dry the meat; the stew needs its moisture.)
1 cup thinly sliced onion
4 large fresh sage leaves
3 tablespoons Italian flat-leaf parsley
1/2 teaspoon crushed red pepper flakes
1 teaspoon salt
Place all the ingredients in a heavy bottomed casserole. Stir to coat the meat and the onions with the oil and evenly distribute the ingredients.
The stirred ingredients
Set over low heat and cook for 2 hours, stirring about every 30 minutes.
After 30 minutesAfter 1 hourAfter 90 minutesAfter 2 hours
When the lamb is tender, remove from the pan with a slotted spoon and place on warmed plates or a platter. Optionally, skim off any excess fat from the sauce and pour it over the lamb. Serve with polenta or toasted country bread.
Wine Pairing: Sangiovese, or if like me you prefer well done lamb with a dry white, opt for an Abruzzese Pecorino or a Sauvignon Blanc.
Sometimes a recipe doesn’t turn out the way you had hoped, and I guess that’s OK—especially if the final dish is, despite its faults, delicious.
Such was the case last night when I prepared a recipe from Marcella Hazan’s second cookbook More Classic Italian Cooking. This is the same volume that introduced us to one of her most famous recipes, Pollo al Limone, Roast Chicken with Lemon, which uses only two ingredients, a young chicken and two lemons, along with salt and freshly ground black pepper, to yields one of the best roast chickens I’ve ever made.
Perhaps because of my success with this dish, I chose the recipe for today’s post: Pollo in Tegame al Limone, Pan Roasted Chicken with Lemon Juice. It’s a little more involved than her roast chicken recipe and uses a few more ingredients. But what immediately caught my eye and led me to make it was that it called for browning the chicken without using any fat. After being washed under cold running water but not dried, the chicken pieces are placed in a skillet without any oil to brown. “The moisture clinging to the washed chicken pieces and their own fat,” says Marcella, “will suffice.” I simply had to see if this would work.
She does warn you to watch the chicken pieces and “turn them before they stick.” Yet even though I followed these directions and hovered over the pan like a mother hen, my chicken only attained just a tinge of brown. And maybe this is what was called for, since even if the chicken had browned normally, the skin would never have been crisp as the dish is cooked covered for 40 to 45 minutes. In fact, the recipe does specifically call for “lightly browning” the chicken.
Moreover, both in appearance and in flavor, this dish reminded me of one of my favorite dishes from the Roman trattoria Da Gino, coniglio al vino bianco, rabbit in white wine. The meat was wonderfully moist, tender, and flavorsome. But alas the skin was disappointingly slimy or rubbery. Perhaps I should have served the chicken without the skin.
Eventually I’ll make this dish again, but with a few tweaks, the first of which will be drying the chicken and browning it with some fat.
Pan-Roasted Chicken with Lemon Juice
Ingredients
2 ½ to 3 pound chicken (I used thighs.)
2 tablespoons vegetable oil
1 tablespoon butter
1 sprig rosemary
3 whole garlic cloves peeled
Salt
Freshly ground black pepper
1/3 cup dry white wine
2 tablespoons freshly squeezed lemon juice
5 or 6 thin julienne strips of lemon peel
Procedure
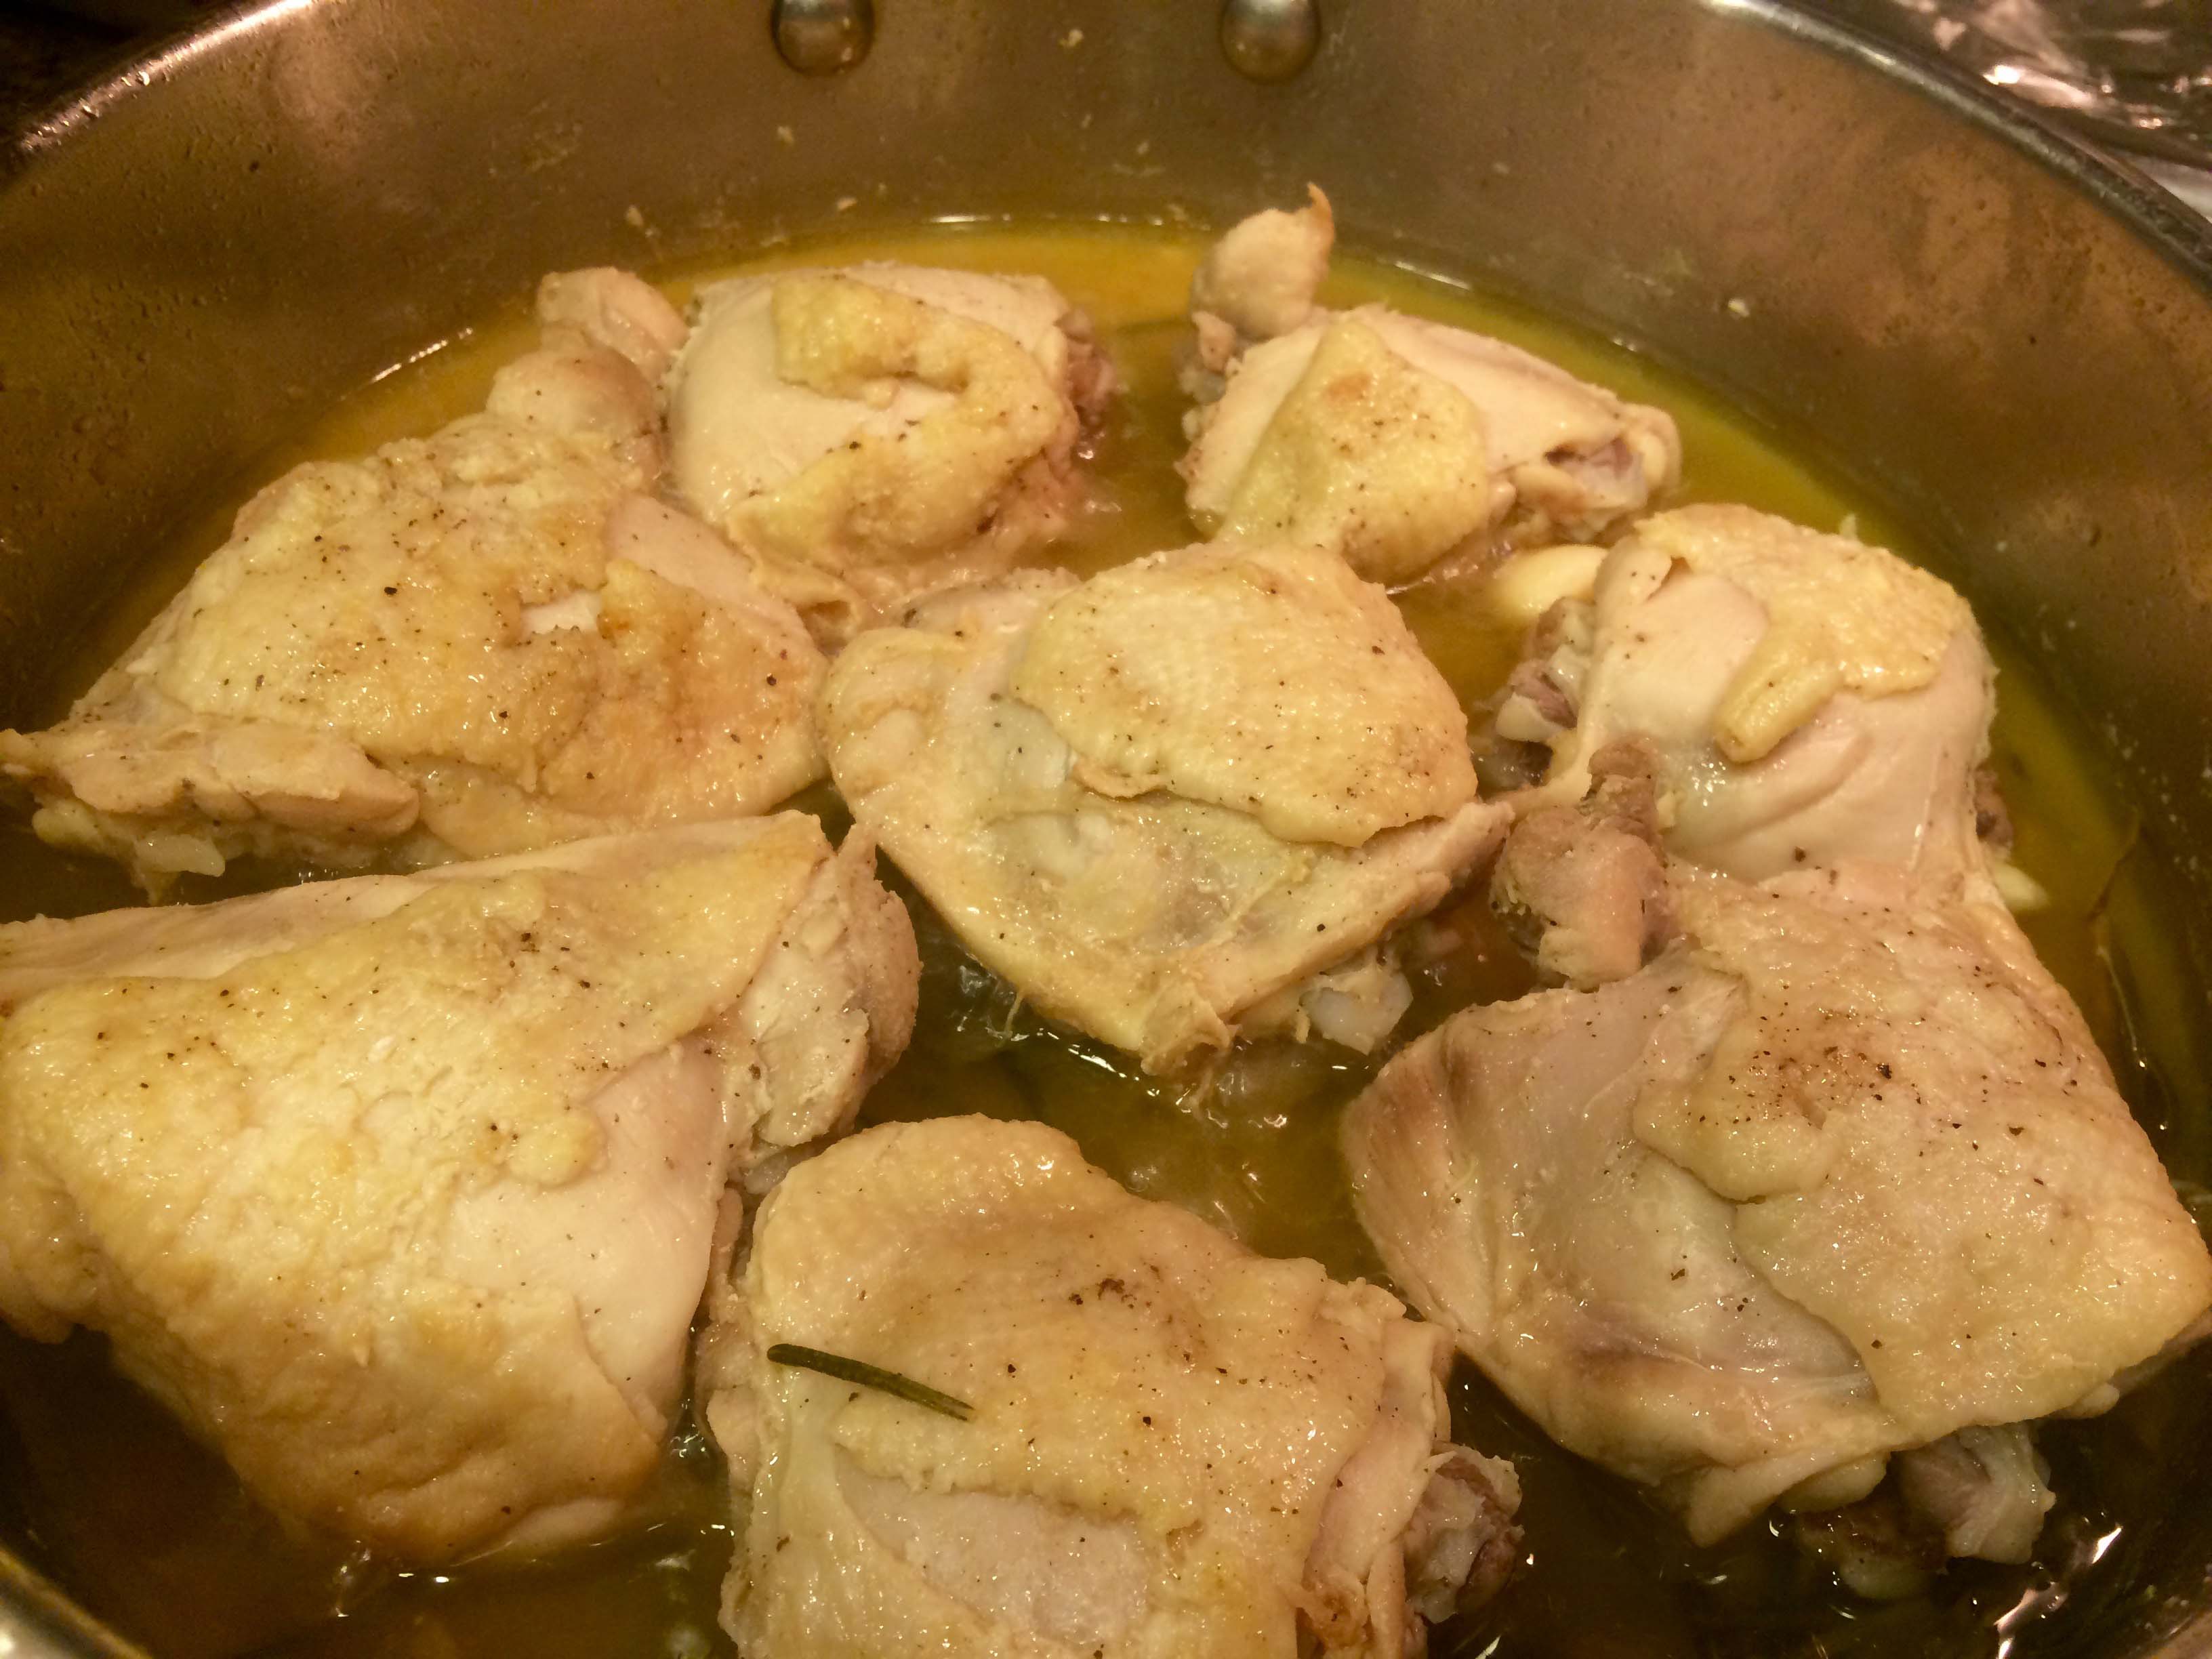
1- Cut up the chicken into 6 or 8 pieces, and wash these under cold running water. Do not dry them.
Washed Chicken
Put the chicken pieces skin side down in a sauté pan in which they will fit without overlapping.
Chicken skin-side down
Turn the heat on to medium high, drying and lightly browning the chicken on all sides. No cooking fat is required at this point. The moisture clinging to the moist chicken pieces and their own fat will suffice. You must watch them, however, and turn them before they stick to the pan.
Chicken lightly browned
2-When this chicken is lightly browned on all sides, add the oil, butter, rosemary, garlic, salt, and pepper. Cook for 2 to 3 minutes, turning the chicken pieces over once or twice.
Adding rosemary, garlic, etc.
3-Add the wine, turn the heat up a bit, and let the wine bubble for half a minute or so. Then turn the heat down to medium low, and cover the pan.
Adding wine
Cook until the chicken is tender, testing one of the thighs with a fork. It should take about 40 to 45 minutes.
4-Turn off the heat, and transfer just the chicken pieces to a warm serving platter.
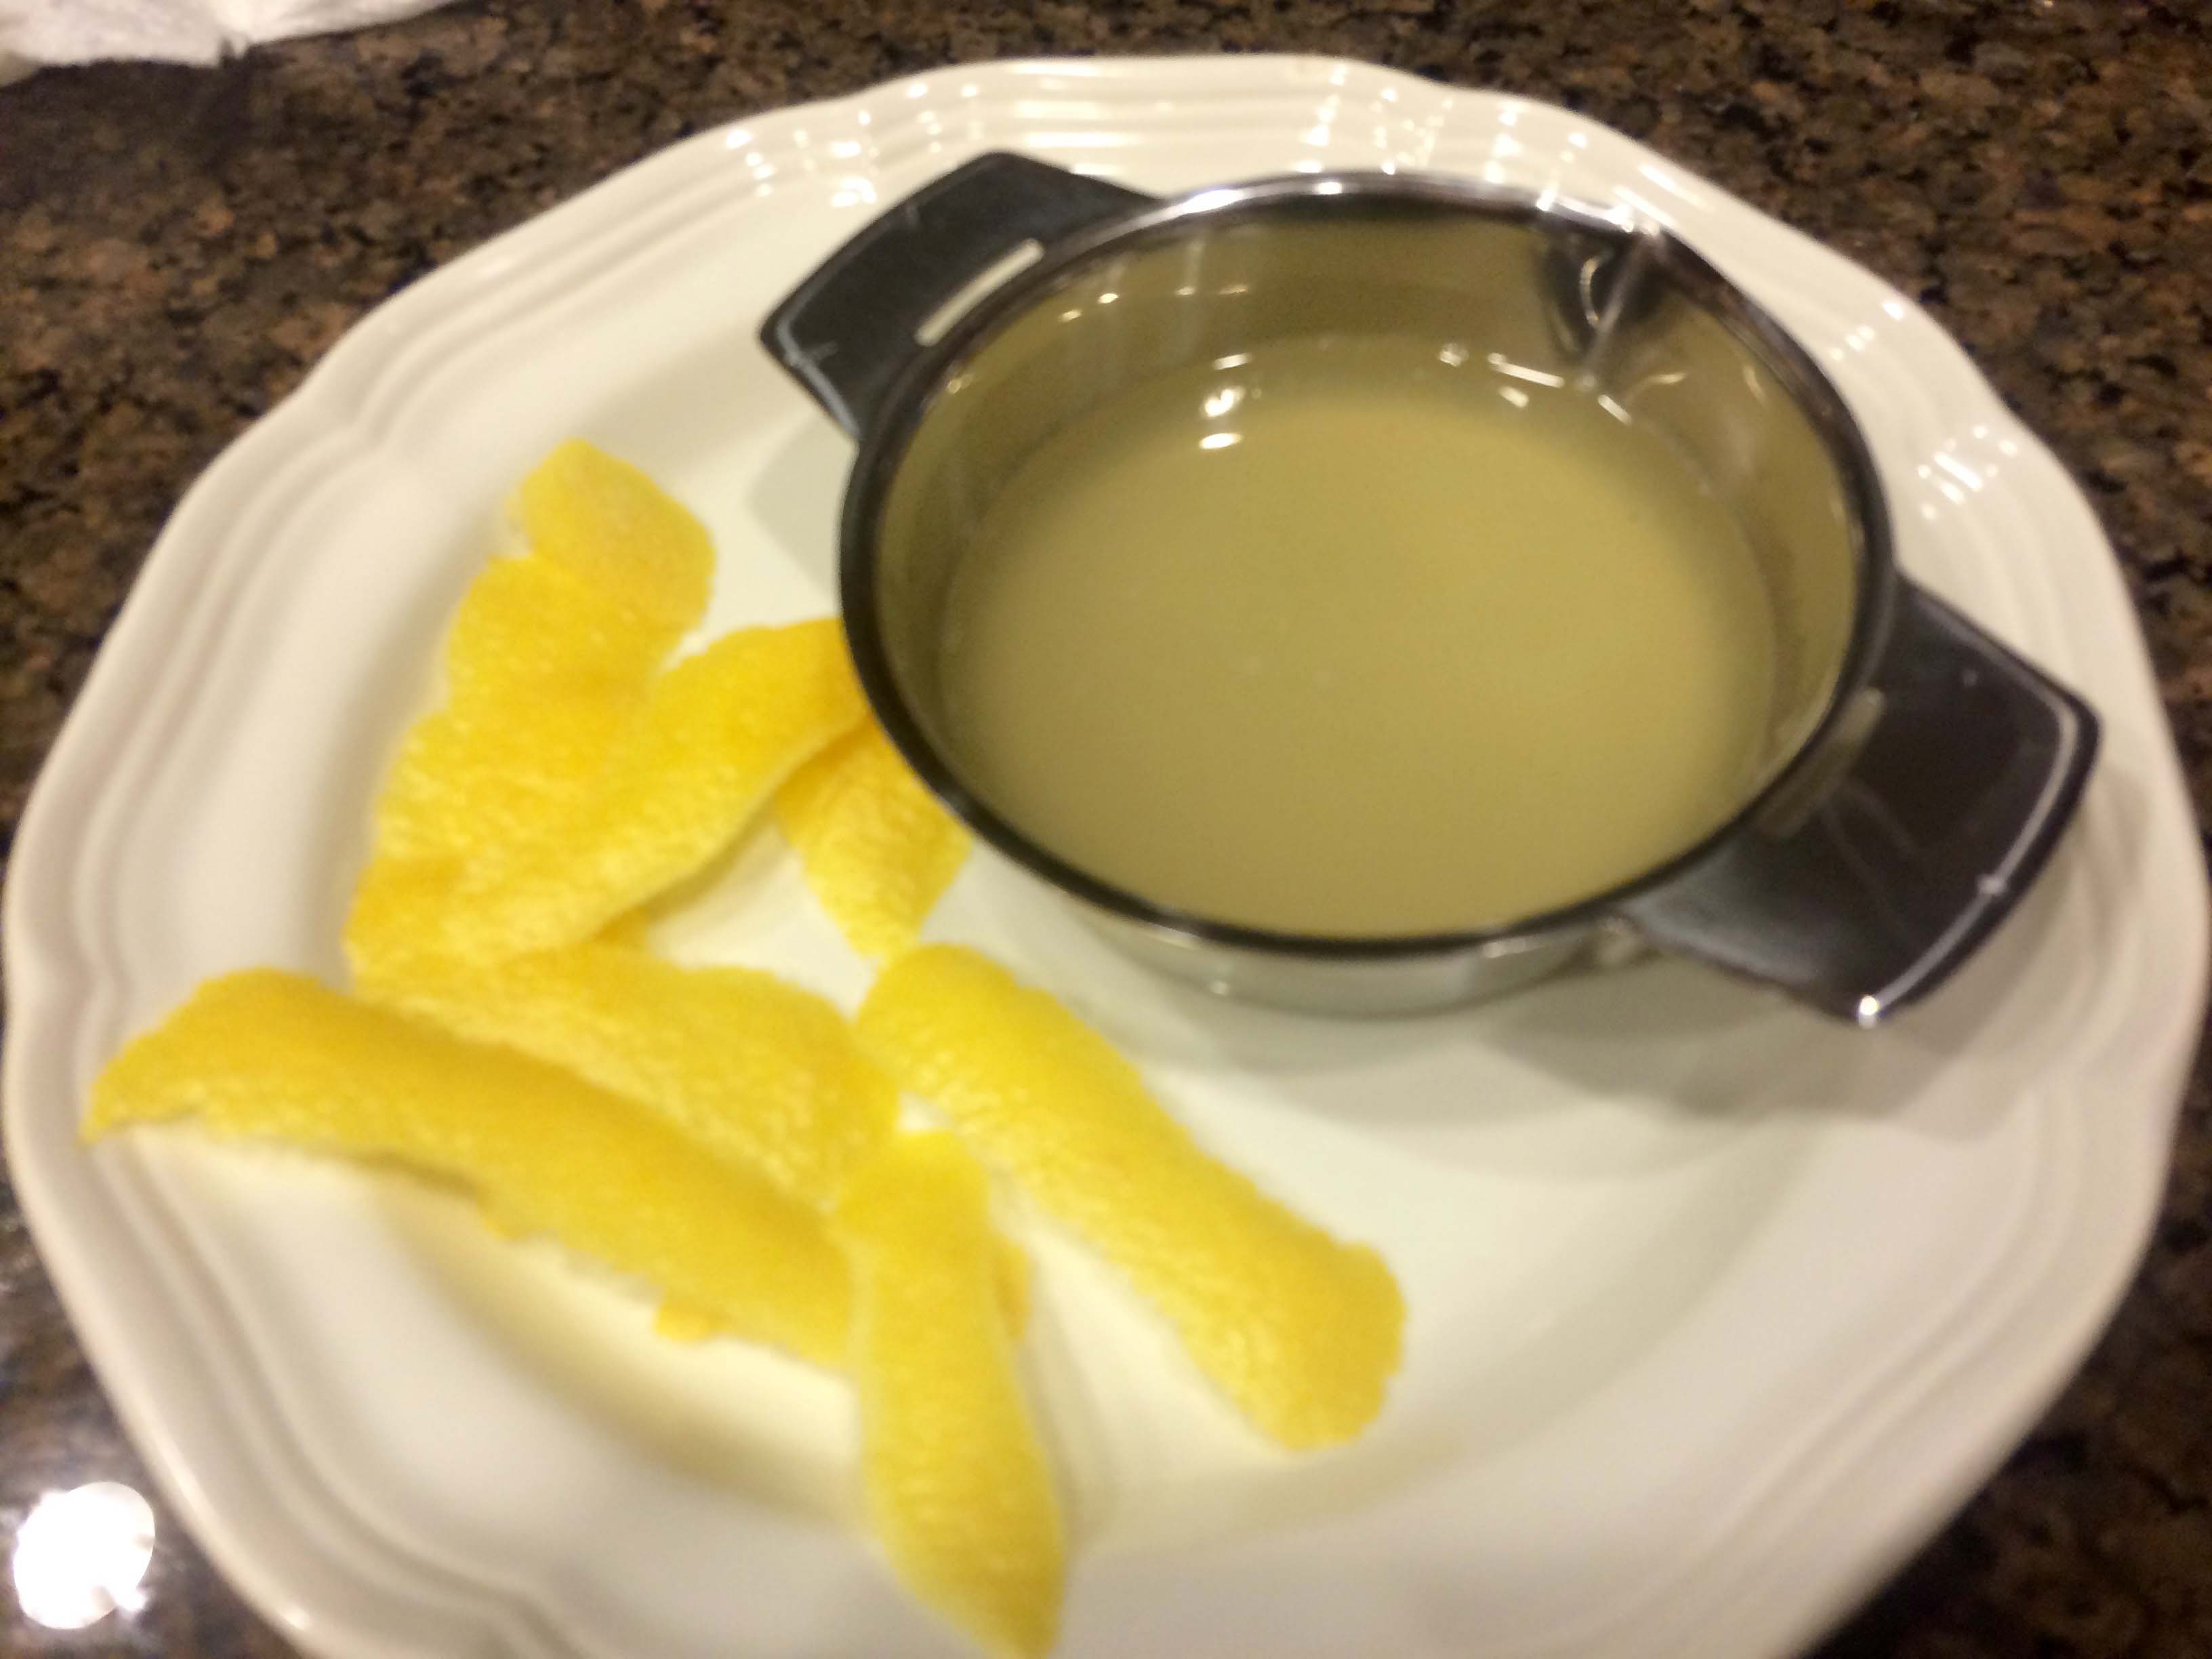
5-Tip the pan, and with a spoon remove all but 2 tablespoons of fat. Add the lemon juice and lemon peel, turn the heat on to medium low, and stir with a wooden spoon, scraping loose any cooking juices that have stuck to the pan.
Lemon juice & peelThe finished sauce
Pour this light sauce over the chicken, and serve at once.
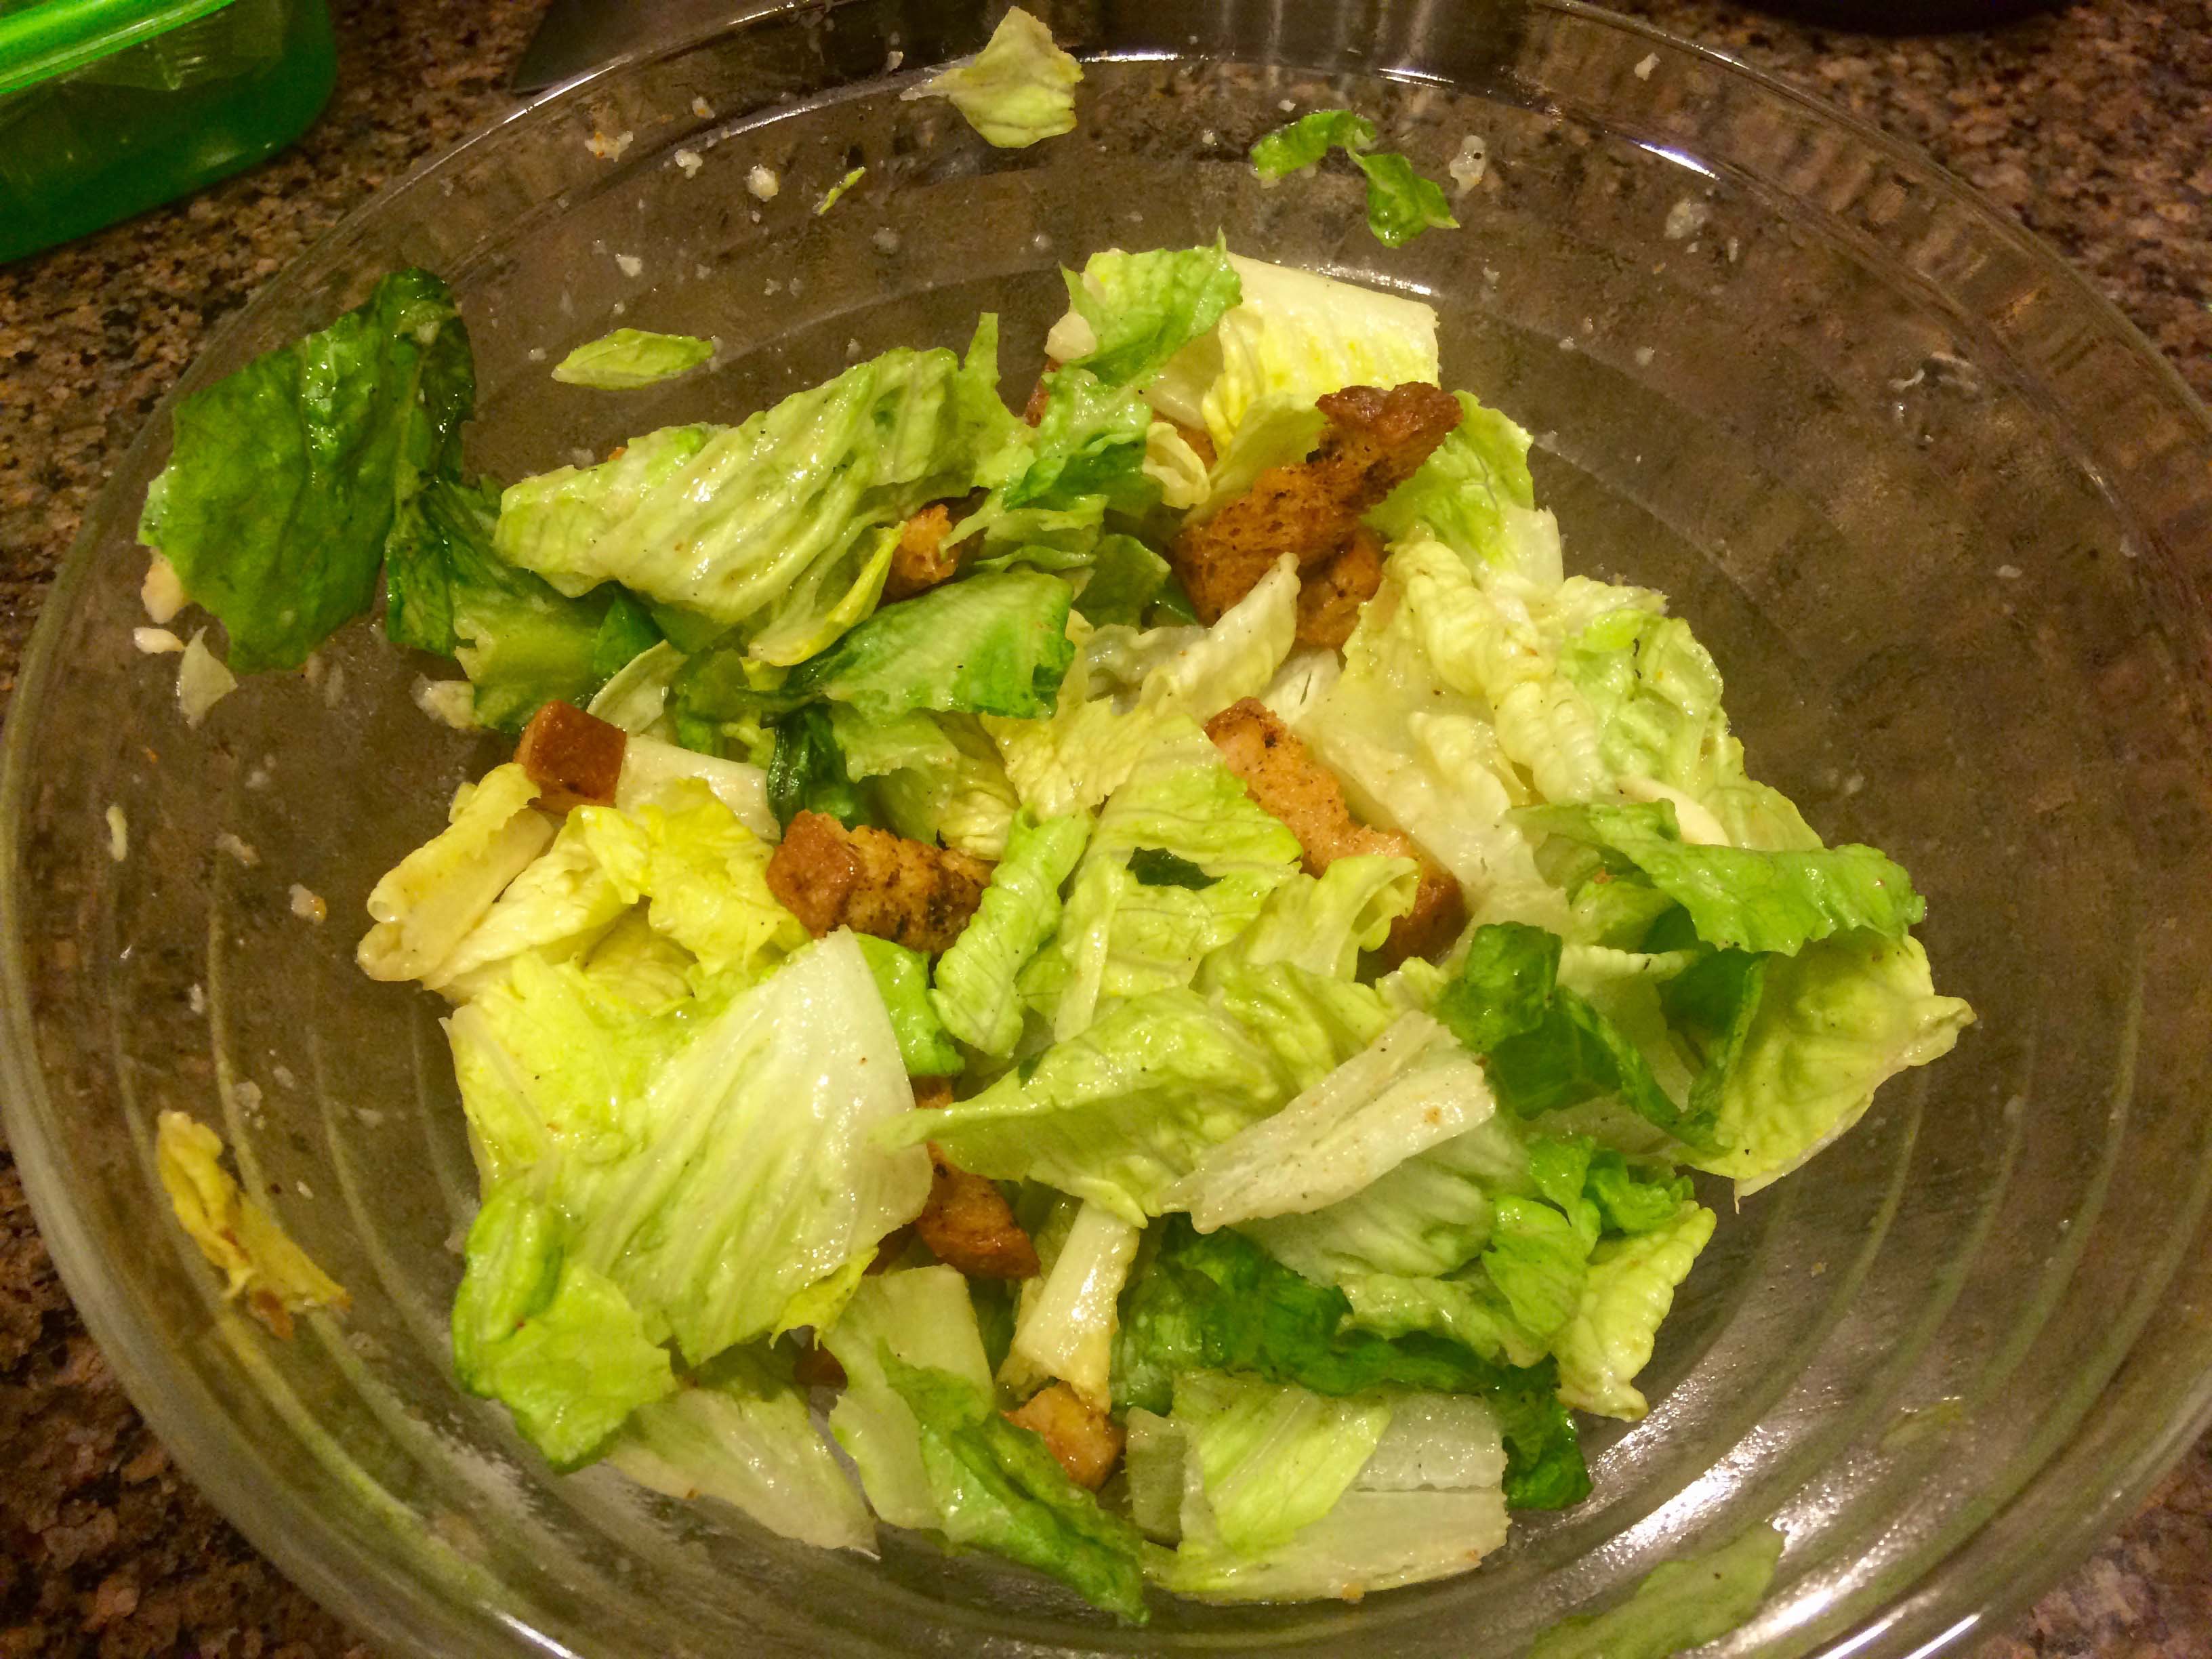
My go-to salad dressing is what’s sometimes called in culinary circles a “broken dressing,” that is, a dressing that is not totally emulsified as is, for example, a classic vinaigrette. Growing up in an Italian-American household, we had a salad at the end of every meal, typically iceberg but occasion it was mixed with arugula, frisee, or even escarole. But the dressing was always the same: plenty of vinegar (either red-wine or cider), a splash of oil, a little dry mustard, a pressed garlic clove, salt, pepper, and a pinch of sugar.
When I started to cook for myself in the early 70s, influenced by the likes of Claiborne, Beard, and Child, I started to make the classic vinaigrette that used far more olive oil and considerably less vinegar than my family’s dressing and replaced the dry mustard with Dijon. I mastered it and motivated by compliments always used it at dinner parties. Yet when I dined alone, I returned to my familial broken dressing, but kept the change in mustard.
The other night, however, at a small dinner party, in a rush to get a salad onto the table, I used this dressing on a salad of hearts of romaine. Our guests remarked that they found the dressing light and refreshing. Those comments made me think that maybe my family’s retro dressing is ready for a revival at future get togethers at home.
Here’s my recipe; the measurements are approximate as I only make this dressing by eye.
1/3 cup red-wine vinegar, or cider vinegar
1 tablespoon extra virgin olive oil
1/2 teaspoon Dijon mustard
1 garlic clove, grated
1/4 teaspoon sugar
salt and pepper to taste
One final note. Owing to the amount of vinegar, only dress the salad immediately before serving to avoid wilting the greens.
Although I attribute my passion for cooking to my Neapolitan aunt, who I used to observe closely whenever she prepared, solely from memory, one of the multitude of dishes in her repertoire, it was Marcella Hazan who really taught me how to cook classic Italian dishes.
I remember how her first book, published in 1976, inspired me to try so many new dishes like baked semolina gnocchi, vitello tonnato, pork loin braised in milk, her unique ragu Bolognese, etc. etc. Over the years, I’ve collected almost all of her books and often refer to them either for new recipes or for cooking wisdom. It is the latter of these, sage advice, that makes up the greater part of her last book, Marcella Says, published almost 30 years after her first.
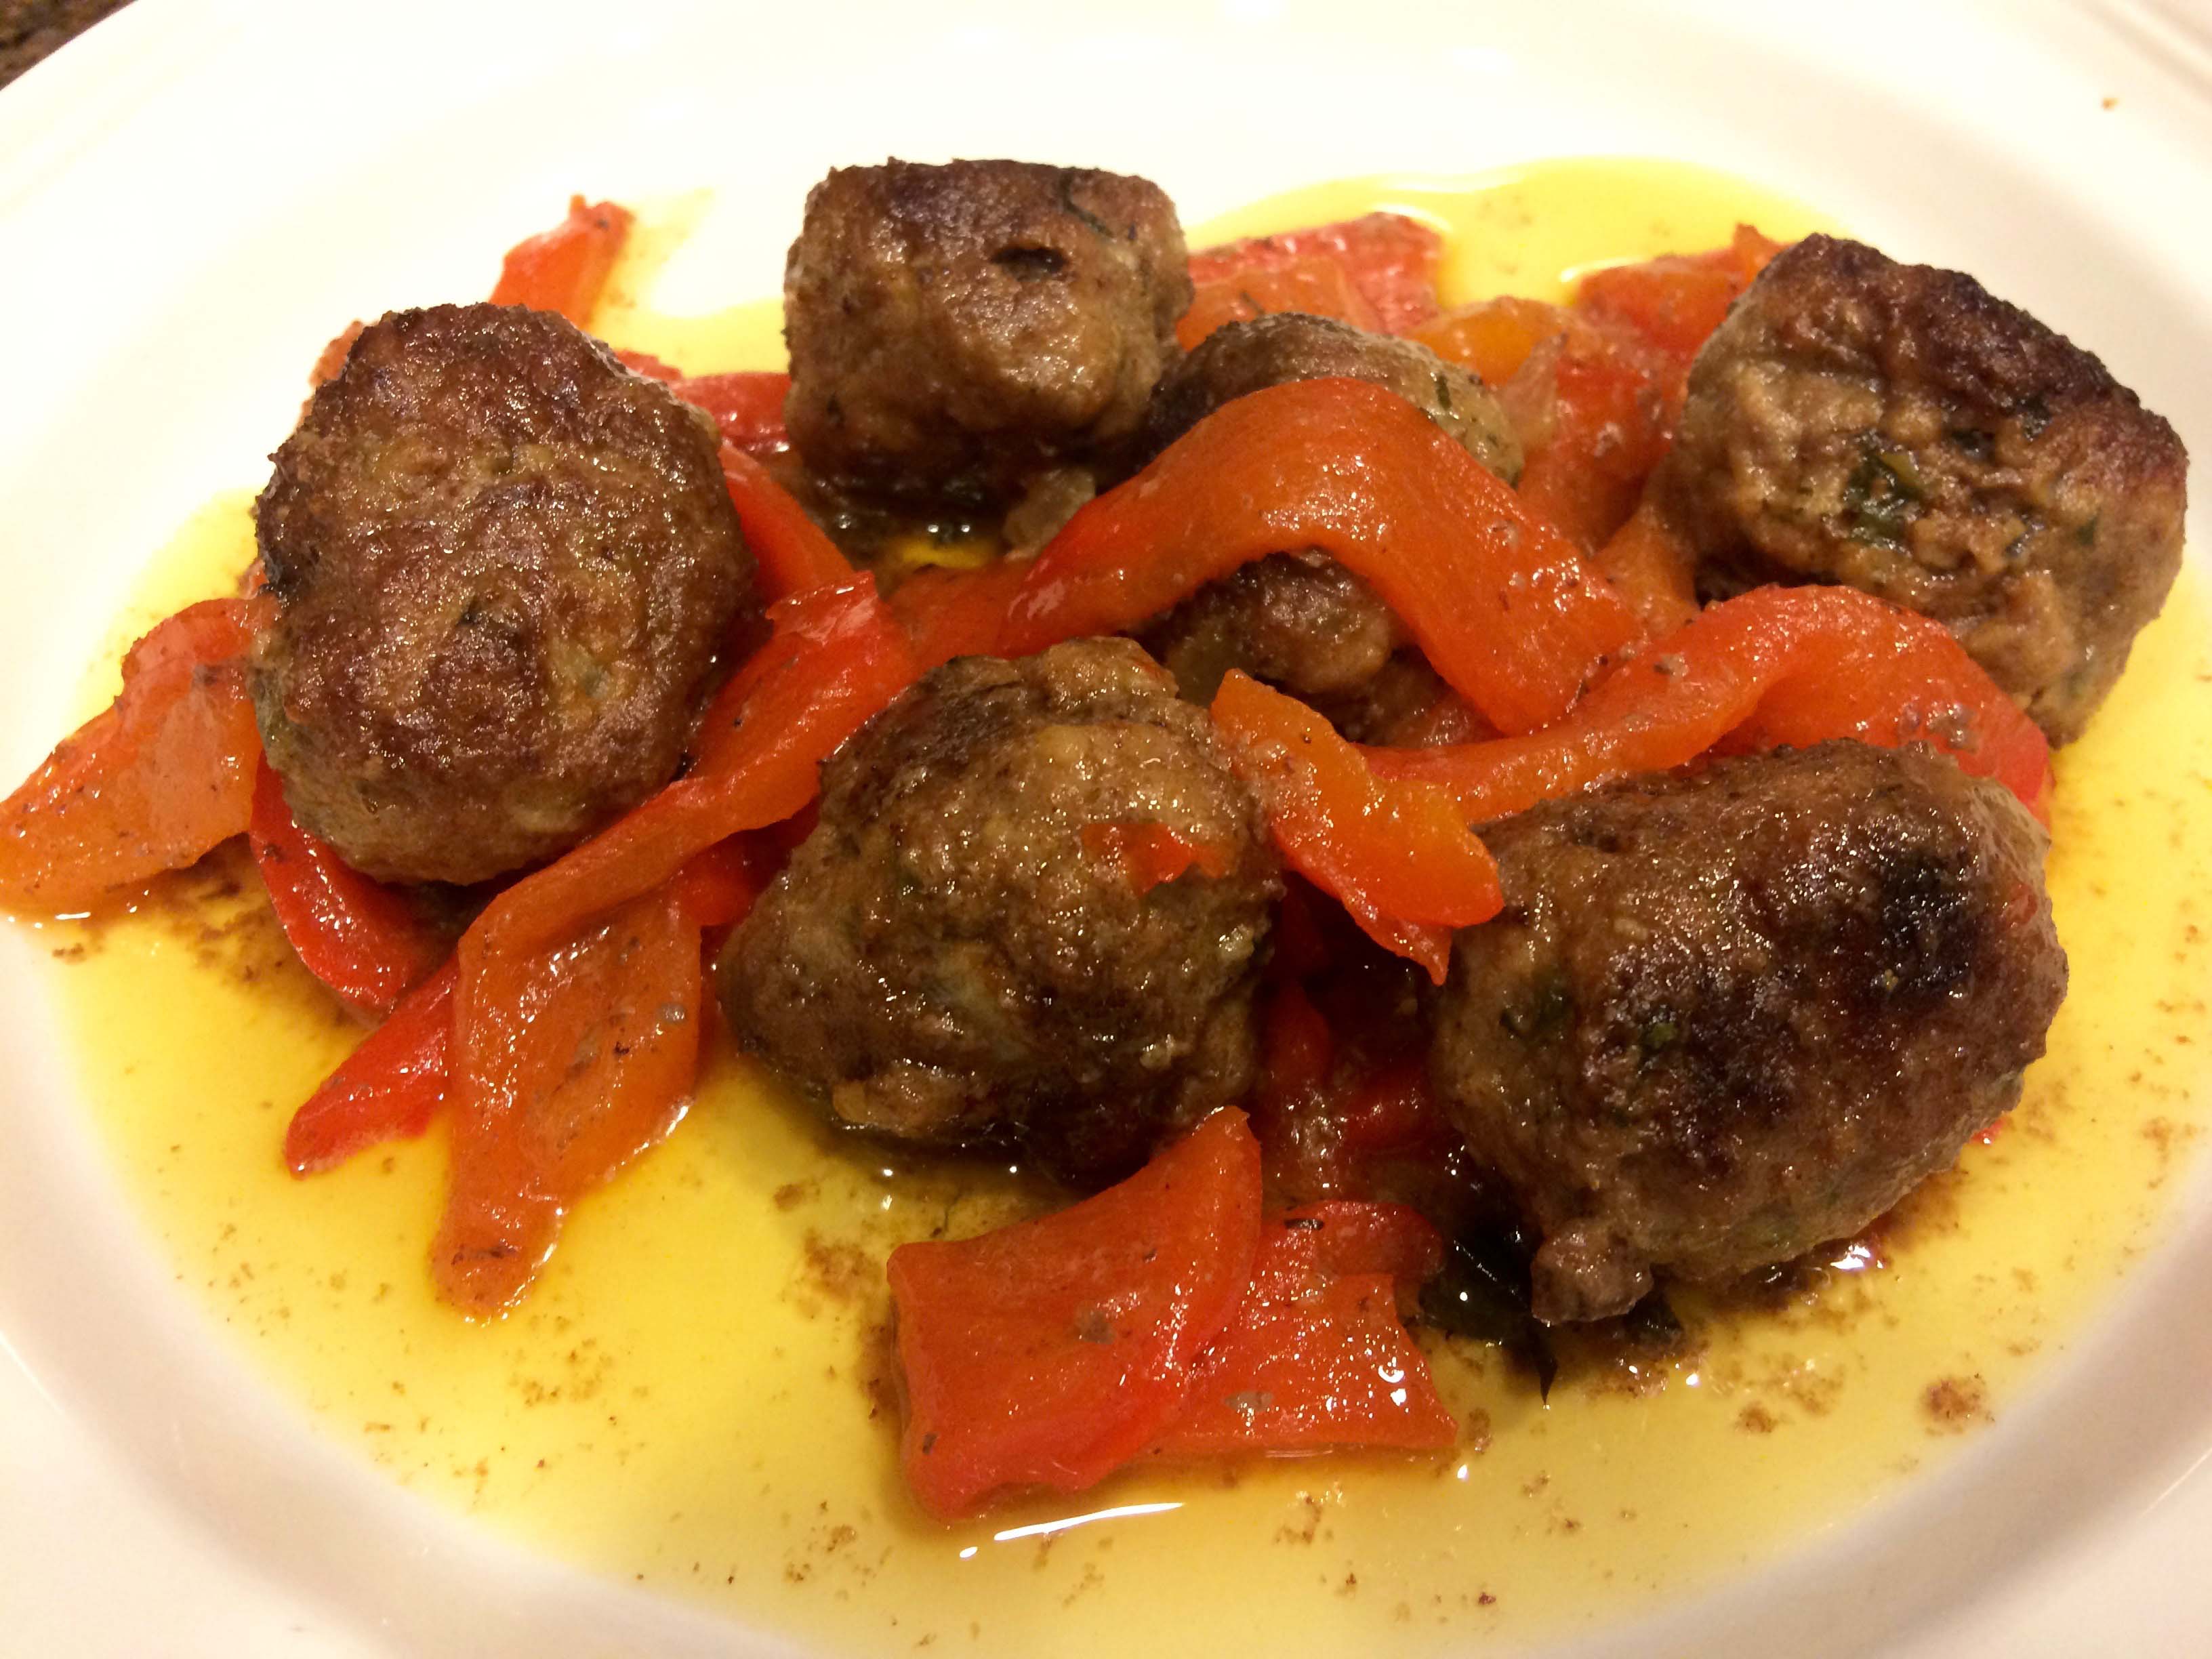
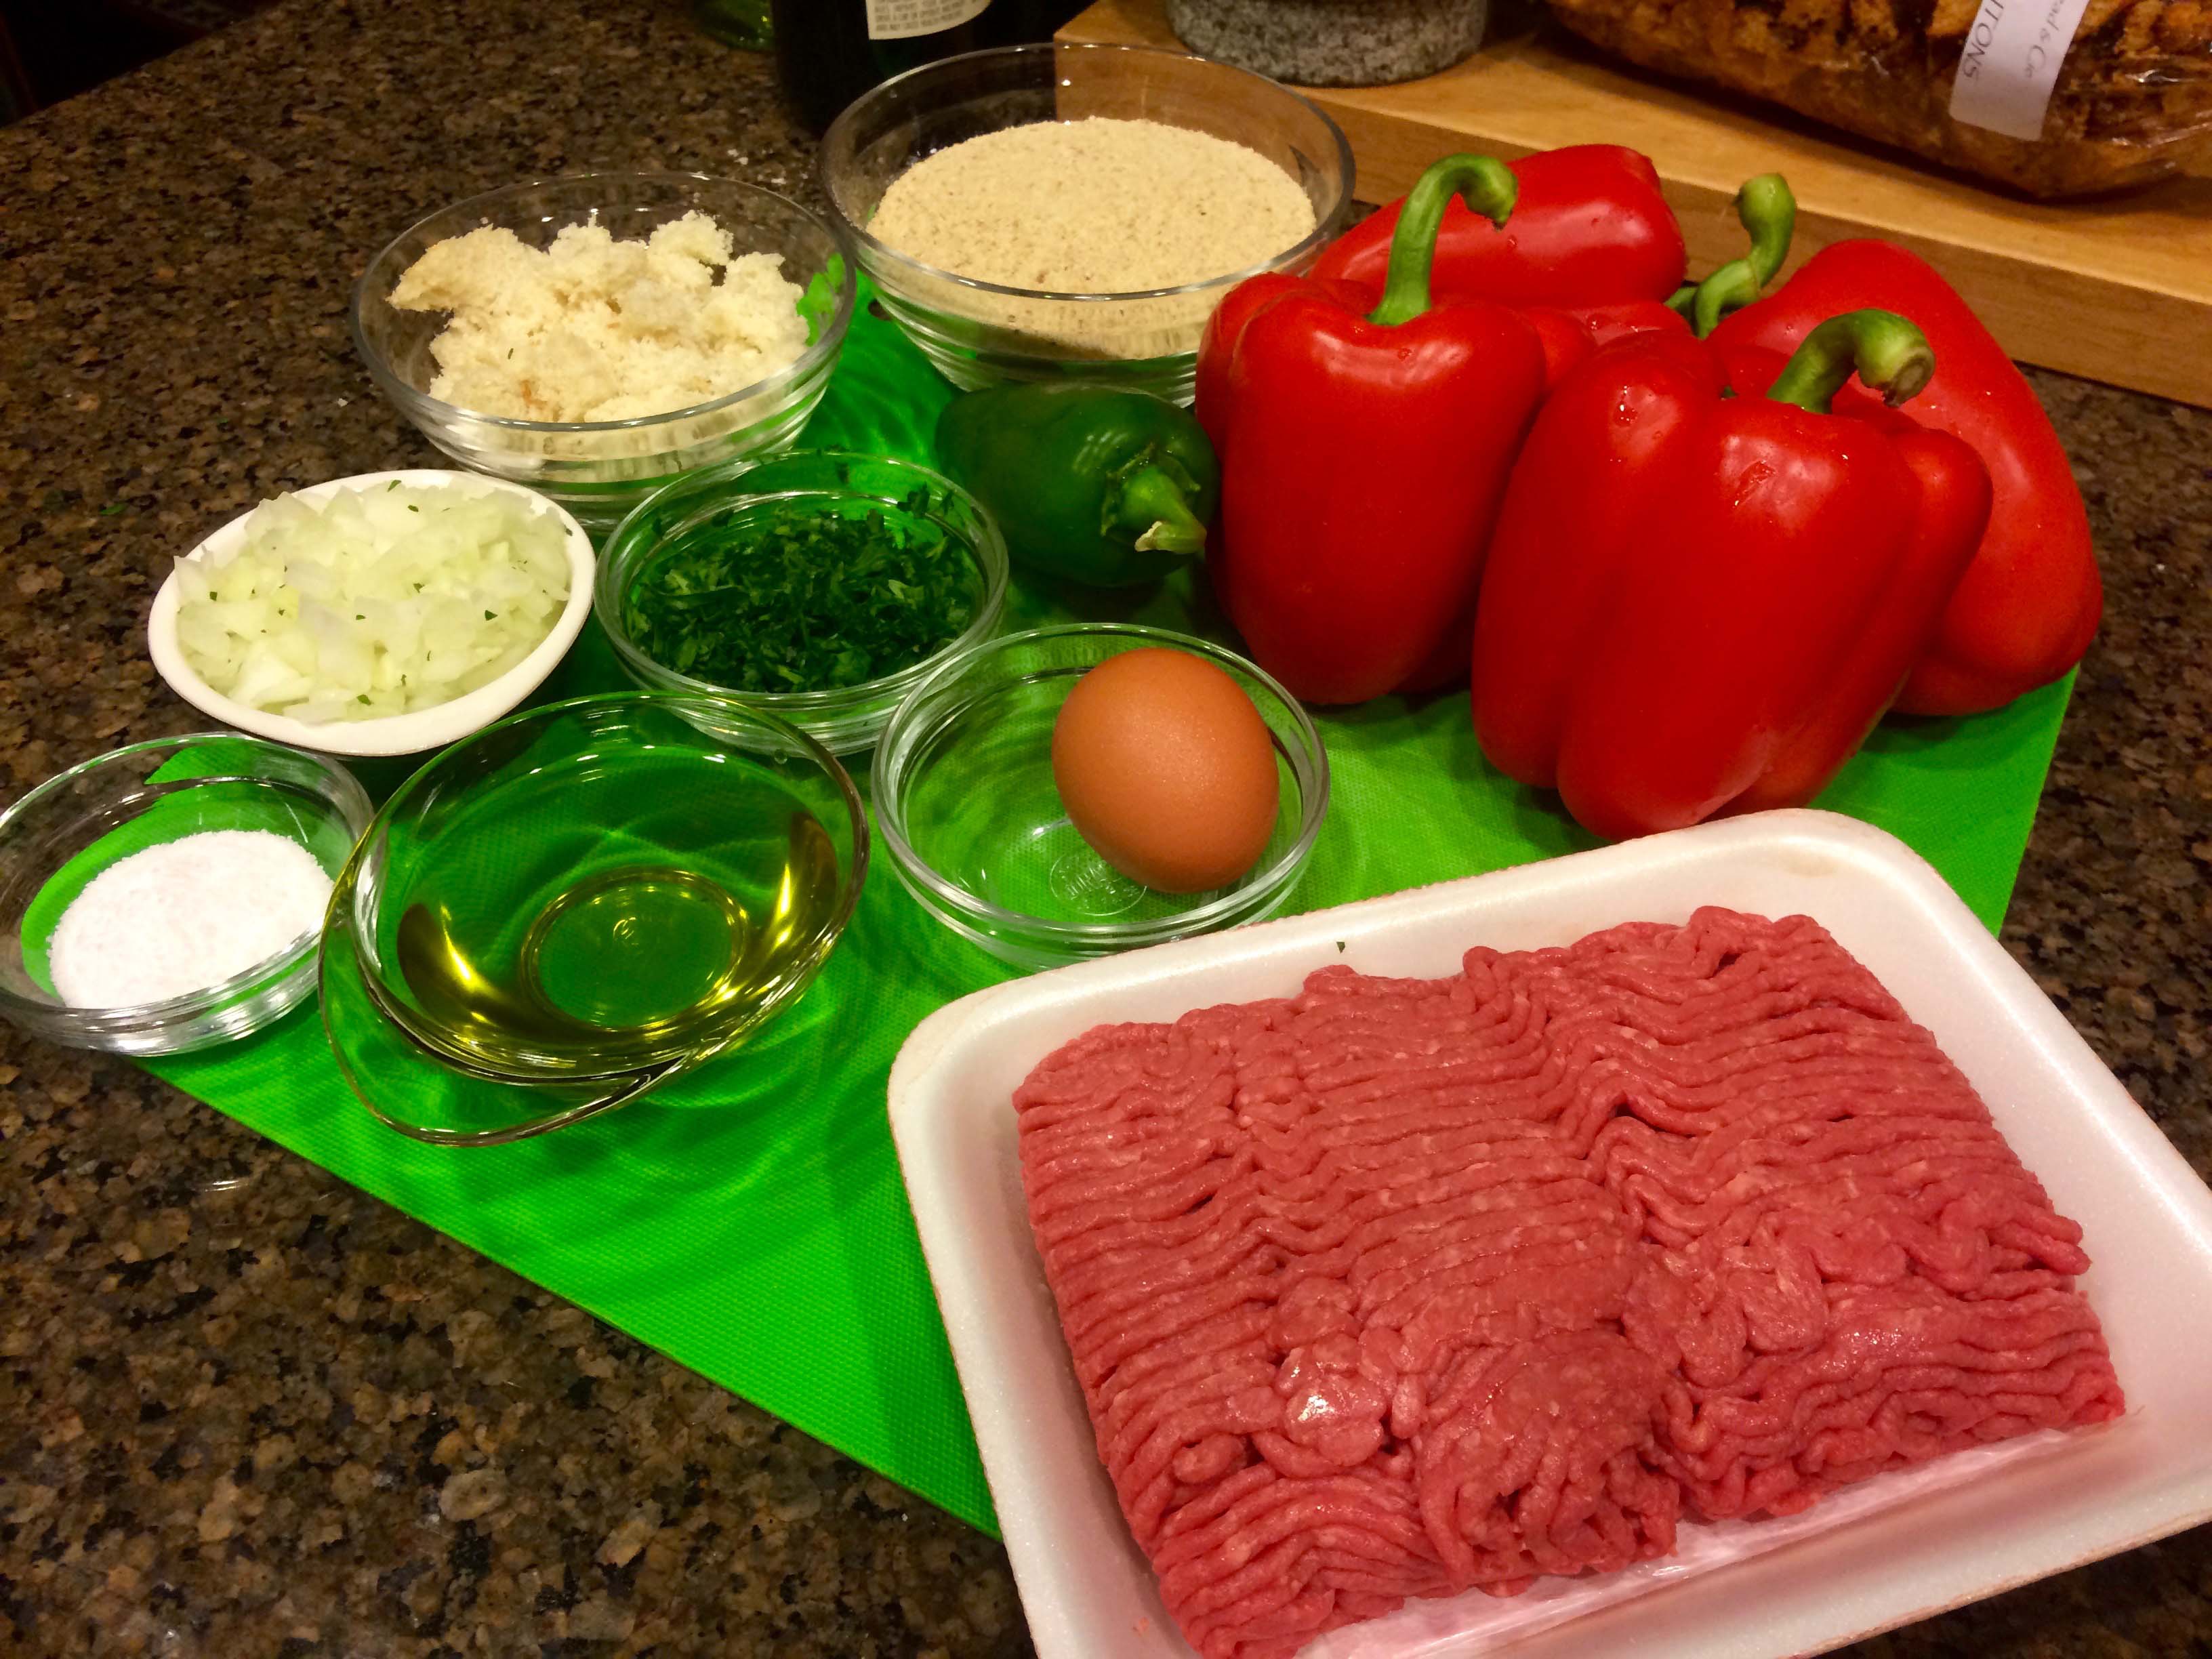
From that final collection, comes the recipe for today’s post, Polpettine di Manzo con i Peperoni, Spicy Beef Meatballs with Bell Peppers. These are nothing like the spicy meatballs one may associate with the legendary Alka Seltzer commercial or with the Italian-American versions that are part of many a Sunday sauce. Rather, they are small and delicate bundles of meat, gently mixed with parsley, chopped onion, and jalapeño pepper, and bound with egg and a white-bread panade, made from torn white bread soaked in milk.
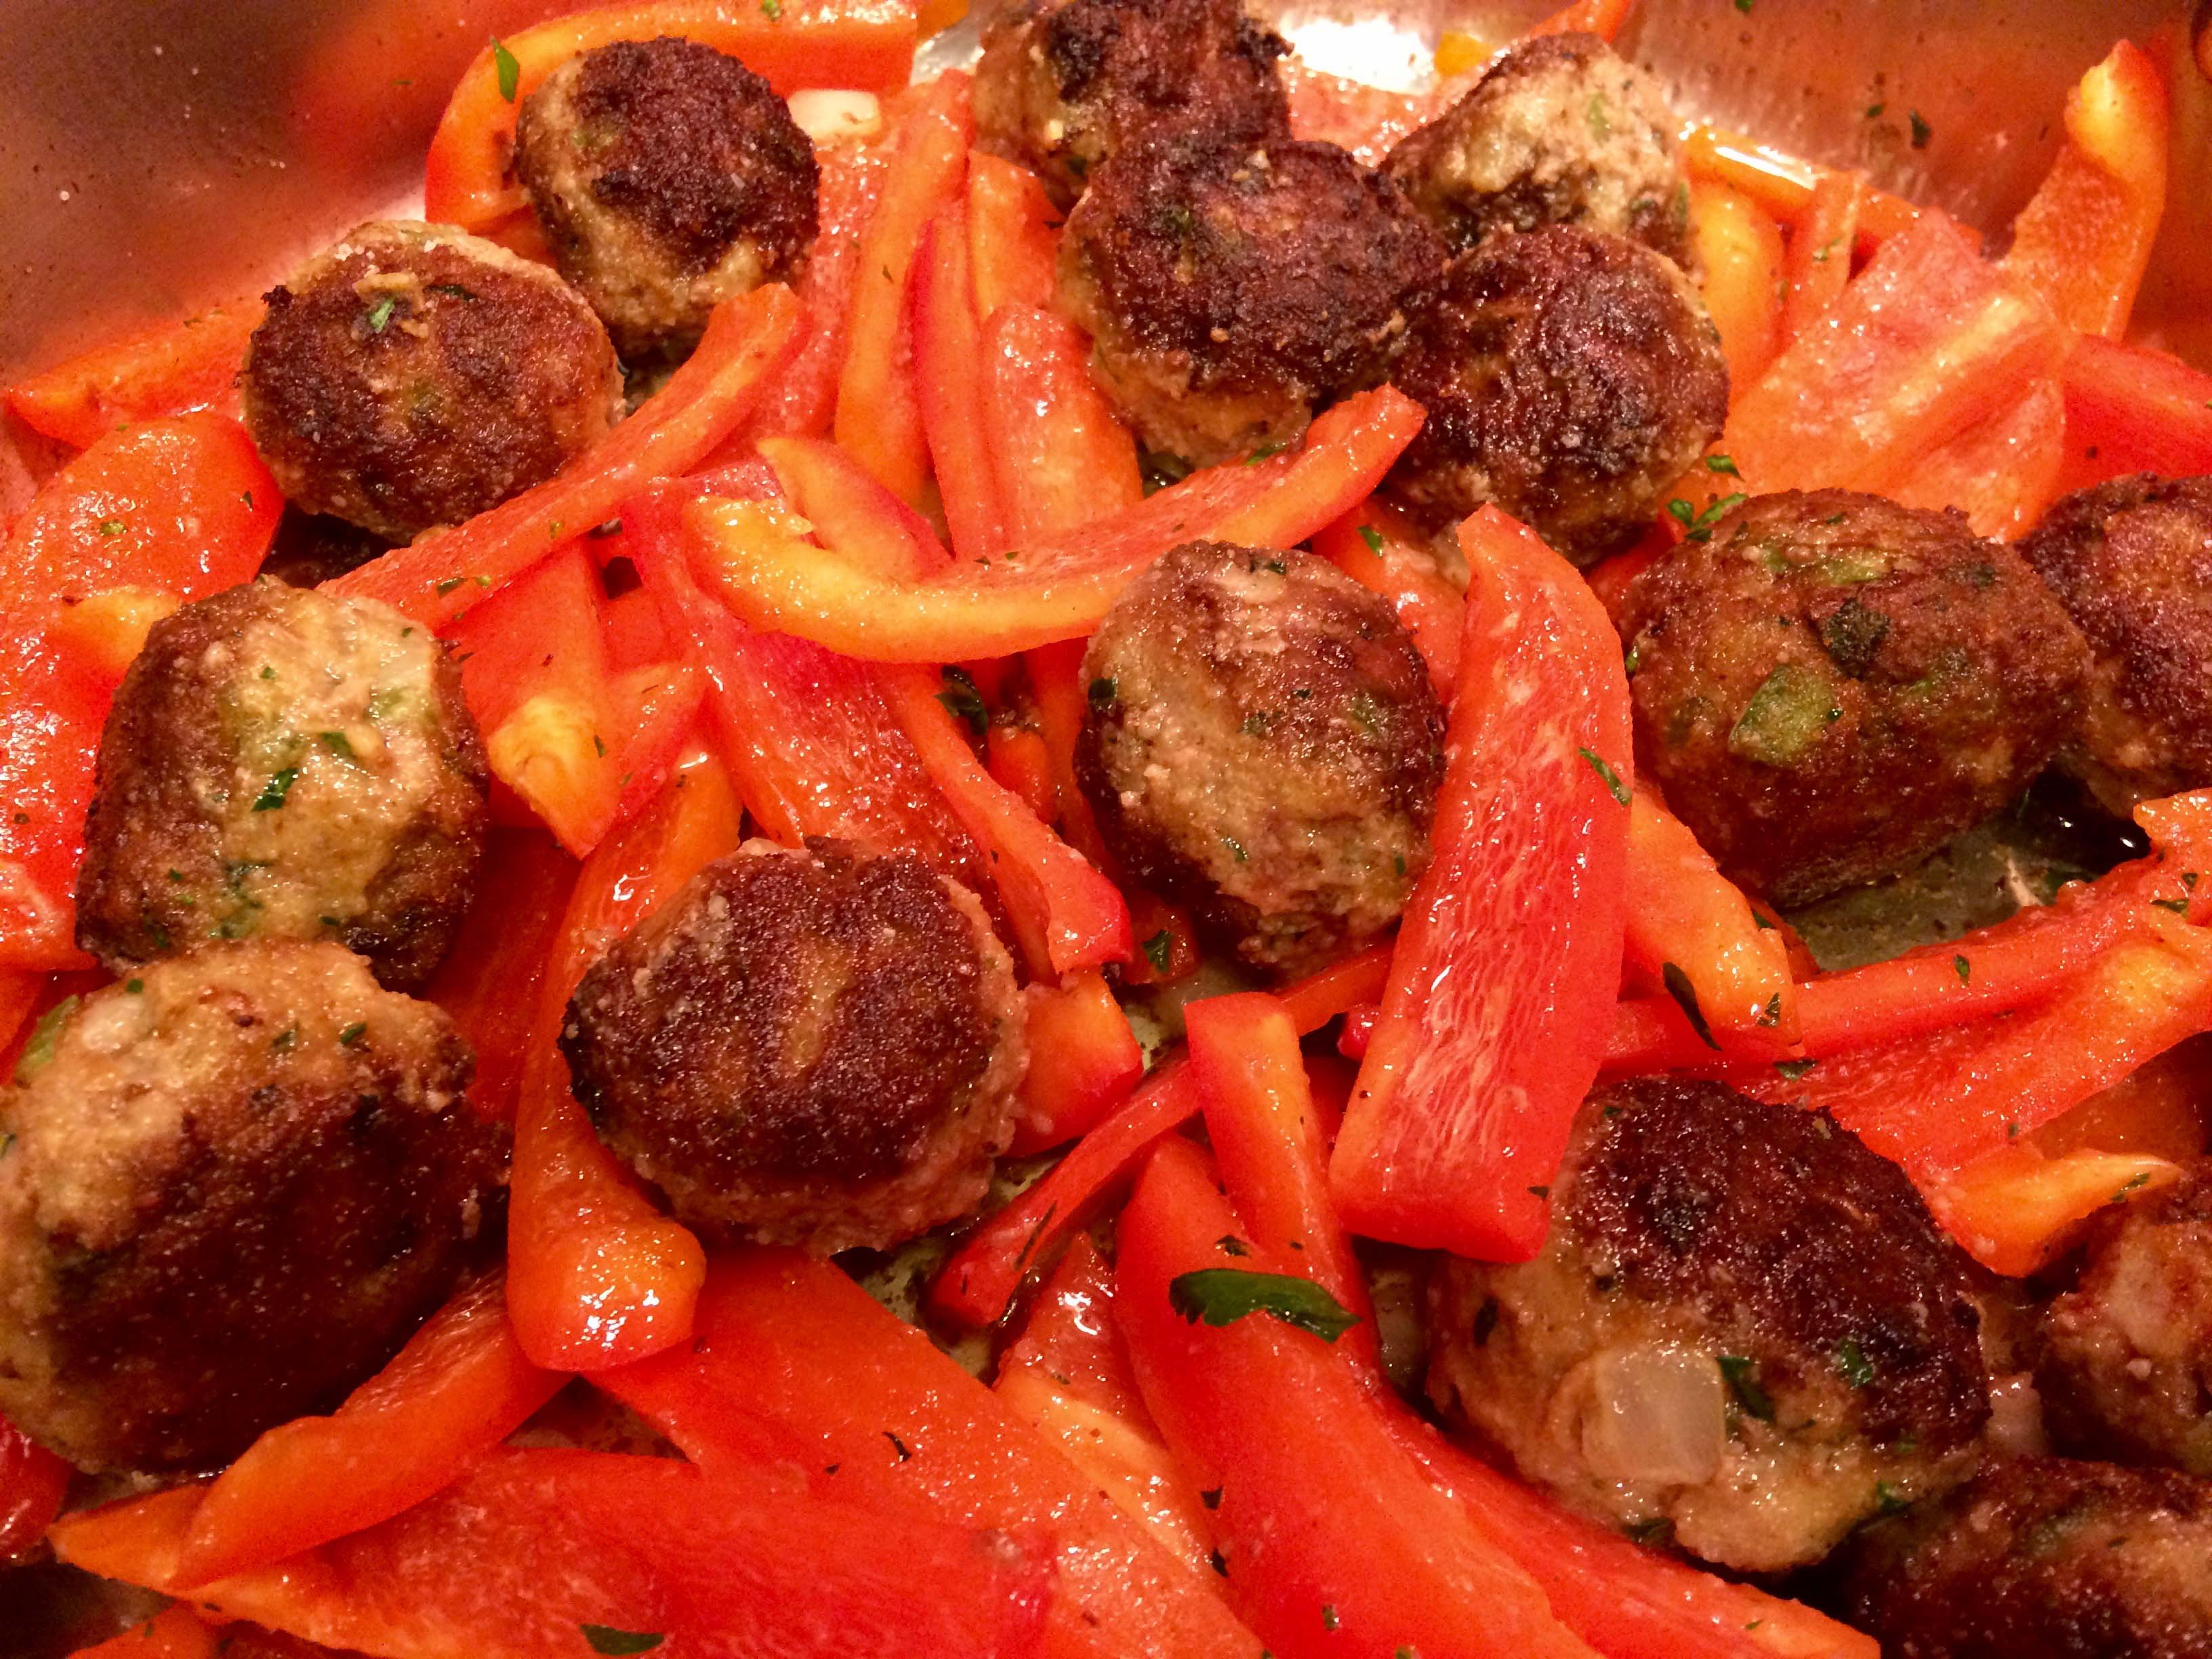
Another difference is that there’s no tomato sauce. After frying, the meatballs are simmered along with a load of bell peppers, peeled and sliced. How long the peppers are cooked is up to you. If you like your peppers with some body, you can opt to cook them for as little as ten minutes. Or if, like me, you prefer a more tasty, succulent sauce, you can continue the simmer for about 30 minutes, or when the peppers just begin to dissolve.
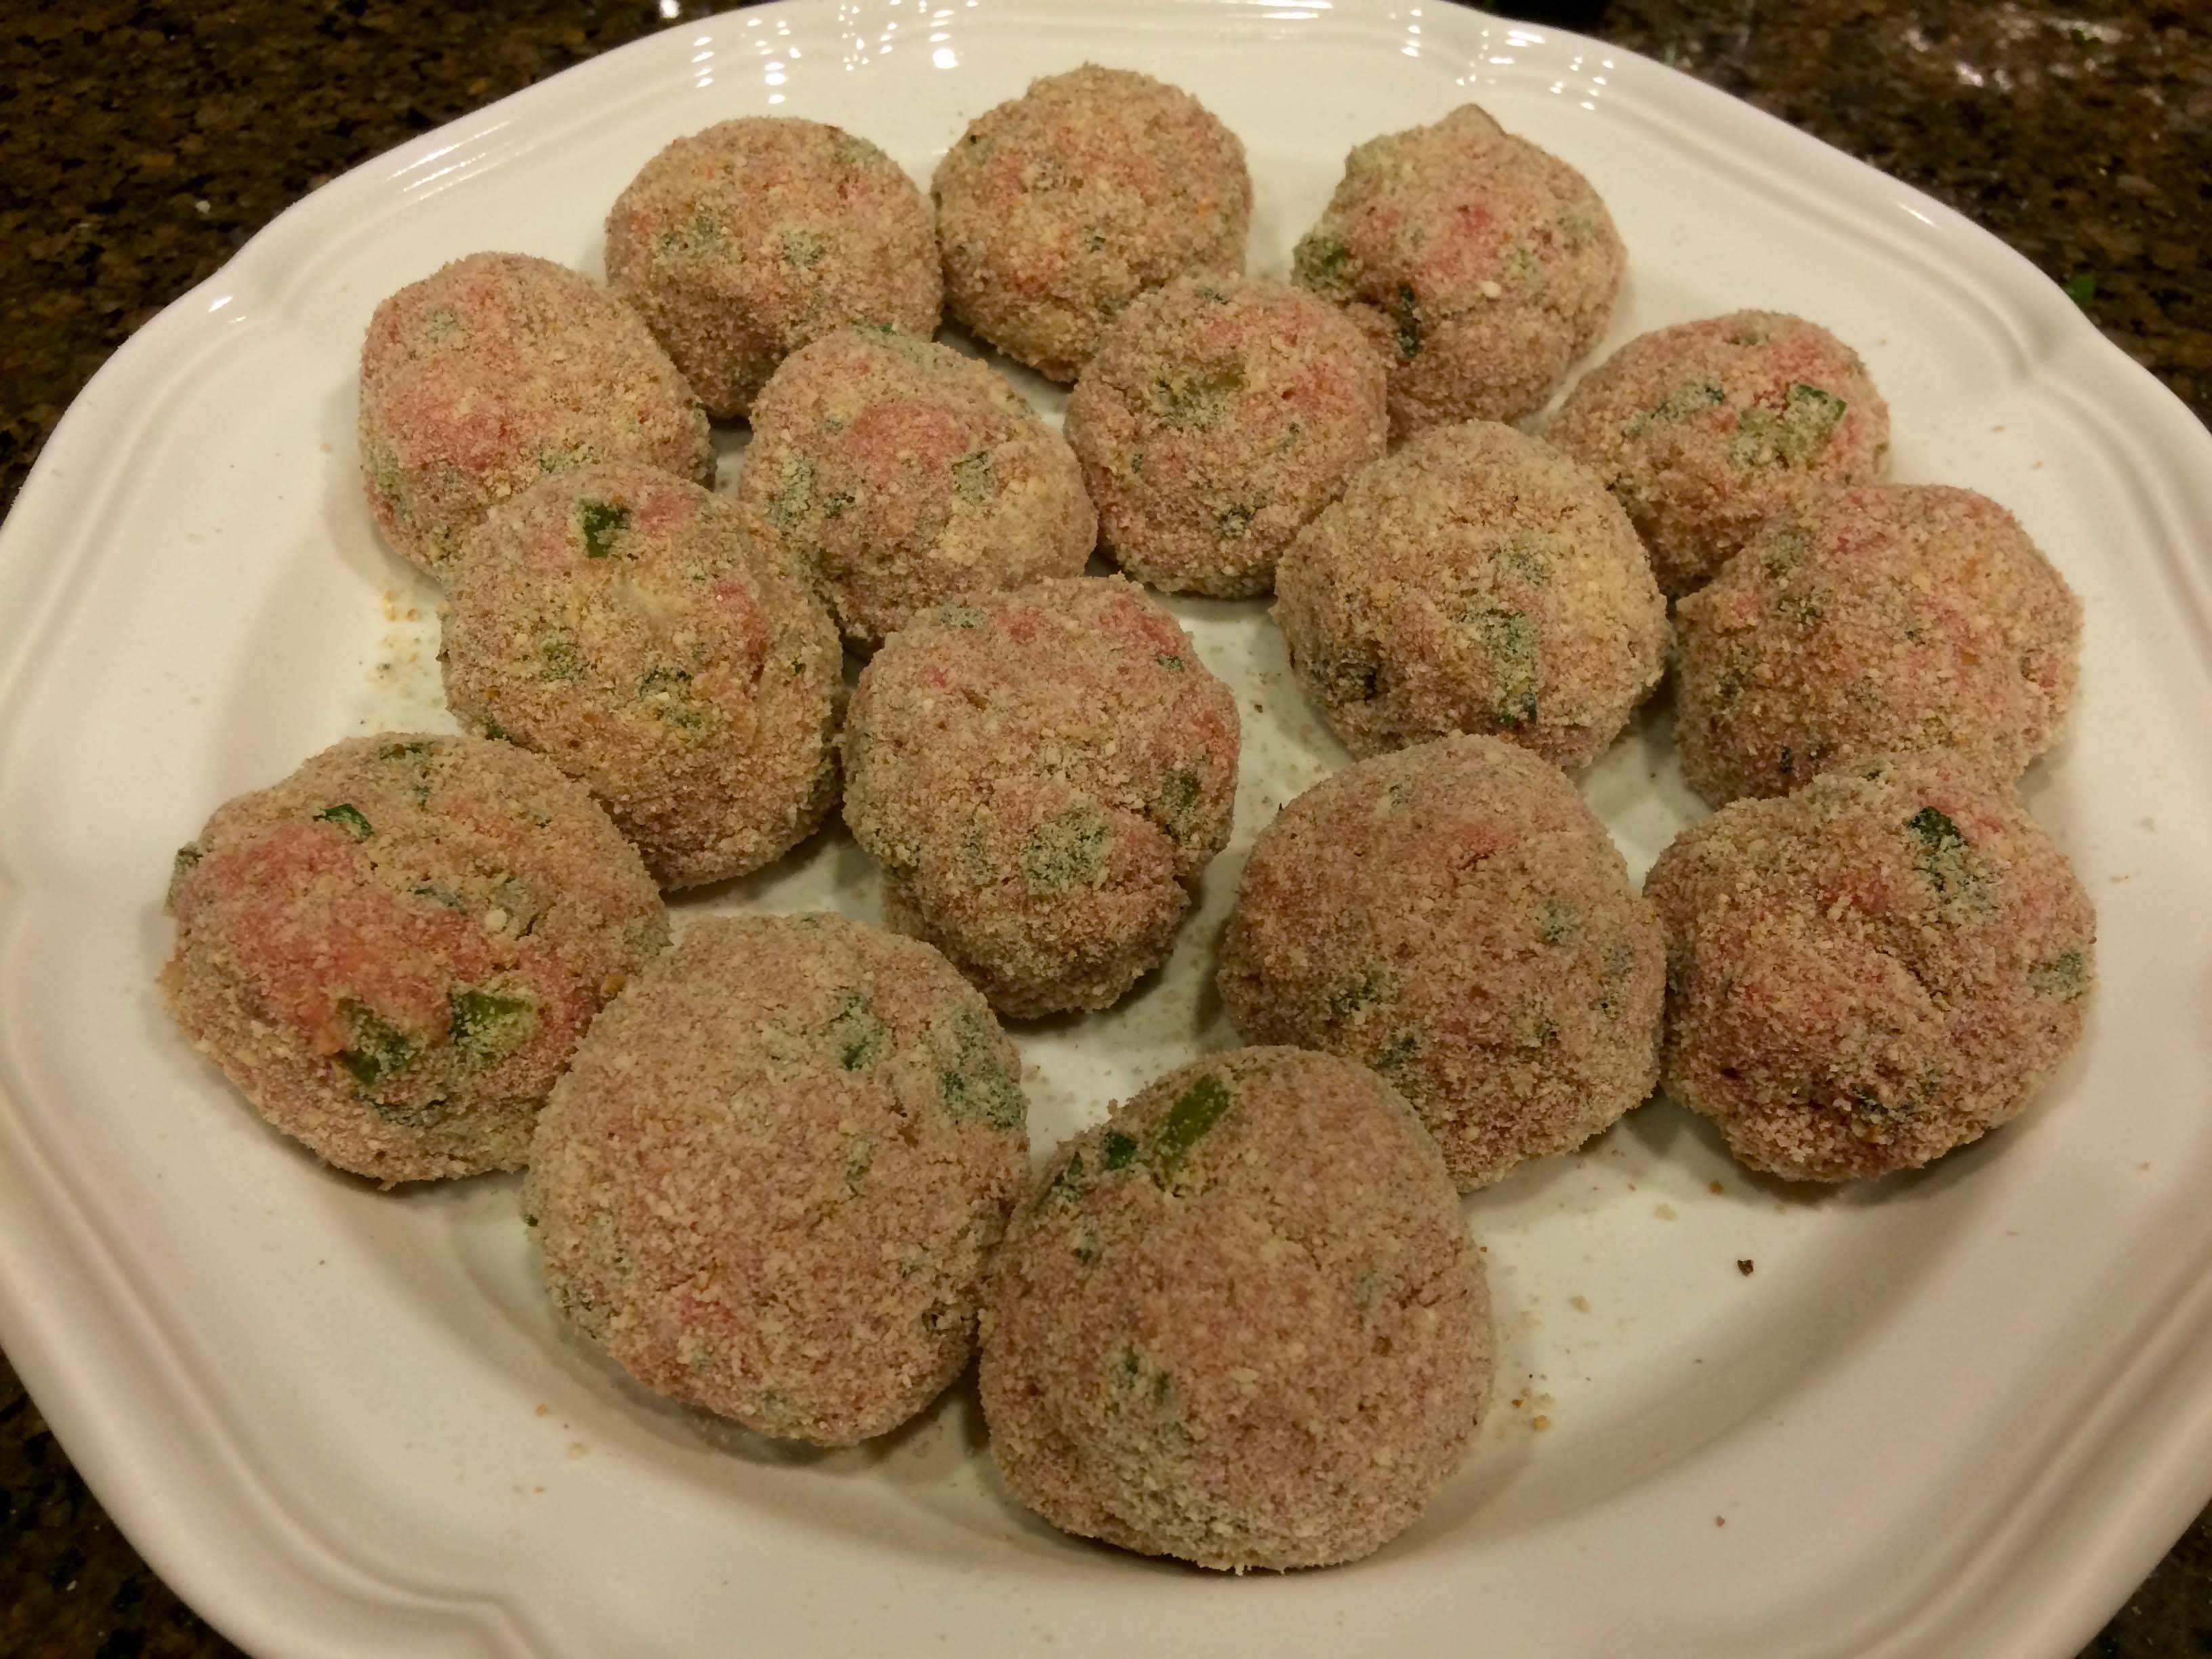
My only problem with this recipe was with the size of the meatballs. The recipe says they should be the size of a very small egg, which I interpreted to be about 1 inch in diameter and made 16 meatballs. However, when I reread the recipe, I noticed that the yield should have been 30 to 35 balls.(I guess Marcella may have had a different egg in mind.) Nevertheless, I thought my size choice made for the perfect bite especially when accompanied by a piece of the soft red pepper. (Should you choose to make smaller meatballs, you may want to chop the onions, pepper, and parsley a little finer than I did.)
One final note. I was surprised by the inclusion of a jalapeño and almost substituted some crushed red-pepper flakes. But Hazan made a good case for using it since in her words it adds a “fine fragrance and mellow style of spiciness.”
Ingredients
Ingredients
4 meaty red bell peppers
2 tablespoons chopped Italian flat-leaf parsley
½ cup chopped onion
Chopped fresh jalapeño pepper, 2 to 3 tablespoons, or to taste
⅔ cup torn fresh breadcrumb—the soft crustless part of a slice of bread
⅔ cup whole milk
1 pound ground beef chuck
1 egg
Fine sea salt
1 ½ cups fine, dry, unflavored bread crumbs, spread on a plate or a sheet of wax paper
4 tablespoons extra virgin olive oil
A warm serving platter
Yield: 30 to 35 meatballs. serving 4 persons
Procedure
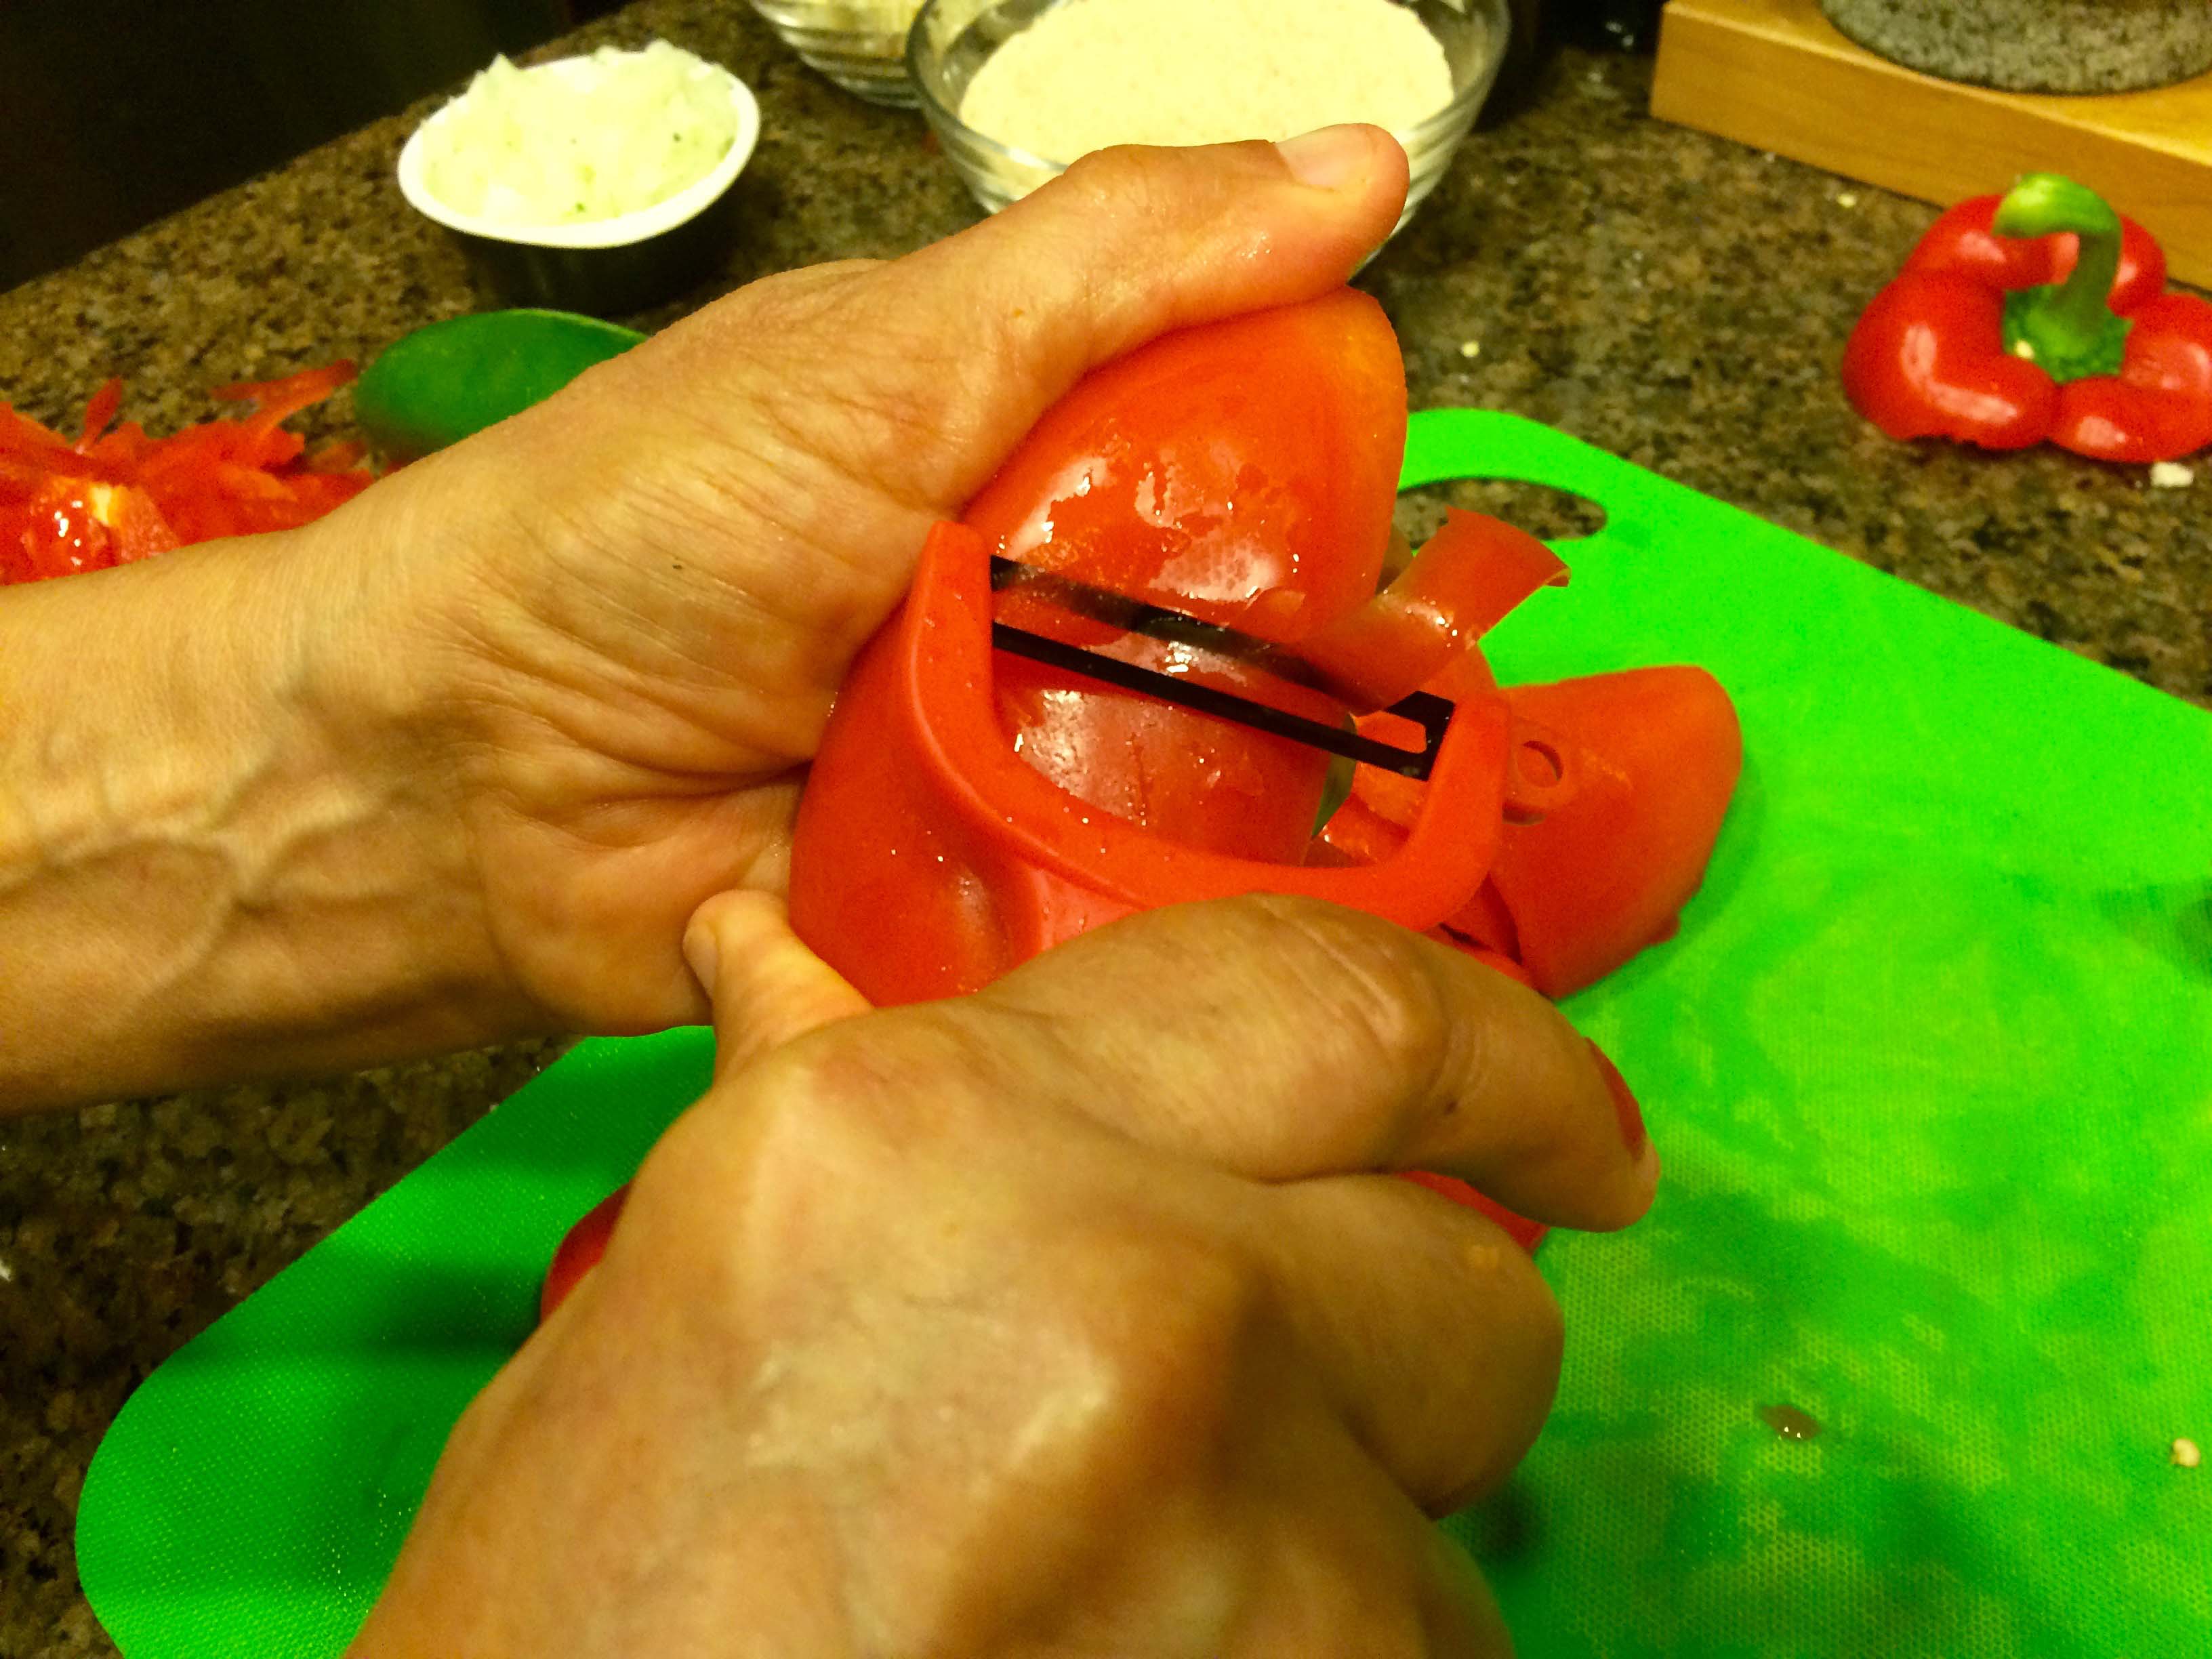
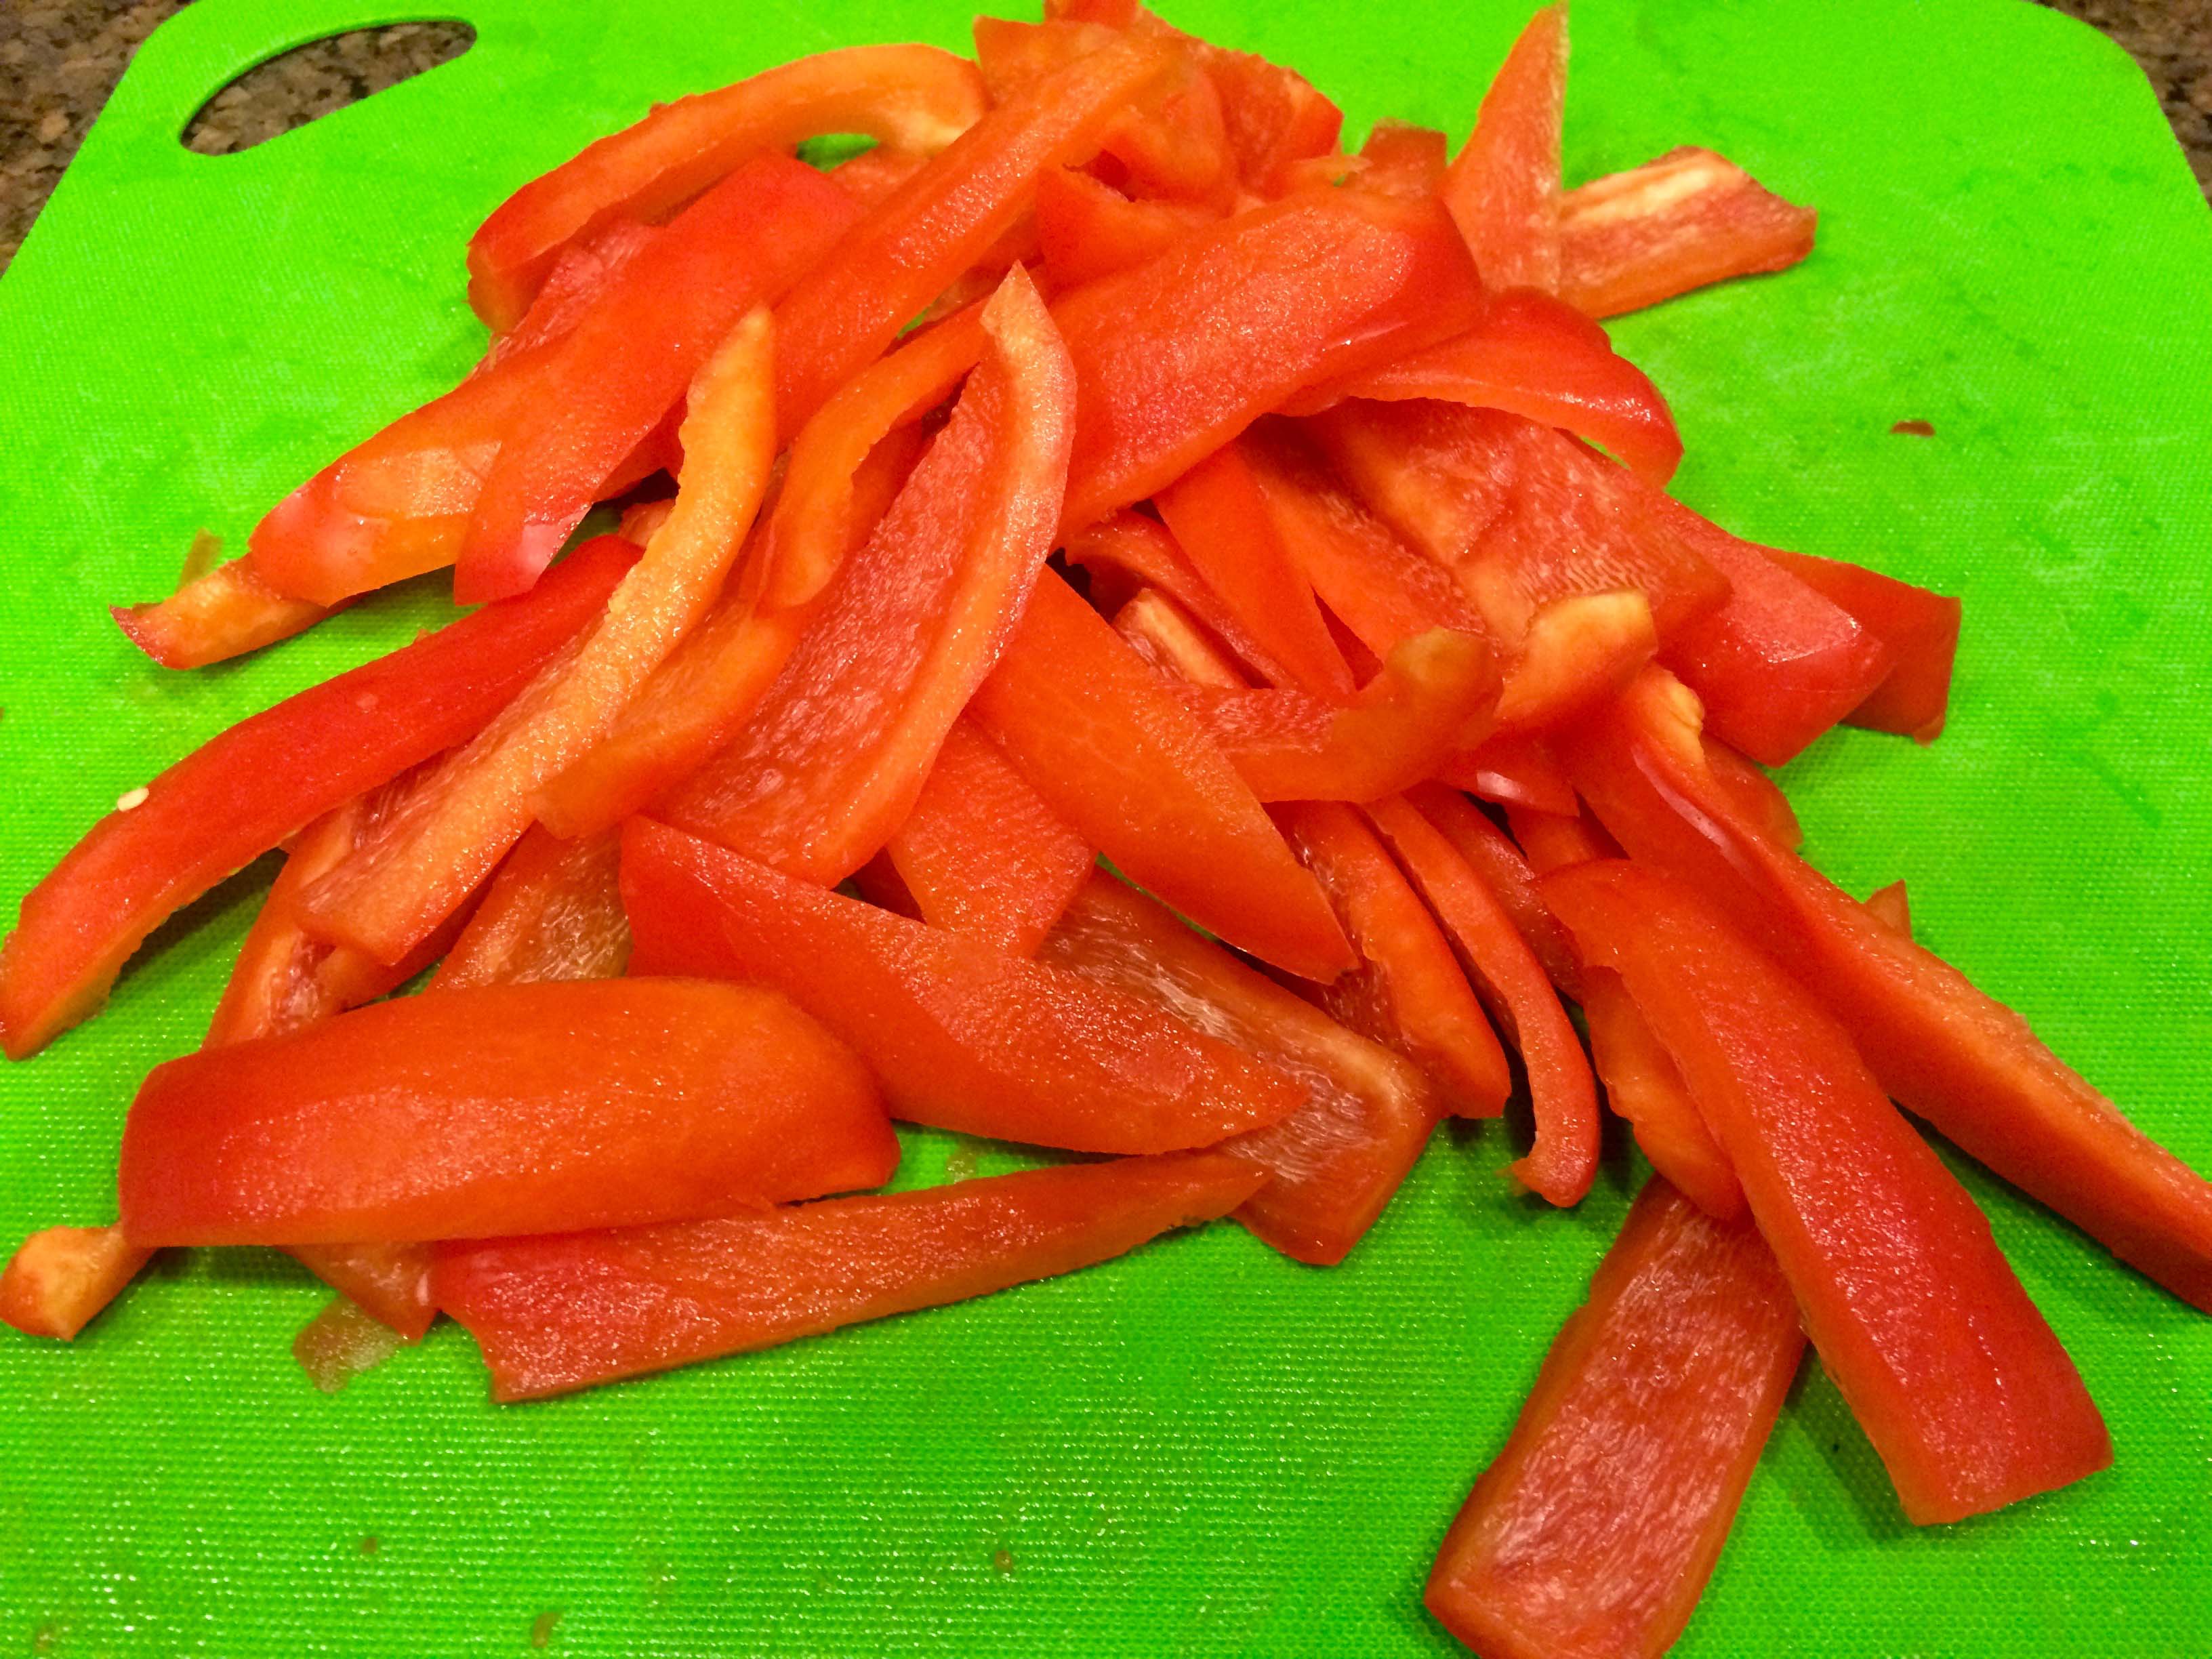
1 – Cut the bell pepper lengthwise along the creases, remove the stem, seeds, and pithy core, and skin them with a swivel-blade vegetable peeler. Cut the pepper into strips about 1/2 inch wide.
Peeling the peppersPeppers sliced
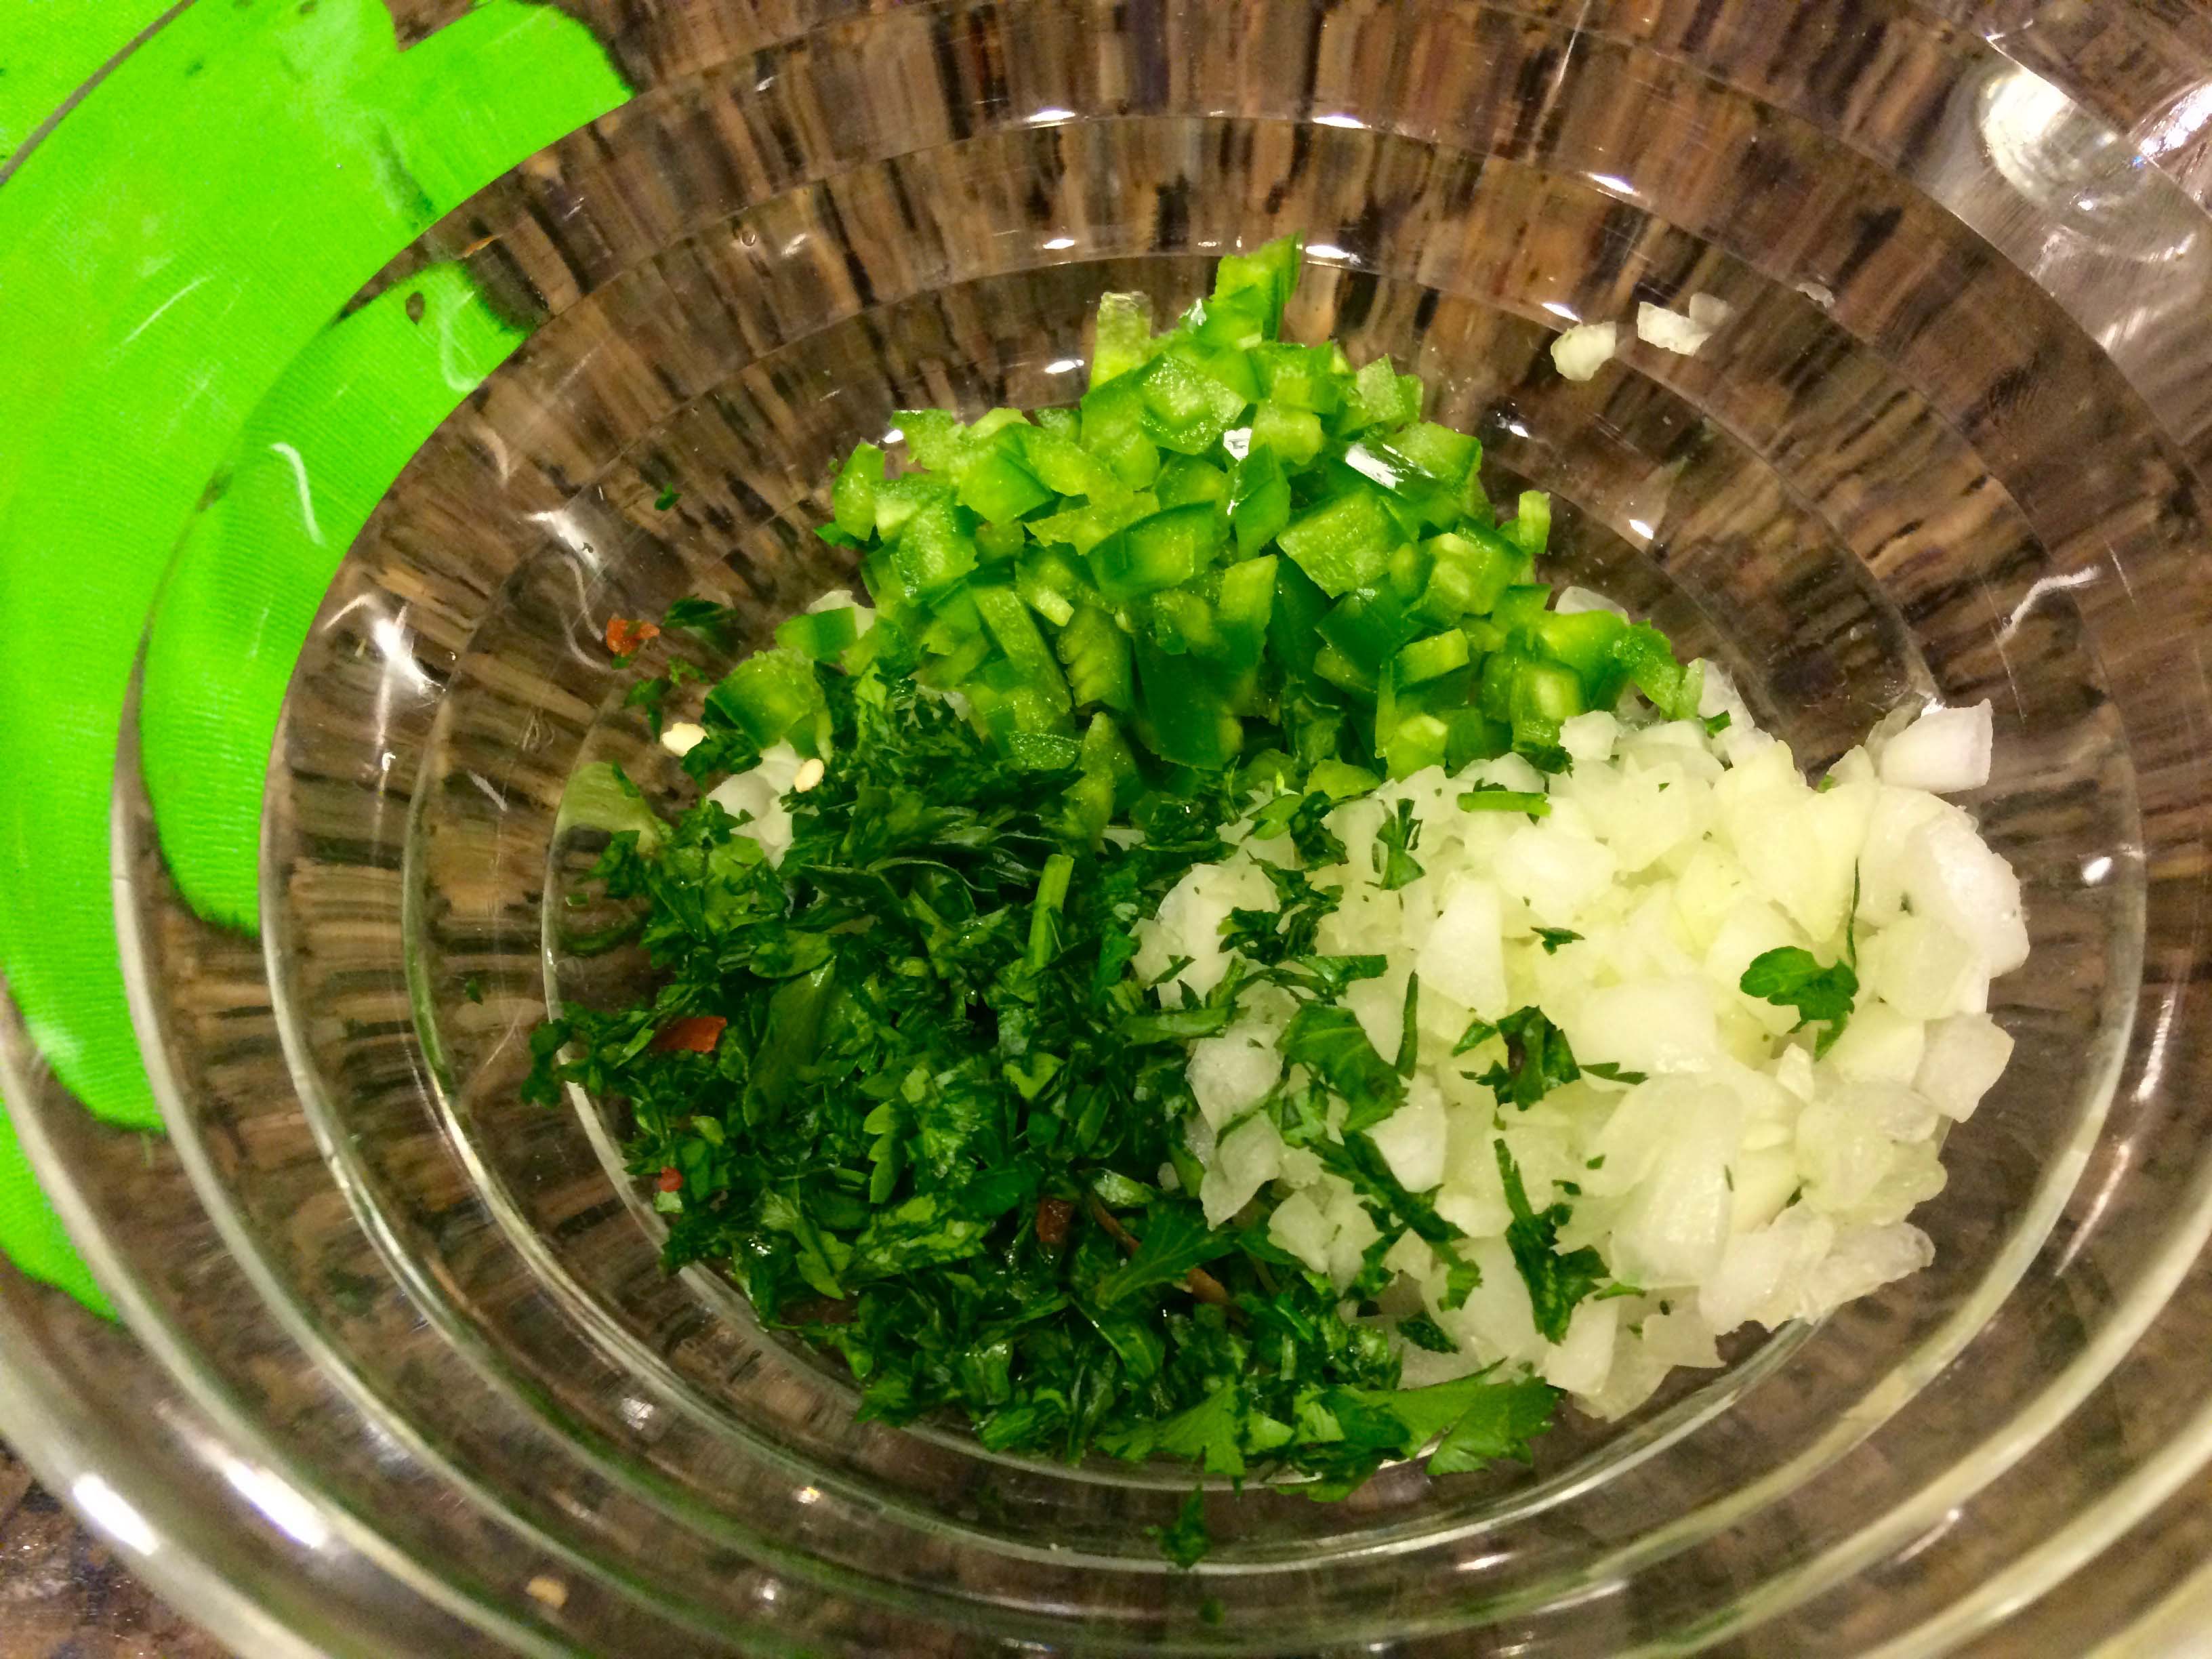
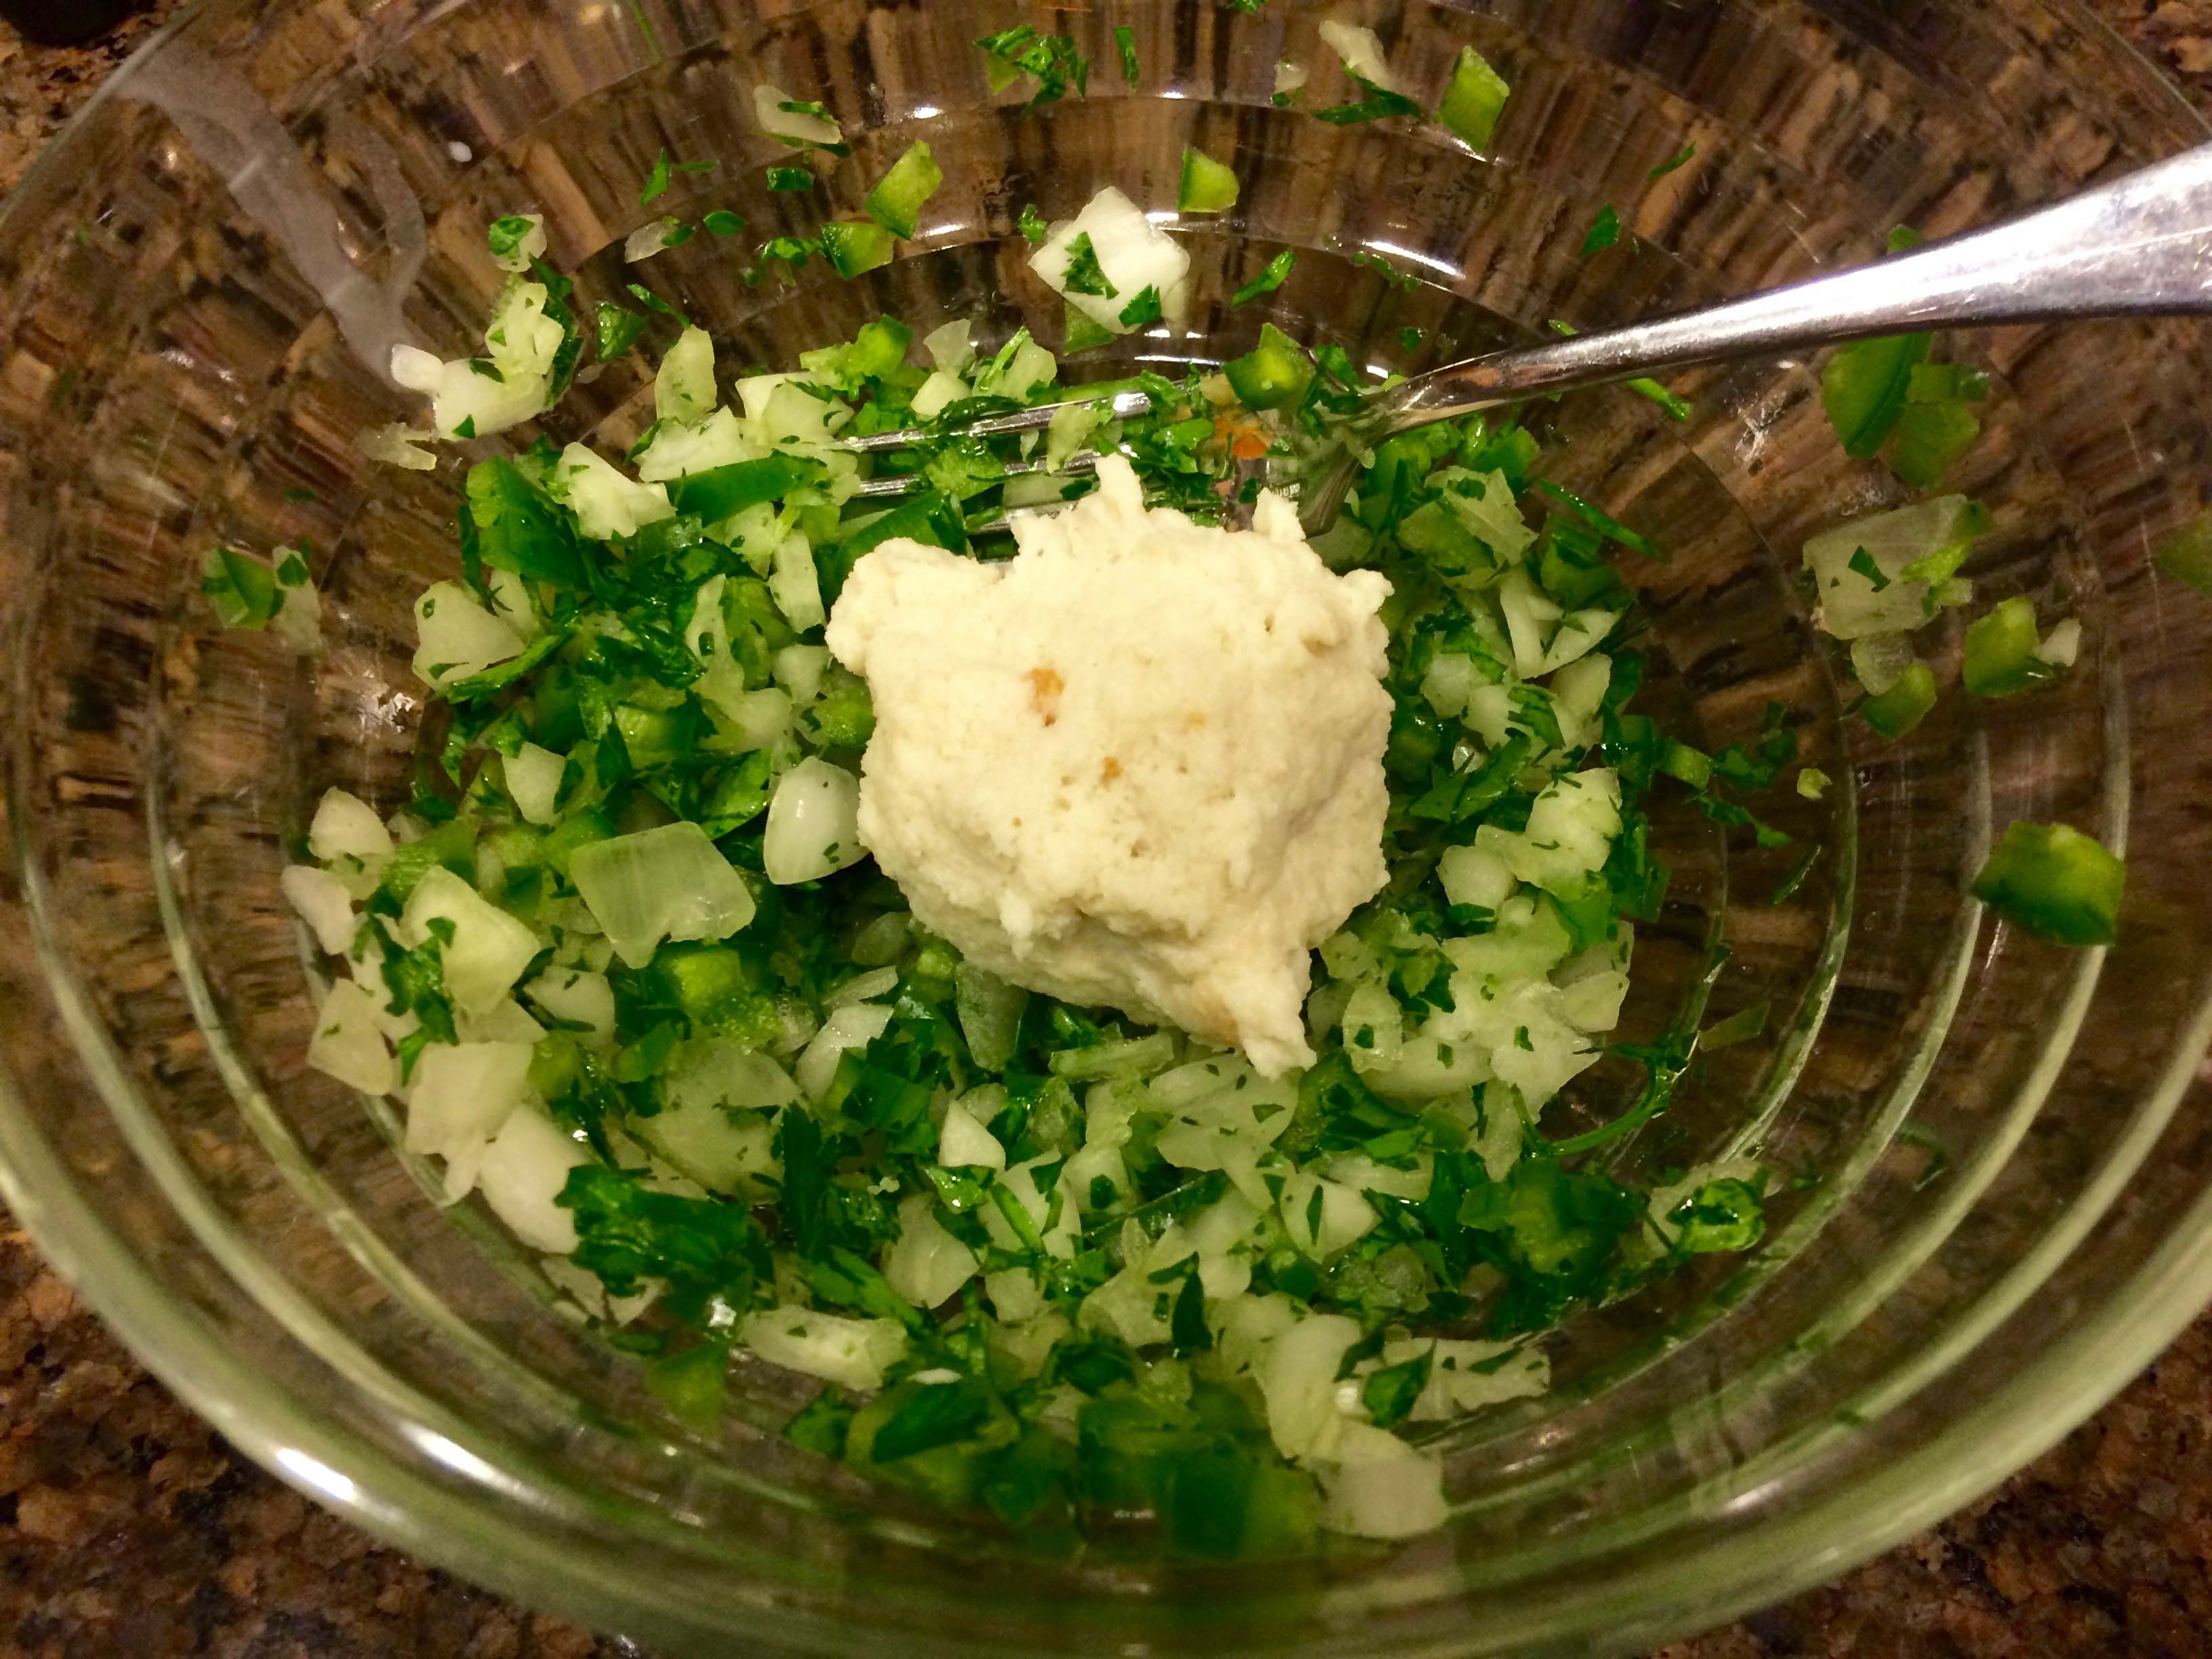
2 – Put the parsley, onion, and jalapeño pepper in a bowl and mix together well.
Parsley, onion, jalapeno
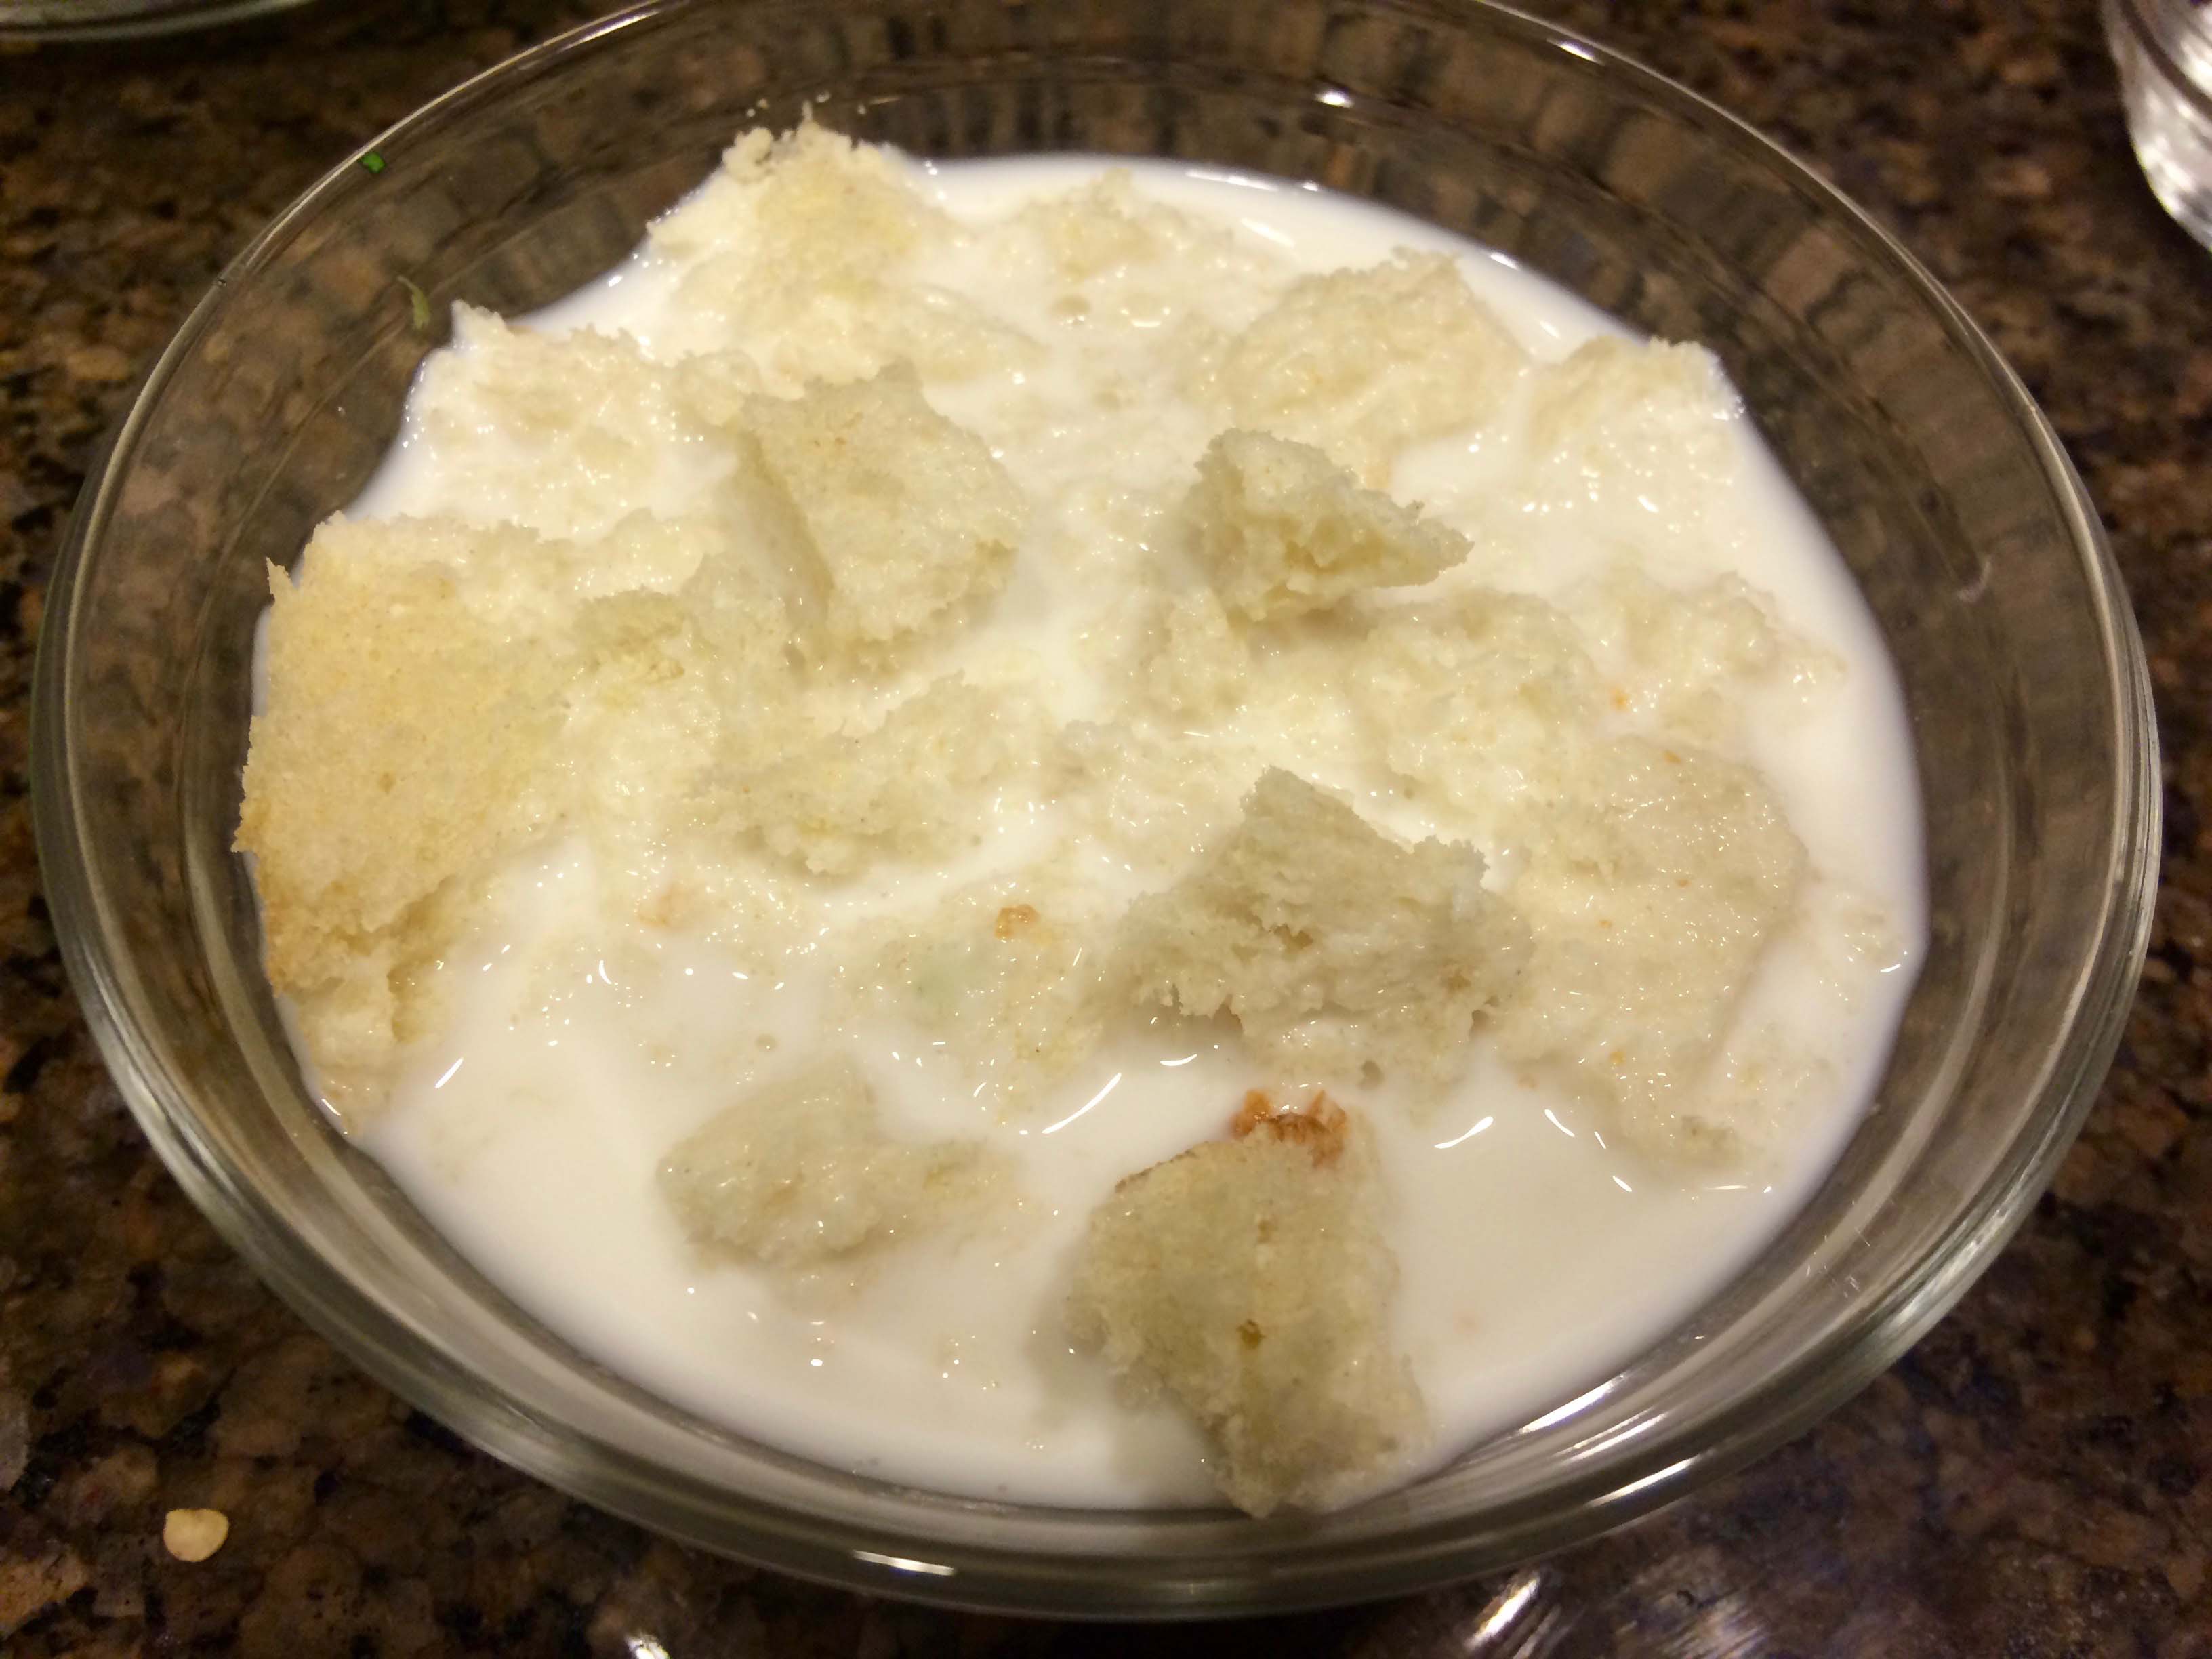
3 – In a small bowl soak the fresh bread crumb in the milk.
Soaking the bread
As soon as the bread is saturated with the milk, squeeze it out gently in your hand and add it to the onion mixture, working it until combined.
Adding bread to onion mixture
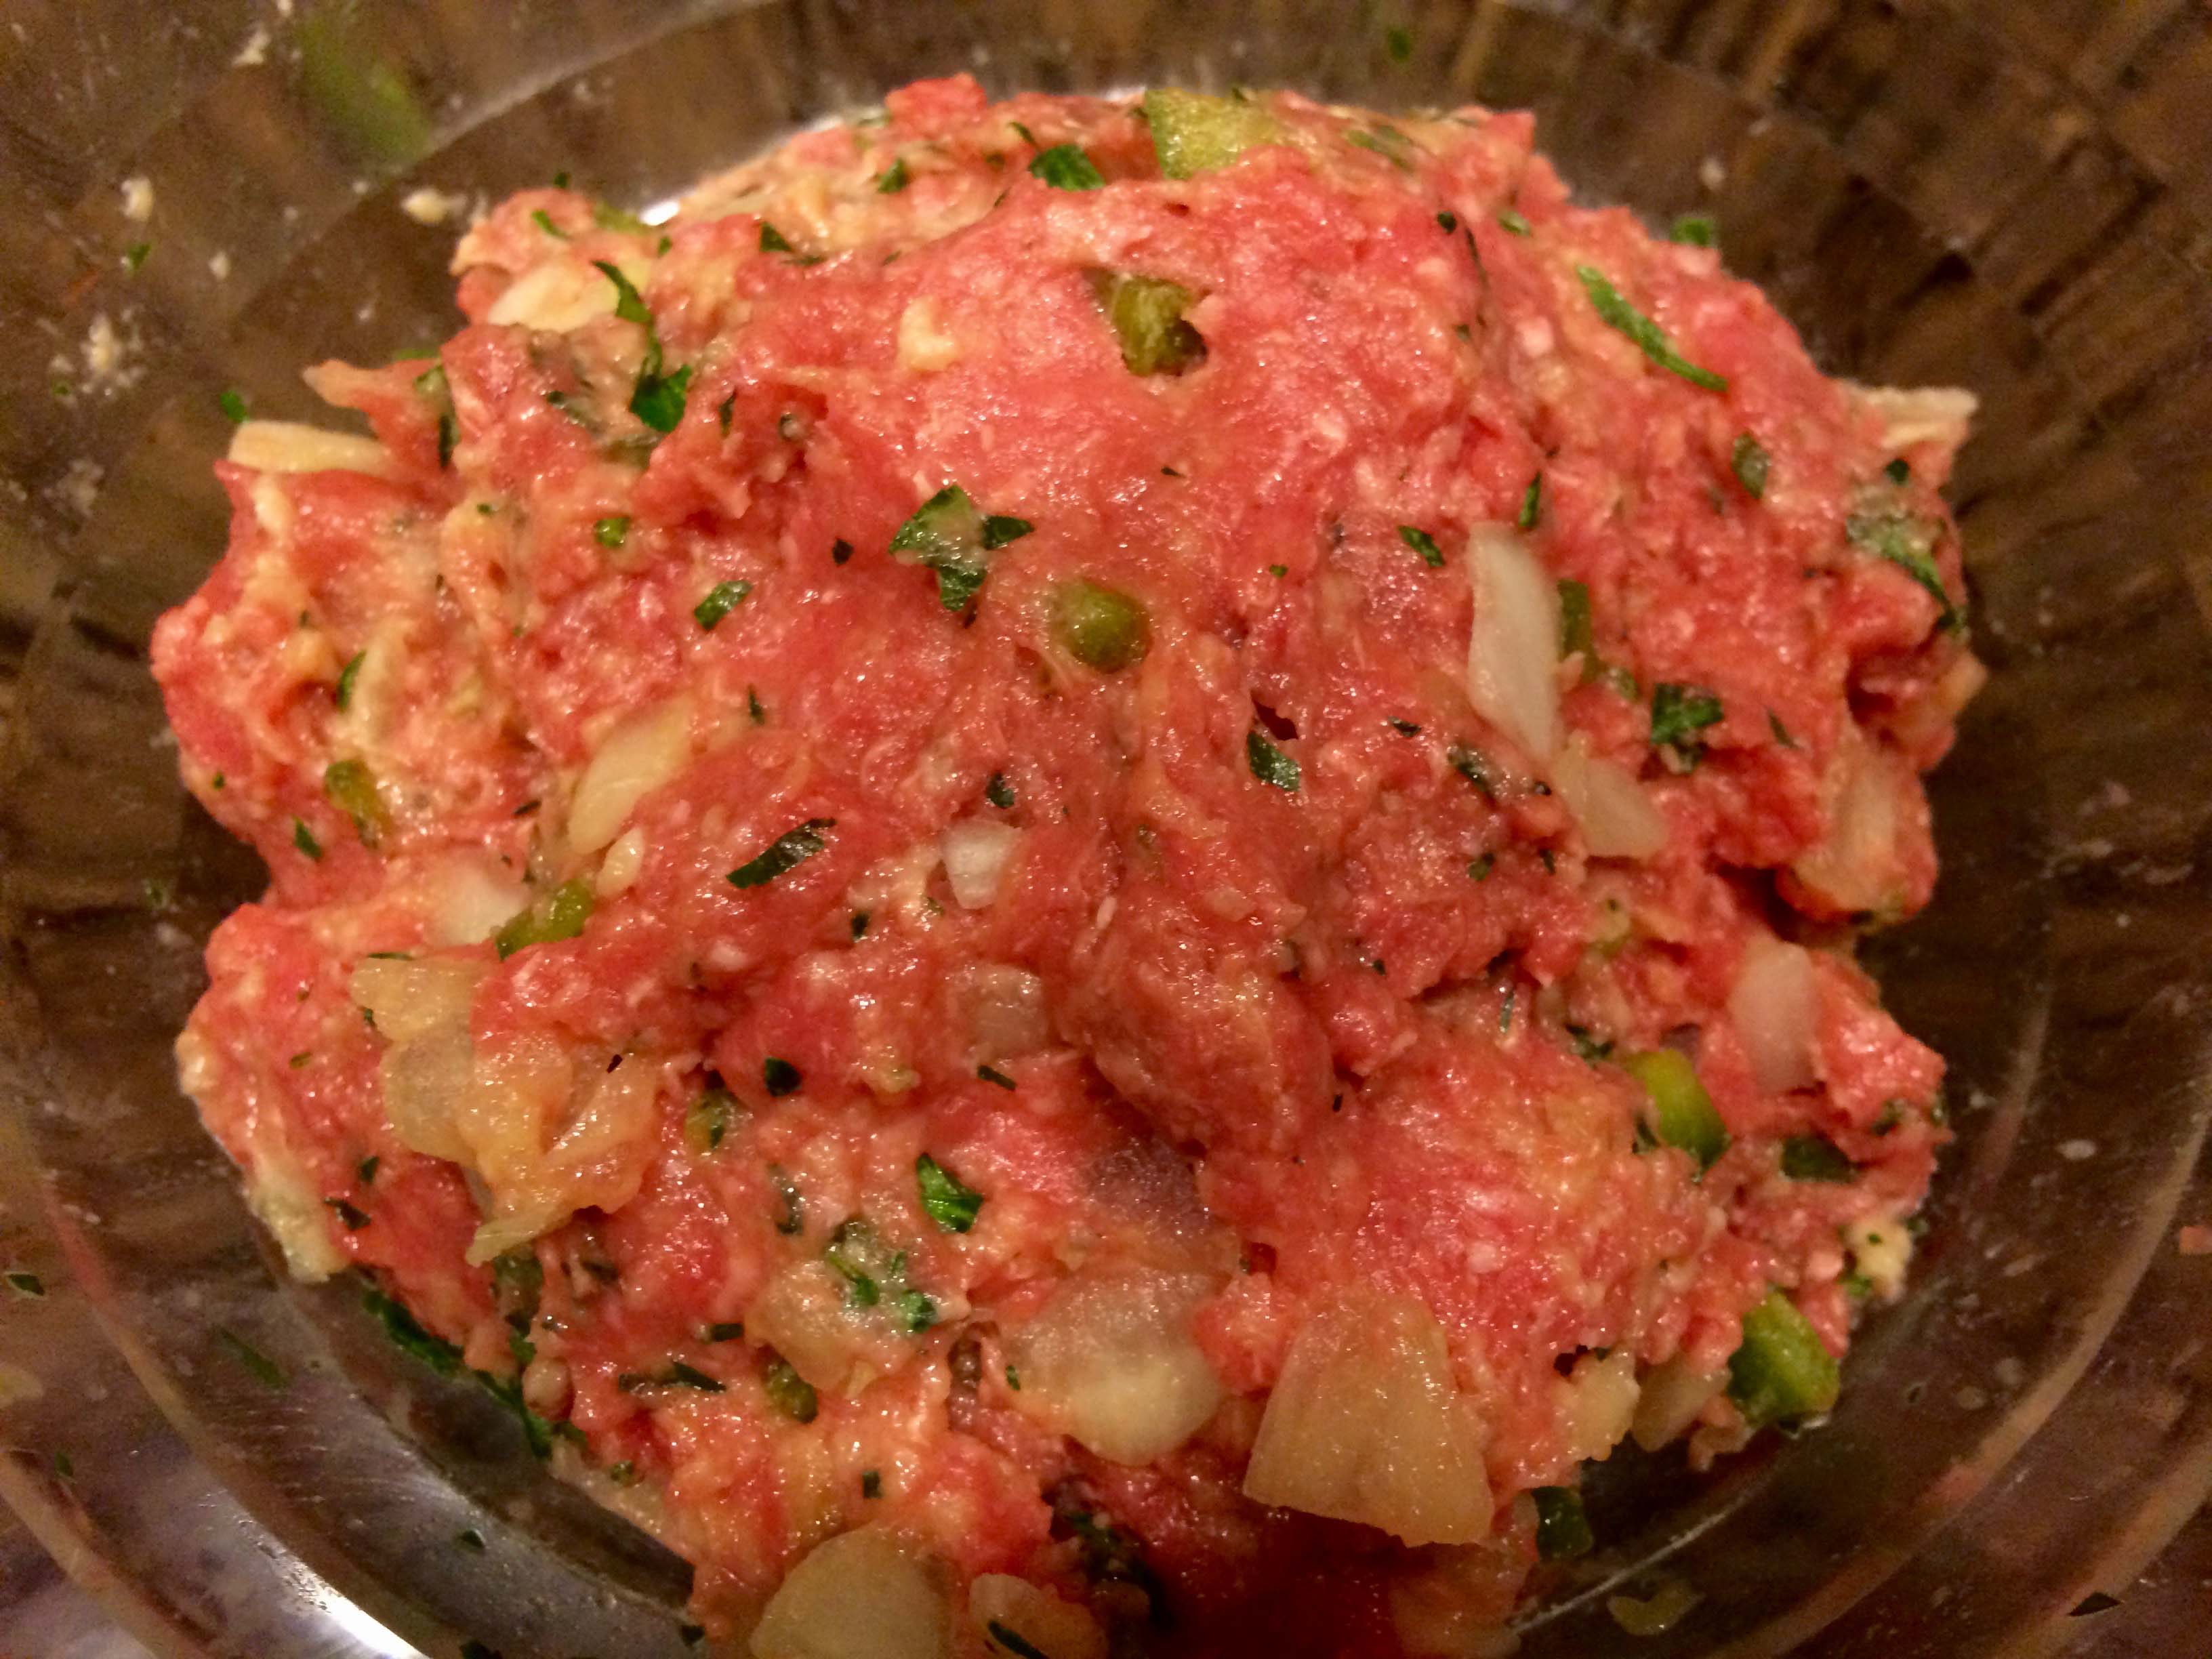
4 – Add the ground chuck, egg, and salt, kneading the mixture very gently with your hands.
Gently kneaded meat
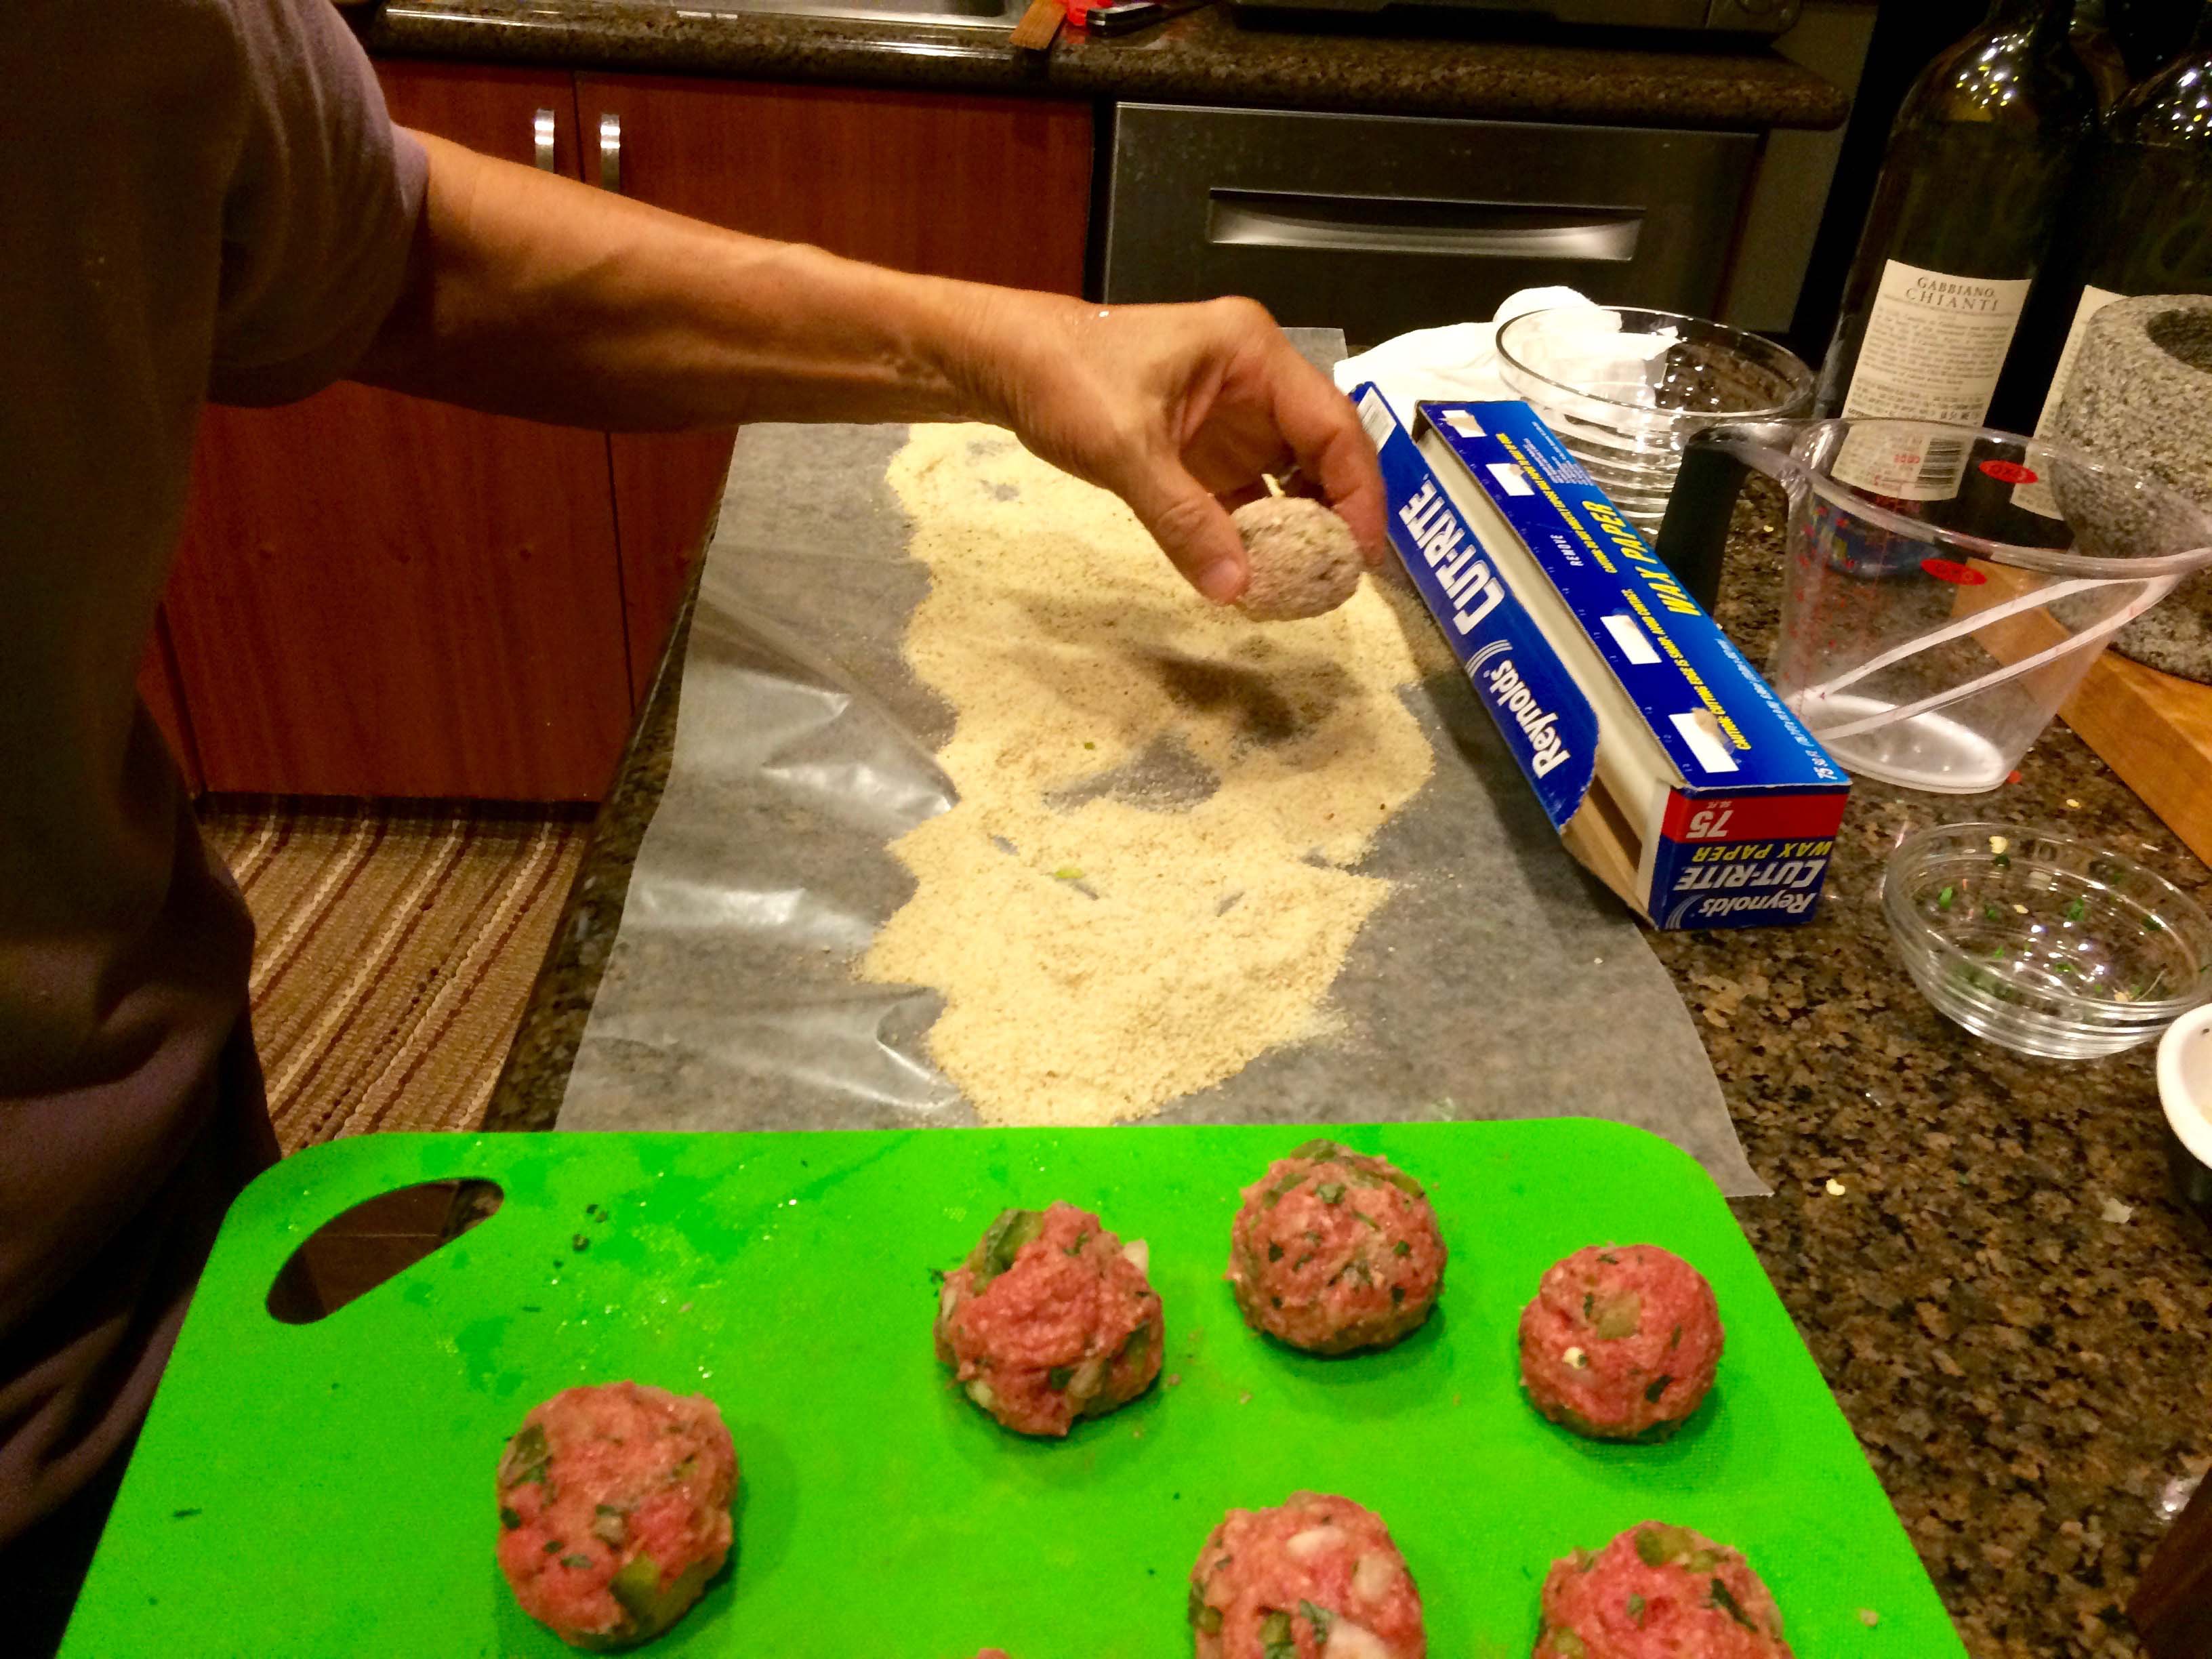
5 – Pull off a piece of the meatball mixture about the size of a very small egg and shape it in your hands into a ball, being careful not to squeeze it too hard.
Shaped meatballs
6 – Roll the meatball in the bread crumbs. Pull off another piece of the meat mixture and repeat the procedure until you have used all of it and the balls have been rolled in bread crumbs.
Breading meatballsThe breaded lot
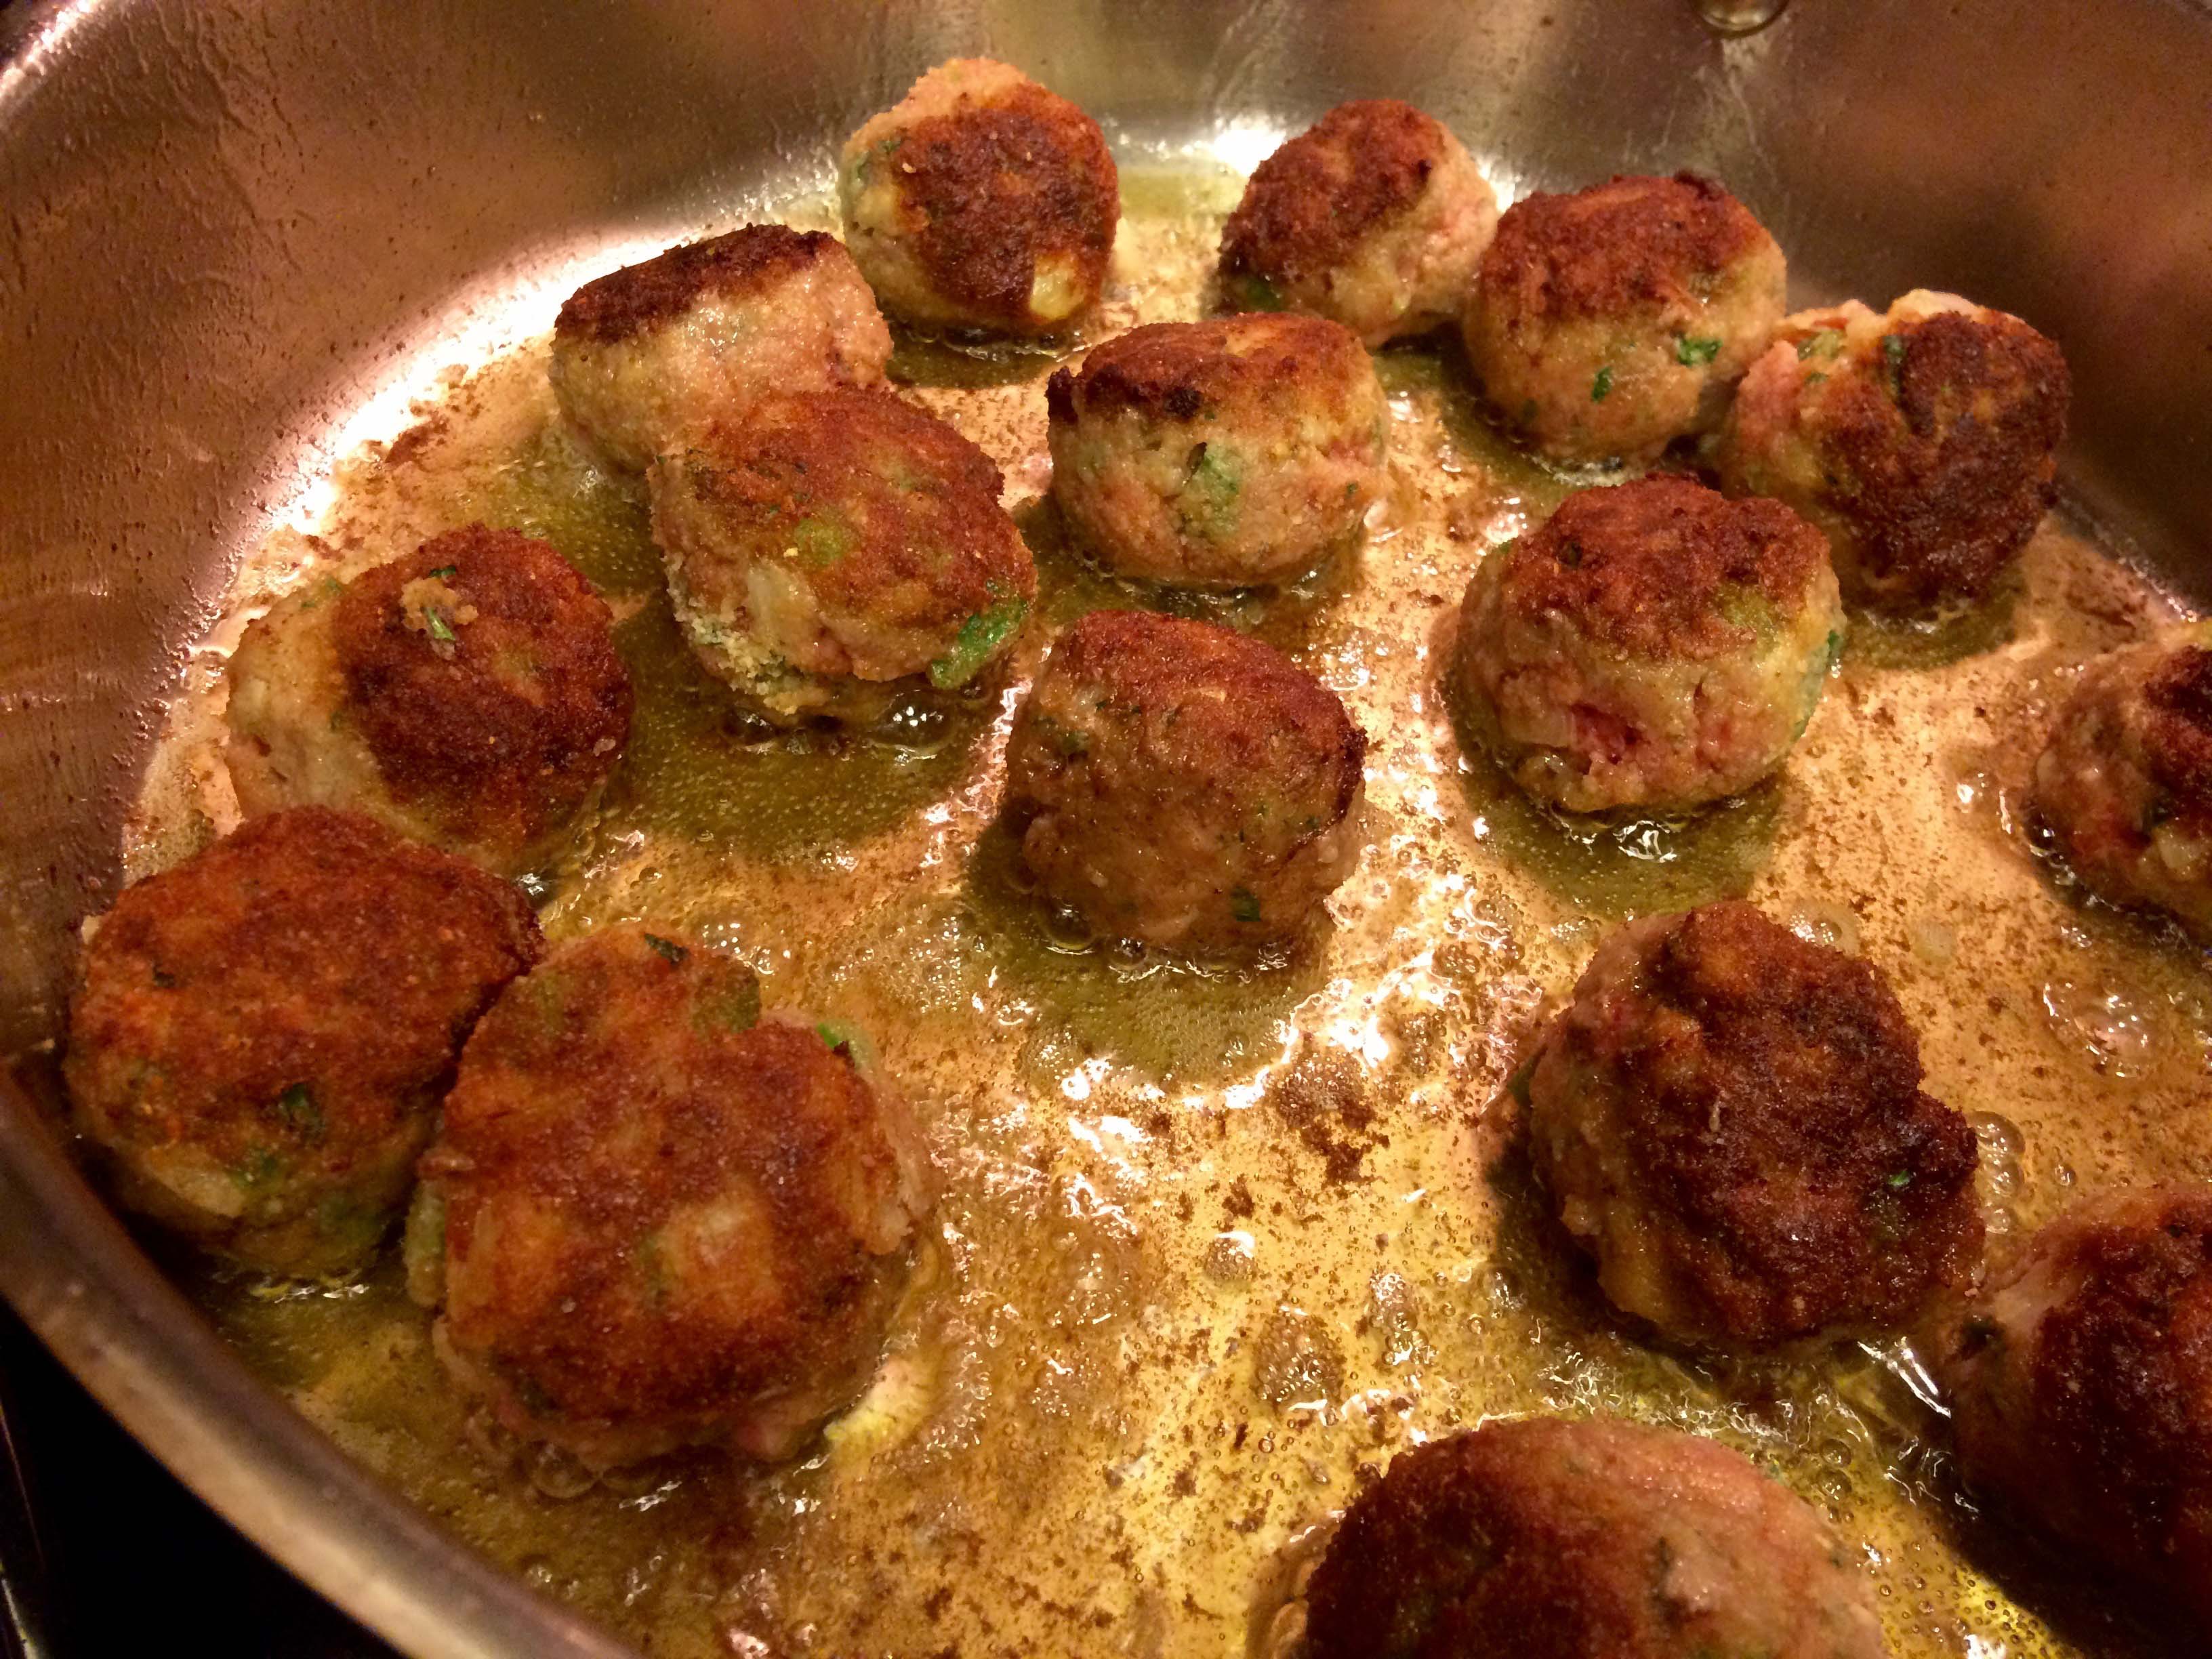
7 – Pour the oil into a 12-inch skillet and turn the heat on to high. When the oil is hot, slip in the meatballs. Brown them to a dark color on one side, then turn them to do the other side. Do not turn them more than once. If the meatballs do not fit into the pan in a single uncrowded layer, do a batch at a time. When you have browned them all, put the meatballs into the pan before continuing. (I used a little more oil than called for in the recipe, but removed it after the meatballs were browned.)
Browning the meatballs
8 – Add the peppers with a little bit of salt, turn the contents of the pan over using a wooden spoon and a light touch, lower the heat, and cover the pan.
Adding the peppers
You have a choice of how long to continue cooking. If you want the peppers to star—that is, if you would like them to maintain enough of their shape to show on the plate—cook them just until a fork slips easily into them, about 10 minutes. If you think that you may enjoy them more as a sauce, and a very tasty sauce it would be, just continue to cook them until they begin to dissolve. When the peppers are done to taste, transfer the contents of the pan to a warm platter and serve at once.