Roast Chicken

chickplatedsmall

Roast chicken has to be one of my favorite poultry dishes. However, for a weeknight dinner roasting a whole bird may be a little too time consuming. That’s one of the reasons why I use Dave Lieberman’s recipe “Dad’s Roast Chicken My Way.” Lieberman somehow disappeared from the Food Network, but his easygoing approach to cooking was a welcome alternative to some of the network’s more flamboyant stars.

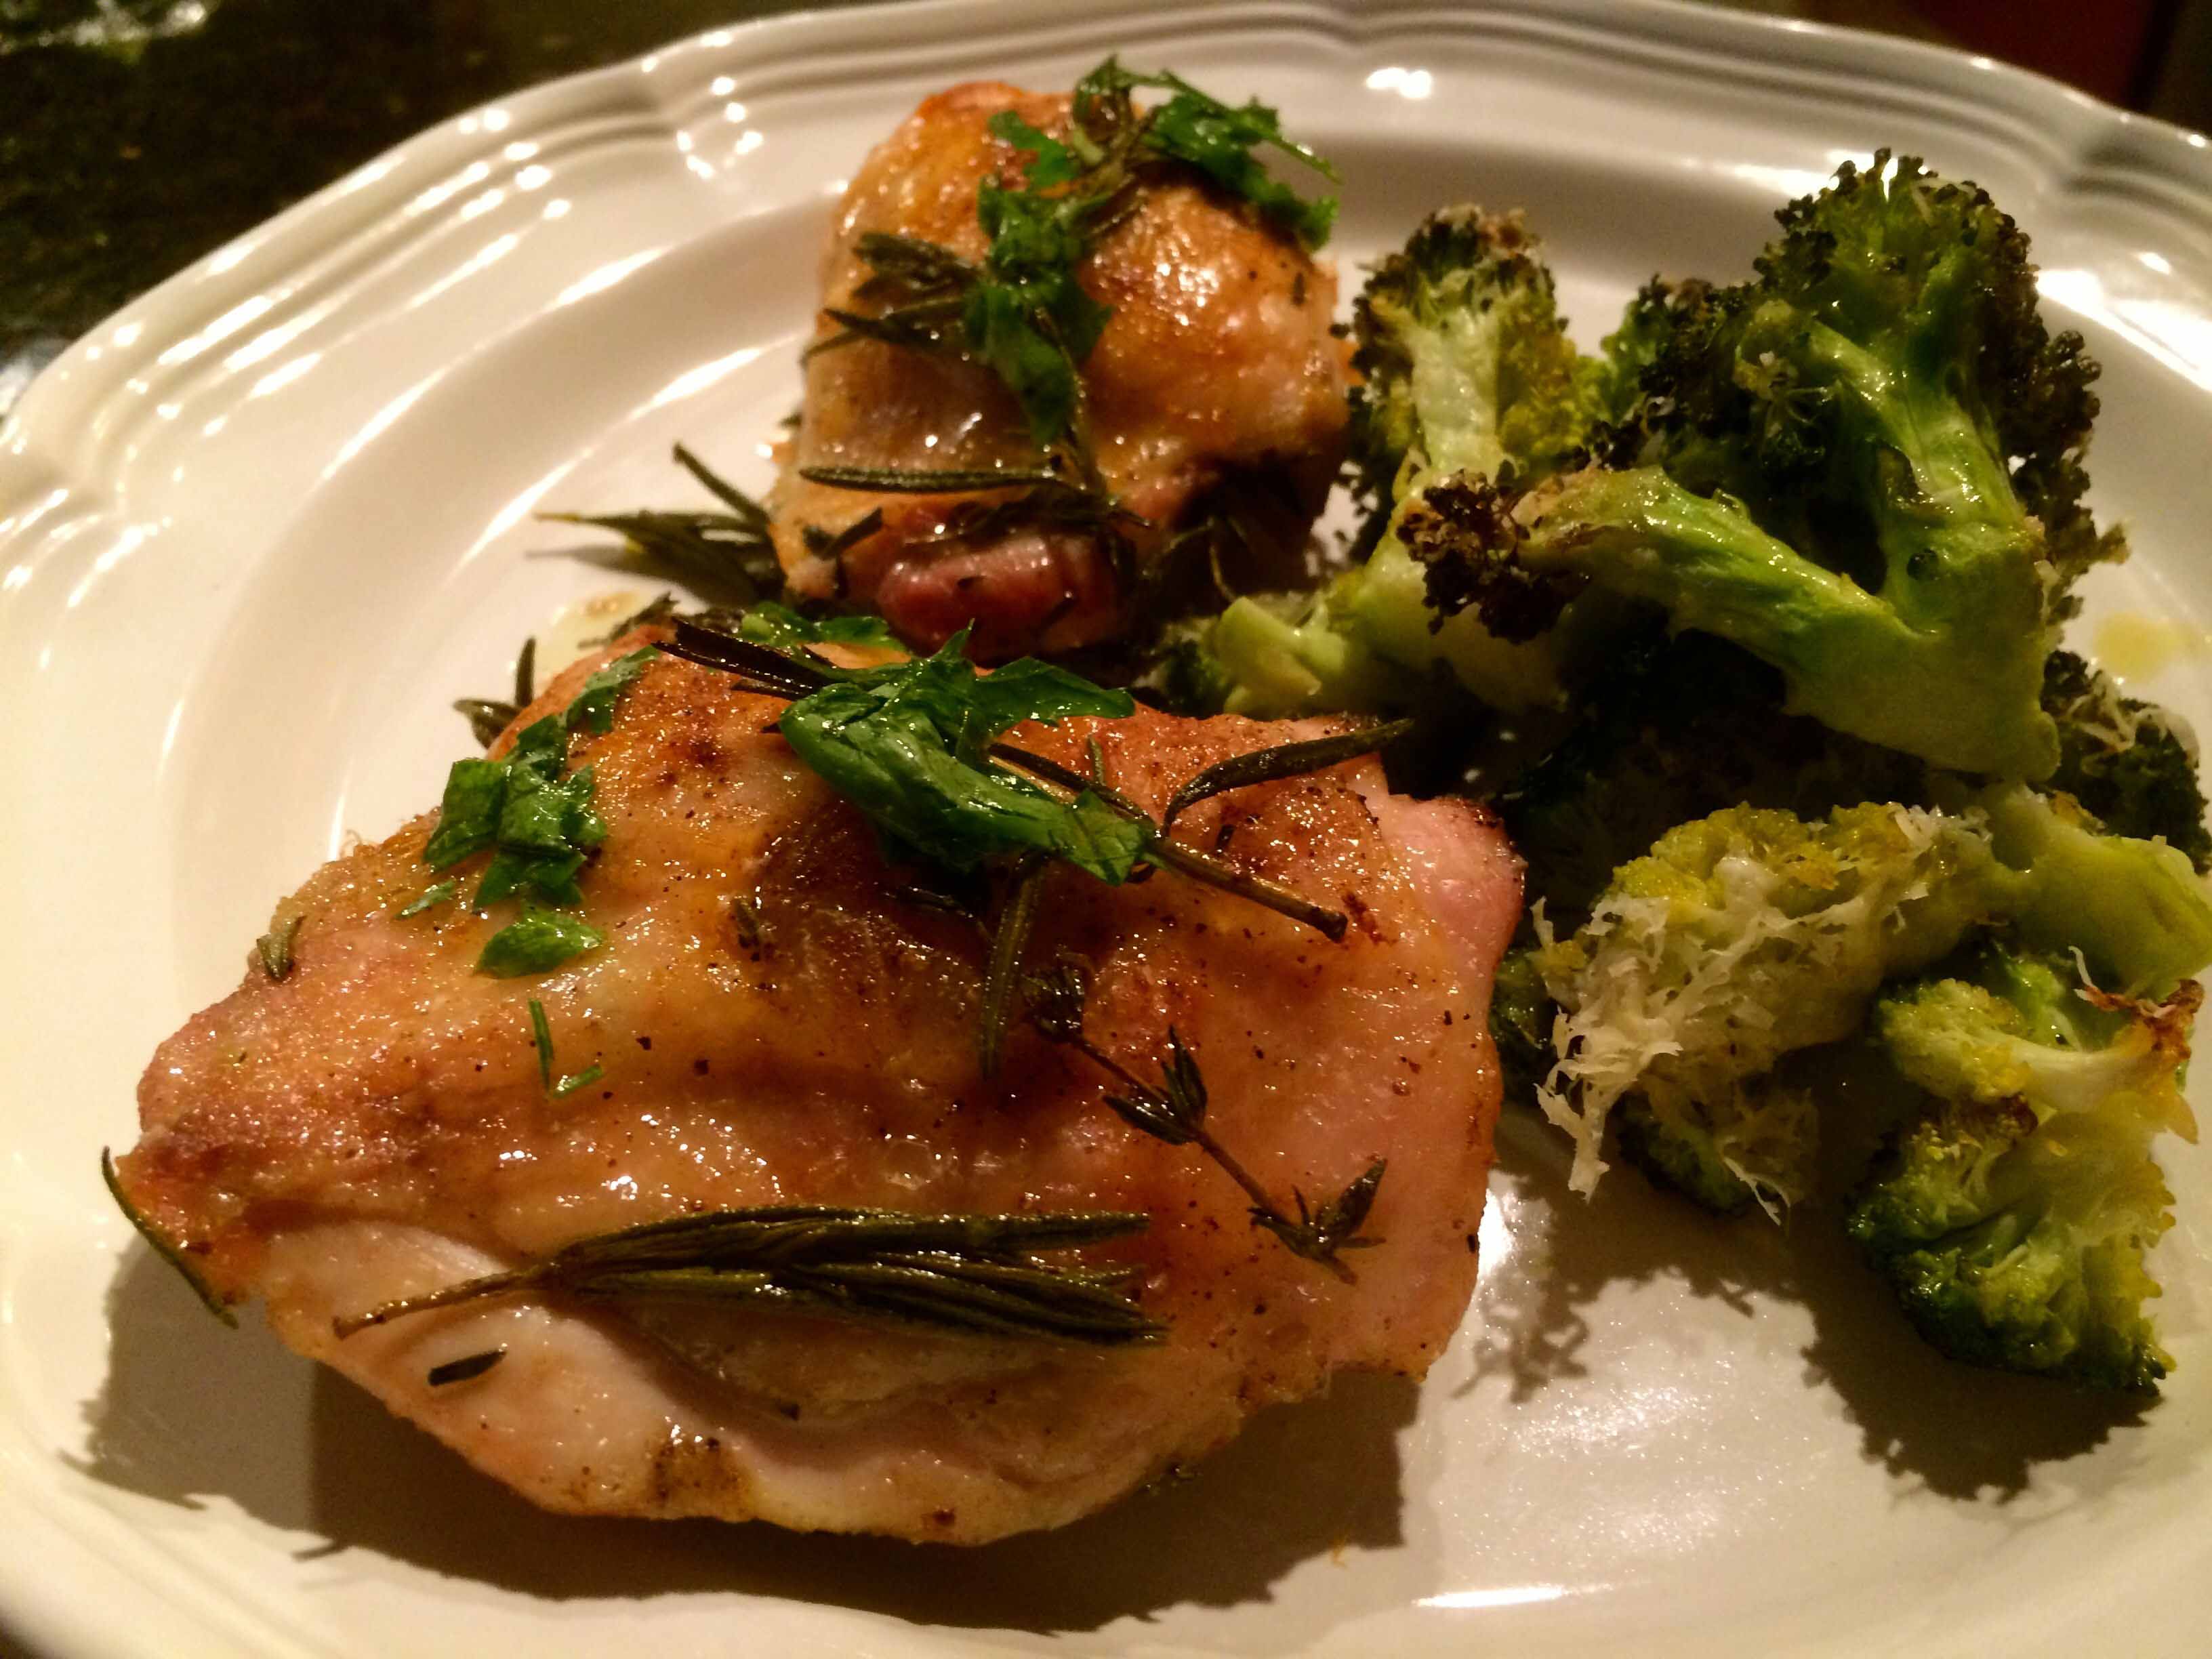
Over the years, I’ve tweaked this recipe adding a little ground cumin to the seasoning, upping the amount of herbs, and sprinkling the skin with some paprika for added color. But my major change is substituting skin-on, bone-in thighs for the chicken pieces. In my opinion, thighs are the tastiest parts of the chicken.

I like to serve this dish with roasted broccoli.

Also, take the time to make the olive oil drizzle. Just a little adds a lot of flavor to the chicken, especially if you don’t enjoy eating the skin.

Dad’s Roast Chicken My Way Adapted from The Food Network

Ingredients
For the chicken:
1 (3 1/2-pound) chicken cut in 8 serving pieces (I use thighs.)
Kosher salt and freshly ground black pepper
Ground cumin
5 sprigs fresh rosemary
5 sprigs fresh thyme
Olive oil, for drizzling
Zest of 1 lemon
Paprika

For the parsley drizzle:
1/2 bunch parsley
1/2 cup extra-virgin olive oil
1/2 lemon, juiced
Kosher salt and freshly ground black pepper

Directions
Preheat the oven to 400 degree F.

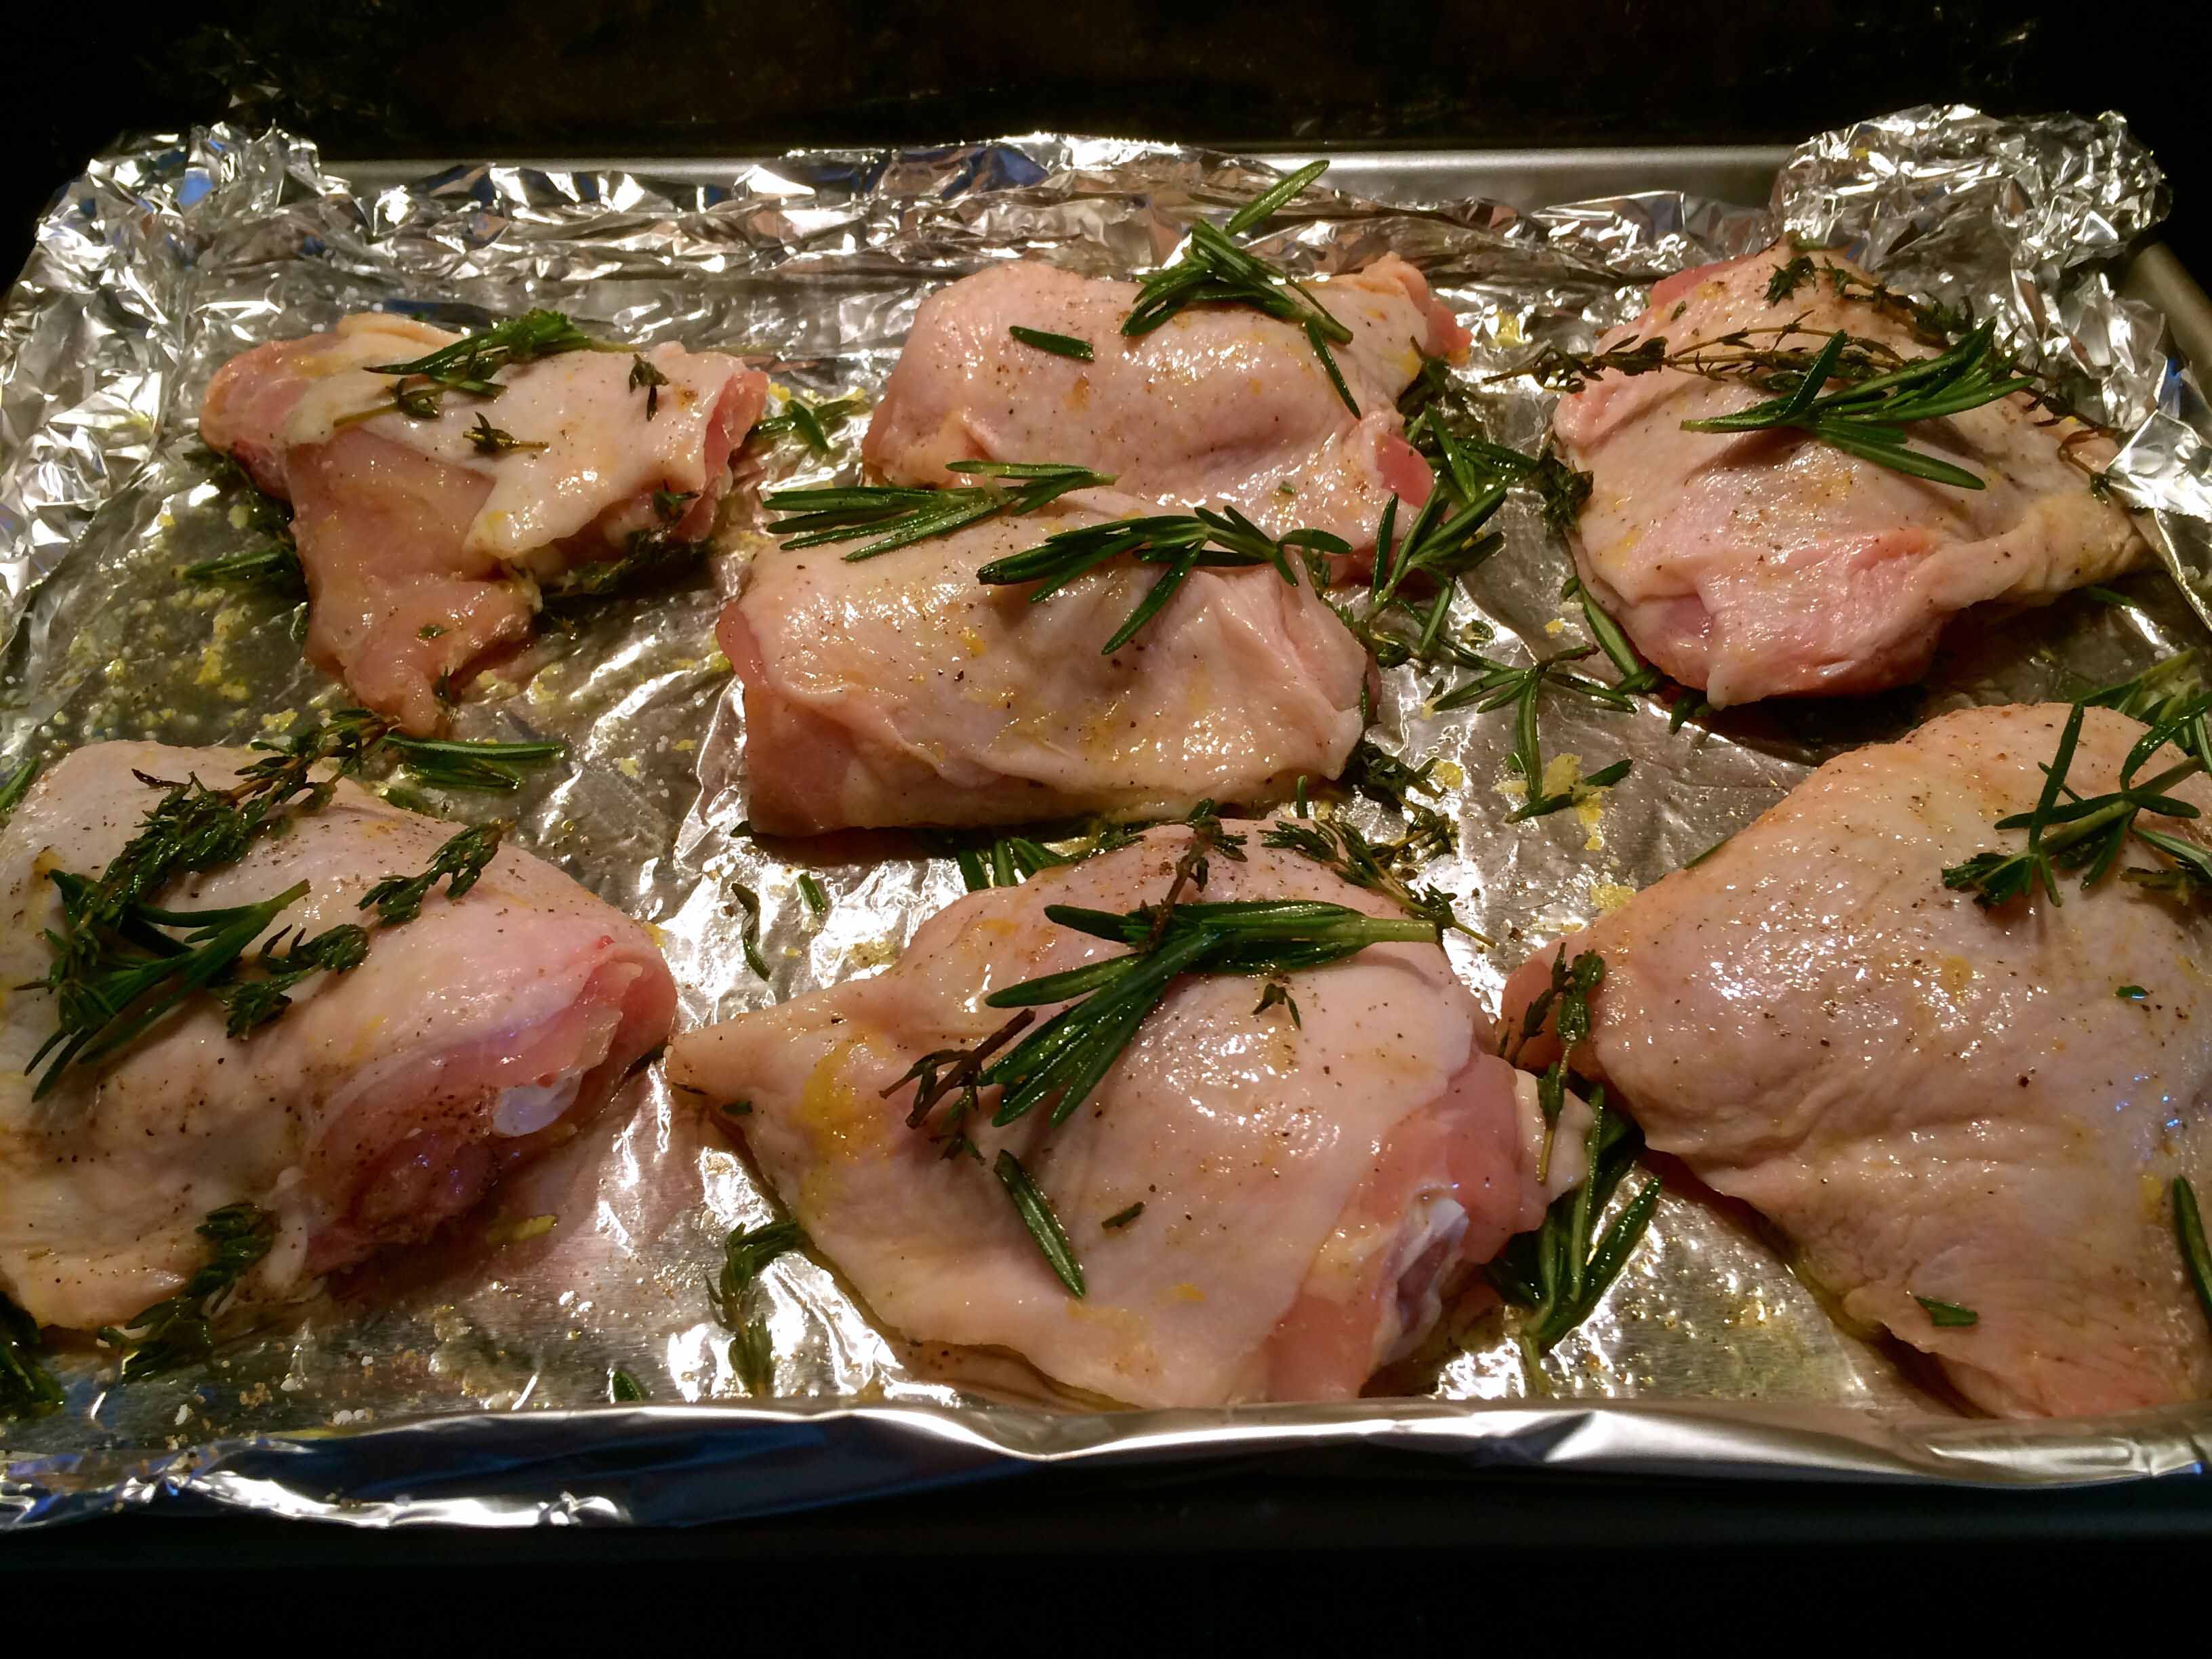
Trim off any excess skin or fat from the chicken. Cut off and discard the wing tips. Place the chicken pieces in an 11 by 13-inch baking pan lined with foil, or any pan that that they fit in without crowding.

Season the chicken pieces generously with salt, pepper, cumin olive oil, the herbs, and the lemon zest. Toss through all the seasonings and then arrange the chicken piece skin side up in the pan. Allow to marinate for 30 minutes at room temperature. (You can season the chicken pieces and set them up in the roaster up to a day before you cook them. Cover the pan with plastic wrap and refrigerate.)

Chicken marinating
Chicken marinating

Roast until the skin is nicely browned and there is no pink near the thigh bone and the juices run clear, about 35 to 40 minutes. Check both white meat and dark meat. If the white meat is done before the dark meat, take it out and set it on the serving plate until the dark meat is done.

For the parsley drizzle, wash and dry the parsley. Remove the leaves from the stems and chop the leaves finely. Combine the remaining ingredients in a bowl and use immediately to garnish the roast chicken.

Wine Pairing: Chablis, un-oaked Chardonnay, Pinot Noir


Pizza Margherita Redux

pmsundaysmall

Last night saw another pizza Margherita from my kitchen. On a quest to improve what’s already a good pizza, I keep trying different flours, kneading times, cook times, and the like. Yesterday’s attempt involved a change of ovens.

For quite some time now, I’ve been relying on my Breville Smart Oven for baking pizza. It does a very good job, especially with the help of a pizza stone. But the more I read on the subject, I’m finding that cooking temperature plays a key role. Every pizza enthusiast dreams of having a wood-burning oven that can reach an ideal temperature between 700°F to 750°F; but for most of us having one will more than likely only remain a dream.

Before baking
Before baking

So last night, following my favorite pizza recipe from Lynne Rossetto Kasper’s The Italian Country Table, I used the lowest shelf of my oven with a pizza stone and baked the pizza at 500°F. The higher temp made a difference not only in the cooking time, but in the texture of the dough. The cooking time was reduced by 5 minutes and the dough definitely had more chew.

What I’m looking for now is more height to the pizza, those “bubbles” in the crust that you get from cooking in a wood-burning oven. If any of you have any suggestions, please let me know.

Here’s a link to the Pizza Recipe.

Wine Pairing: Montepulciano d’Abruzzo

Barbecued Baby Back Ribs

ribsplatedsmall

For us, Friday often means “Margarita Madness.” Consequently, frozen margaritas dictate the menu, which often means something other than Italian and, more than likely, something along the lines of grilled meat, Tex-Mex or, as we enjoyed last night, barbecue.

I wanted pork ribs with meat falling off the bones, which meant either slow-cooking or pressure-cooking. Given my schedule, I opted for the latter. One of my go-to books for pressure cooking is Pressure Cooker Perfectionfrom America’s Test Kitchen, which is where I found a great recipe for Barbecued Baby Back Ribs.

When I went to the butcher, he was actually butchering a pig. He said he could only provide me with a small rack of baby backs so I opted for standard pork spare ribs to have enough for our party.

ribsrawsmall
Local sourced pork ribs

One gripe I have with the book I used is their highlighting the pressure cooking time in the recipe, which was 30 minutes. It leads one to believe that it’s a 30-minute recipe, when in fact it’s more like a 60 minute one. Lesson learned, at least for now: READ THE ENTIRE RECIPE BEFORE STARTING TO COOK!

When I cook, I like to have all the prep completed. I’ve therefore modified the book recipe to follow my style of cooking.

This recipe yielded some of the most mouth-watering ribs I’ve ever had, with a sauce that was the perfect balance of sweet, spicy, and savory. Neither the generous dry nor and the ketchup-molasses sauce overpowered the succulence of these local sourced ribs.

Unbuttered corn on the cob was the side.

Barbecued Baby Back Ribs Adapted from Pressure Cooker Perfection

Ingredients
3 tablespoons paprika
2 tablespoons packed brown sugar
2 teaspoons chili powder
Salt and pepper
1/4 teaspoon cayenne pepper
2 (1 1/2-to 2-pound) racks baby back ribs, cut into 2-rib sections
1 tablespoon vegetable oil
1 onion, chopped fine
2 garlic cloves, minced
1 cup ketchup
1/2 cup water
1/4 cup molasses
2 tablespoons cider vinegar
2 tablespoons Dijon mustard

1. Prepare Dry Rub: Combine paprika, sugar, chili powder, 1 teaspoon salt, 2 teaspoons pepper, and cayenne, then rub mixture evenly over ribs.

2. Prepare Sauce: Combine ketchup, water, molasses, vinegar, and mustard. Measure out and reserve 1 cup sauce.

3. Heat oil in pressure-cooker pot over medium heat until shimmering. Add onion and cook until softened, about 5 minutes. Stir in garlic and cook until fragrant, about 30 seconds. Add the sauce, except for the reserved cup, and stir.

4. Arrange ribs upright in pot with meaty sides facing outward, then pour reserved sauce over ribs.

5. Lock pressure-cooker lid in place and bring to high pressure over medium-high heat. As soon as pot reaches high pressure, reduce heat to medium-low and cook for 30 minutes, adjusting heat as needed to maintain high pressure.

6. Remove pot from heat and allow pressure to release naturally for 15 minutes. Quick release any remaining pressure, then carefully remove lid, allowing steam to escape away from you.

ribscookedsmall
Ribs right after cooking

7. Adjust over rack 6 inches from broiler element and heat broiler. Place wire rack inside aluminum foil-lined rimmed backing sheet and spray with vegetable oil spray. Transfer ribs, meaty side up, to prepared baking sheet. Using large spoon, skim excess fat from surface of sauce. Bring sauce to simmer and cook until thickened and measures 2 cups, about 10 minutes. Brush ribs with some of the sauce, then broil until browned and sticky, 10 to 15 minutes, flipping and brushing with additional sauce every few minutes. Serve ribs with remaining sauce.

ribsglazedsmall
Ribs sauced before going under the broiler

Farfalle with Sun-Dried Tomatoes and Arugula

farfalletom1small

I needed a pasta course last night that would be perfect for dining al fresco. Wanted something light yet flavorful. My search led me to Molto Bataliby Mario Batali, where I found the recipe below for Farfalle with Sun-Dried Tomatoes and Arugula.

Farfalle with Sun-Dried Tomatoes and Arugula Adapted from Molto Mario.

1/4 cup extra virgin olive oil
6 garlic cloves, thinly sliced
10 oil-packed sun-dried tomato halves, thinly sliced
1/4 cup dry white wine
2 tablespoons salt
1 1/2 pounds farfalle pasta
4 cups (about 5 ounces) baby arugula, trimmed

Bring 8 quarts of water to boil in a large pasta pot.

While the water is heating, heat the olive oil in a 14-inch sauté pan over medium heat. Add the garlic and cook until light golden brown. (I added my thinly sliced garlic to the cold oil. I watched it carefully, stirring occasionally so that the garlic would cook slowly and not get overly browned. If your garlic should burn, start over.)

Add the sliced sun-dried tomatoes and the wine to the oil and garlic, and bring to a boil to create your sauce. Remove from the heat.

Add the salt to the boiling water. Drop the farfalle into the boiling water and cook for 1 minute less that the package instructions indicate. Just before the pasta is done, carefully ladle 1/4 cup of the pasta water into the sauté pan containing the sauce.

Drain the pasta in a colander and add it to the pan containing the sauce. Add the arugula and toss well. Over medium heat, toss again for about 30 seconds, until the pasta is nicely coated, and then pour into a warmed serving bowl.

Serve immediately.

This recipe serves up to 10 as a first course or 6 as a main. If you are only making only a pound of pasta, I would not reduce the ingredients for the sauce.

farfallecheesesmall

We ended our meal with the some fresh cherries and Pecorino Romano Genuino. The term “genuino” can only be used for Romano produced in Lazio, the province of Rome. I find it a bit milder and more flavorful than other types of pecorino Romano.

Our dinner wine was a delicious chilled Chiaretto Valtenesi from producer Pasini San Giovanni, a blend of Groppello, Marzemino, Barbera and Sangiovese.

Wine Pairing:  Dry Rosé.

Grilled Steak

steak6192small

I’m a steak lover: sirloin, flank, t-bone, skirt, NY-strip, almost any cut will make me happy. In my wanton middle age, I used to indulge in steak several times a week. Now, in my sixties, it’s maybe once a week. Alas, I’ve grown heath conscious.

I cook my steaks simply. Rarely do I use marinades or rubs, and when I do, it’s only for a flank or skirt steak. I also prefer to use locally raised beef and, when possible, go for grass fed. Granted, in NYC “locally” may be farther away than in other locations.

Limited to a small outdoor electric grill on the terrace, I prefer to use a two-burner grill pan. I take the steaks out of the fridge about an hour before cooking and let them come to room temperature.

While heating the grill pan, I dry the steaks with paper towels and season them liberally on one side with coarse salt and freshly ground black pepper, followed by a drizzle of olive oil.

When it’s hot, I lightly oil the grill and place the steaks, seasoned side down, near the center of the pan so that they are not directly over the burners. I press down firmly on the steaks to ensure that they are in full contact with the grill and get some grill marks. Note that this is the only time I press on the meat. At this point, I season the other side as I did the first with coarse salt and black pepper.

steak6193small

I cook the steaks for about 1 minute on high to sear them and then reduce the flame to medium. I do not move the steaks at all during cooking. Let the grill do its work.

After 6 or 7 minutes for a 1.25” strip, aiming for medium rare, I turn the steaks and return the heat to high for one minute. I then reduce the heat to medium and continue to cook for about another 6 or 7 minutes, using the last minute to brown the fat on the side of the steaks. Of course, grilling times will vary depending on the thickness of the steaks and the desired level of doneness.

steak6191small

I remove the steaks from the grill, place them on heated plates, tent with foil and let them rest for about 3 minutes.

That’s it. I eschew making or using any sauce for steak since I find that it masks the true flavor of good local raised beef. I do, however, drizzle the steaks with a high quality extra virgin olive oil, for a touch of unctuousness.

For sides as well, I keep them as simple as possible. Baked potato with olive oil and lemon; maybe some steamed spinach. A lightly dressed arugula salad finishes the meal.

Wine Pairing: Cabernet Sauvignon, Syrah, Valpolicella Ripasso


Gamberi Oreganati

shrimparregsmall

For a rather warm spring-into-summer evening, I wanted something quick, easy, and light. Tuesday’s a fish day for us, so I thought some kind of shrimp dish might fit the bill. I found the perfect recipe in The Southern Italian Tableby Arthur Schwartz: Gamberi Oreganati.

All too often, Italian restaurants serve oreganato dishes (scampi, clams, etc.) on sizzling platters, reeking of burnt garlic, covered with greasy bread crumbs, and overwhelmed with herbs. This recipe, however, shows the more austere side of southern Italian, with large shrimp baked in a crunchy crust of lightly seasoned breadcrumbs. The restrained use of olive oil, finely minced garlic, and dried oregano allows the flavor of the shrimp to come through the crisp breading.

Gamberi Oreganati
Shrimp Baked with Flavored Bread Crumbs from The Southern Italian Table by Arthur Schwartz
Serves 2 to 3

1/3 cup fine dry bread crumbs
1/2 teaspoon salt
1 large garlic clove, very finely chopped (about 1 teaspoon)
1 teaspoon dried oregano
1/8 teaspoon hot paprika
1 tablespoon extra-virgin olive oil
1 pound cleaned large or jumbo shrimp (20 to 24 to the pound)
Lemon wedges

Place a rack on the top rung of the oven. Preheat the oven to 400° F.
Combine the bread crumbs, salt, garlic, oregano, paprika, and olive oil in a large mixing bowl. Stir well.
Add the shrimp to the bowl and toss until all the shrimp are coated with crumbs.
Arrange the shrimp in a single layer in a 10-inch baking pan or on a baking sheet. Sprinkle with the remaining crumbs.
Bake for 12 to 14 minutes, until the shrimp are cooked through.
Serve immediately with lemon wedges.

Wine Pairing: Fiano di Avellino, Falanghina, Pinot Grigio

Chicken Braised with Porcini Mushrooms

newpoloporcinismall

Being somewhat of an impulse shopper, I managed to amass quite a stash of dried porcini, woodsy dried mushrooms that, when rehydrated, impart loads of flavor to a dish. Although these mushrooms have a good shelf life, they won’t last forever. To their rescue, another recipe from Giuliano Hazan’s Every Night Italian: Chicken Braised with Porcini Mushrooms.

Rather than cutting up a whole chicken as called for by the recipe, I used only thighs. The chicken is browned on all sides and then braised with sautéed thinly sliced onions, chopped pancetta, re-hydrated dried porcini, tomatoes, parsley, and the mushroom soaking liquid for 40-45 minutes with the pan cover slightly askew. This makes for a thick rich sauce with deep mushroom flavor.

Here’s a link to the recipe online. Chicken Braised with Porcini Mushrooms.

Wine Pairing: Rosso di Montalcino

A Date for Baked Ziti

bakedzitismall

Every so often, my menu is determined not by choice but by one or more expiration dates. (Alas, I remember when the dates that influenced my cooking were of a more romantic variety.) But getting back to the present: Looking in the fridge, I found some mozzarella leftover from pizza making last weekend and some ricotta that I had purchased for eggplant involuting about a week ago. Both were soon approaching their best used by date and there was about 8 ounces of each—too much to throw out without feeling guilty.

Growing up Italian, the two typical ways of putting leftovers to work were frittatas or pasta. Last night, I opted for the latter and decided to make some baked ziti.

I preheated the oven to 350°F .

Next, I made a 20-minute marinara sauce with a small clove of garlic, olive oil, crushed tomatoes, basil, salt and pepper. I minced the garlic and added it to the pan with 2 tablespoons of olive oil and some salt and pepper. I sautéed the garlic for a few minutes, until it was aromatic but had not taken on any color. Next, I added about a teaspoon of chopped basil and sautéed that with the garlic for about 30 seconds and then added a 16 ounce can of chopped tomatoes. I brought this to a simmer over medium heat and let the sauce simmer uncovered over low for about 15 minutes.

As the sauce was cooking, I added an egg yolk to the ricotta, together with some Pecorino-Romano (1/4 cup), chopped fresh basil (1 tablespoon) and a little salt and pepper. I beat this mixture with a spoon until it was creamy.

Meanwhile, I cooked some left over whole-wheat penne, about 8 ounces, that had also been around a tad too long, to about a minute before the al-dente stage.

When the pasta was done, I transferred it to the ricotta mixture and stirred it until well coated.

I then placed a few spoonfuls of the tomato sauce on the bottom of a small baking dish. I followed this with a layer of half of the pasta and ricotta mixture. Over this layer, I spread about half of the sauce and about 3 ounces of mozzarella which I pulled into chunks from the ball. Over the top of this layer, I grated some pecorino. I repeated this process to form a second layer ending with the mozzarella, grated cheese, and a light drizzle of olive oil.

I placed this in a 350°F oven and baked for 30 minutes. After removing it from the over, I let it rest tented with foil for 10 minutes before serving.

bakedziti2small

Keeping with the left-over theme, our wine was a half bottle of Chianti.

Would enjoy hearing how my readers use up their about-to-expire ingredients.

Asian Grilled Salmon

asiangrilledsalmonsmall

Friends are always surprised when I cook something other than Italian. But once in a while, a little change is good.

Tuesday is typically a fish night for us, and we hadn’t had salmon in quite some time. So I turned to one of my go-to recipes for it: Ina Garten’s Asian Grilled Salmon. (The link will take you to the recipe.) It’s perfect for a weeknight meal, with minimal prep and maximum flavor.

Salmon fillets marinate for around 10 minutes in a blend of olive oil, soy sauce, Dijon mustard, and minced garlic. Half the marinade is reserved for a sauce. Rather than mincing the garlic, I use a microplane rasp and also add some rasped fresh ginger.

The fish grills for about 4 to 5 minutes a side and is served with the reserved marinade.

As a side, I prepared a quick cooking couscous tossed with some cherry tomatoes, chopped basil, zahtar, and olive oil.

When you don’t have a lot of time and want something homemade, this salmon and side can be on the table in under an hour.

For wine, I chose a 2013 Mille Sauvignon Friuli Grave DOC. Not as grassy as some new-world entries, it’s fresh and crisp with good citrus notes. At around $17 for a liter bottle, it’s a wonderful value.

sauvignonblancmillesmall


Eggplant Involtini

involtiniplatedsmall

Perhaps the only way I can justify subscribing to so many cooking magazines is to occasionally cook from them. After some pretty hearty meals over the past few days, I decided to look for a vegetable entree for supper.

My search took me to the recent issue of “Cook’s Illustrated” (July-August 2014), which has a wonderful recipe for Eggplant Involtini. What especially attracted me to it first was that the eggplant is baked rather than fried; next, the filling uses considerably less ricotta than many others and is, almost counter-intuitively, kept creamy with the addition of fresh white breadcrumbs; finally the tomato sauce is simple, quick cooking, and fresh tasting.

Just taken from the oven

Another thing I liked about this recipe was that it skipped the traditional sweating of the eggplant with loads of salt to reduce the its bitterness. In fact, the article that includes the recipe explains why this salting process may no longer be necessary given today’s selective cultivating methods.

Rather than providing an edited recipe, I’m providing a link to the magazine’s website, which has a video on how to prepare this dish: Eggplant Involtini Video. The magazine says that the recipe will be online for the next four months. If you’re like me and want a hard copy, I’d say the recipe is well worth the $6.95 cover price of the magazine.

I realize that southern Italian cooking may have fallen out of fashion, but give this recipe a try to see how good it can be when it’s well prepared.

We enjoyed this dish with a wine from one of Chianti’s smallest sub-zones, Montespertoli. The producer is Sonnino, who still uses some white grapes in the blend and does not age the wine in wood. The wine is aromatic with good acidity and rich black fruit flavors.

sonninosmall

Wine Pairing: Sangiovese, Cabernet Franc, Alsatian Riesling