Cacio Pepe

IMG_6269sm

Whenever I get to Rome, one of my first stops is at a small trattoria, Orso 80, steps away from the Piazza Navona, where I always order the same dish: cacio pepe, spaghetti with pecorino cheese and black pepper. One of the city’s classic pastas, it perfectly reflects the essence of Roman cooking: a few ingredients, carefully prepared, and served unadorned.

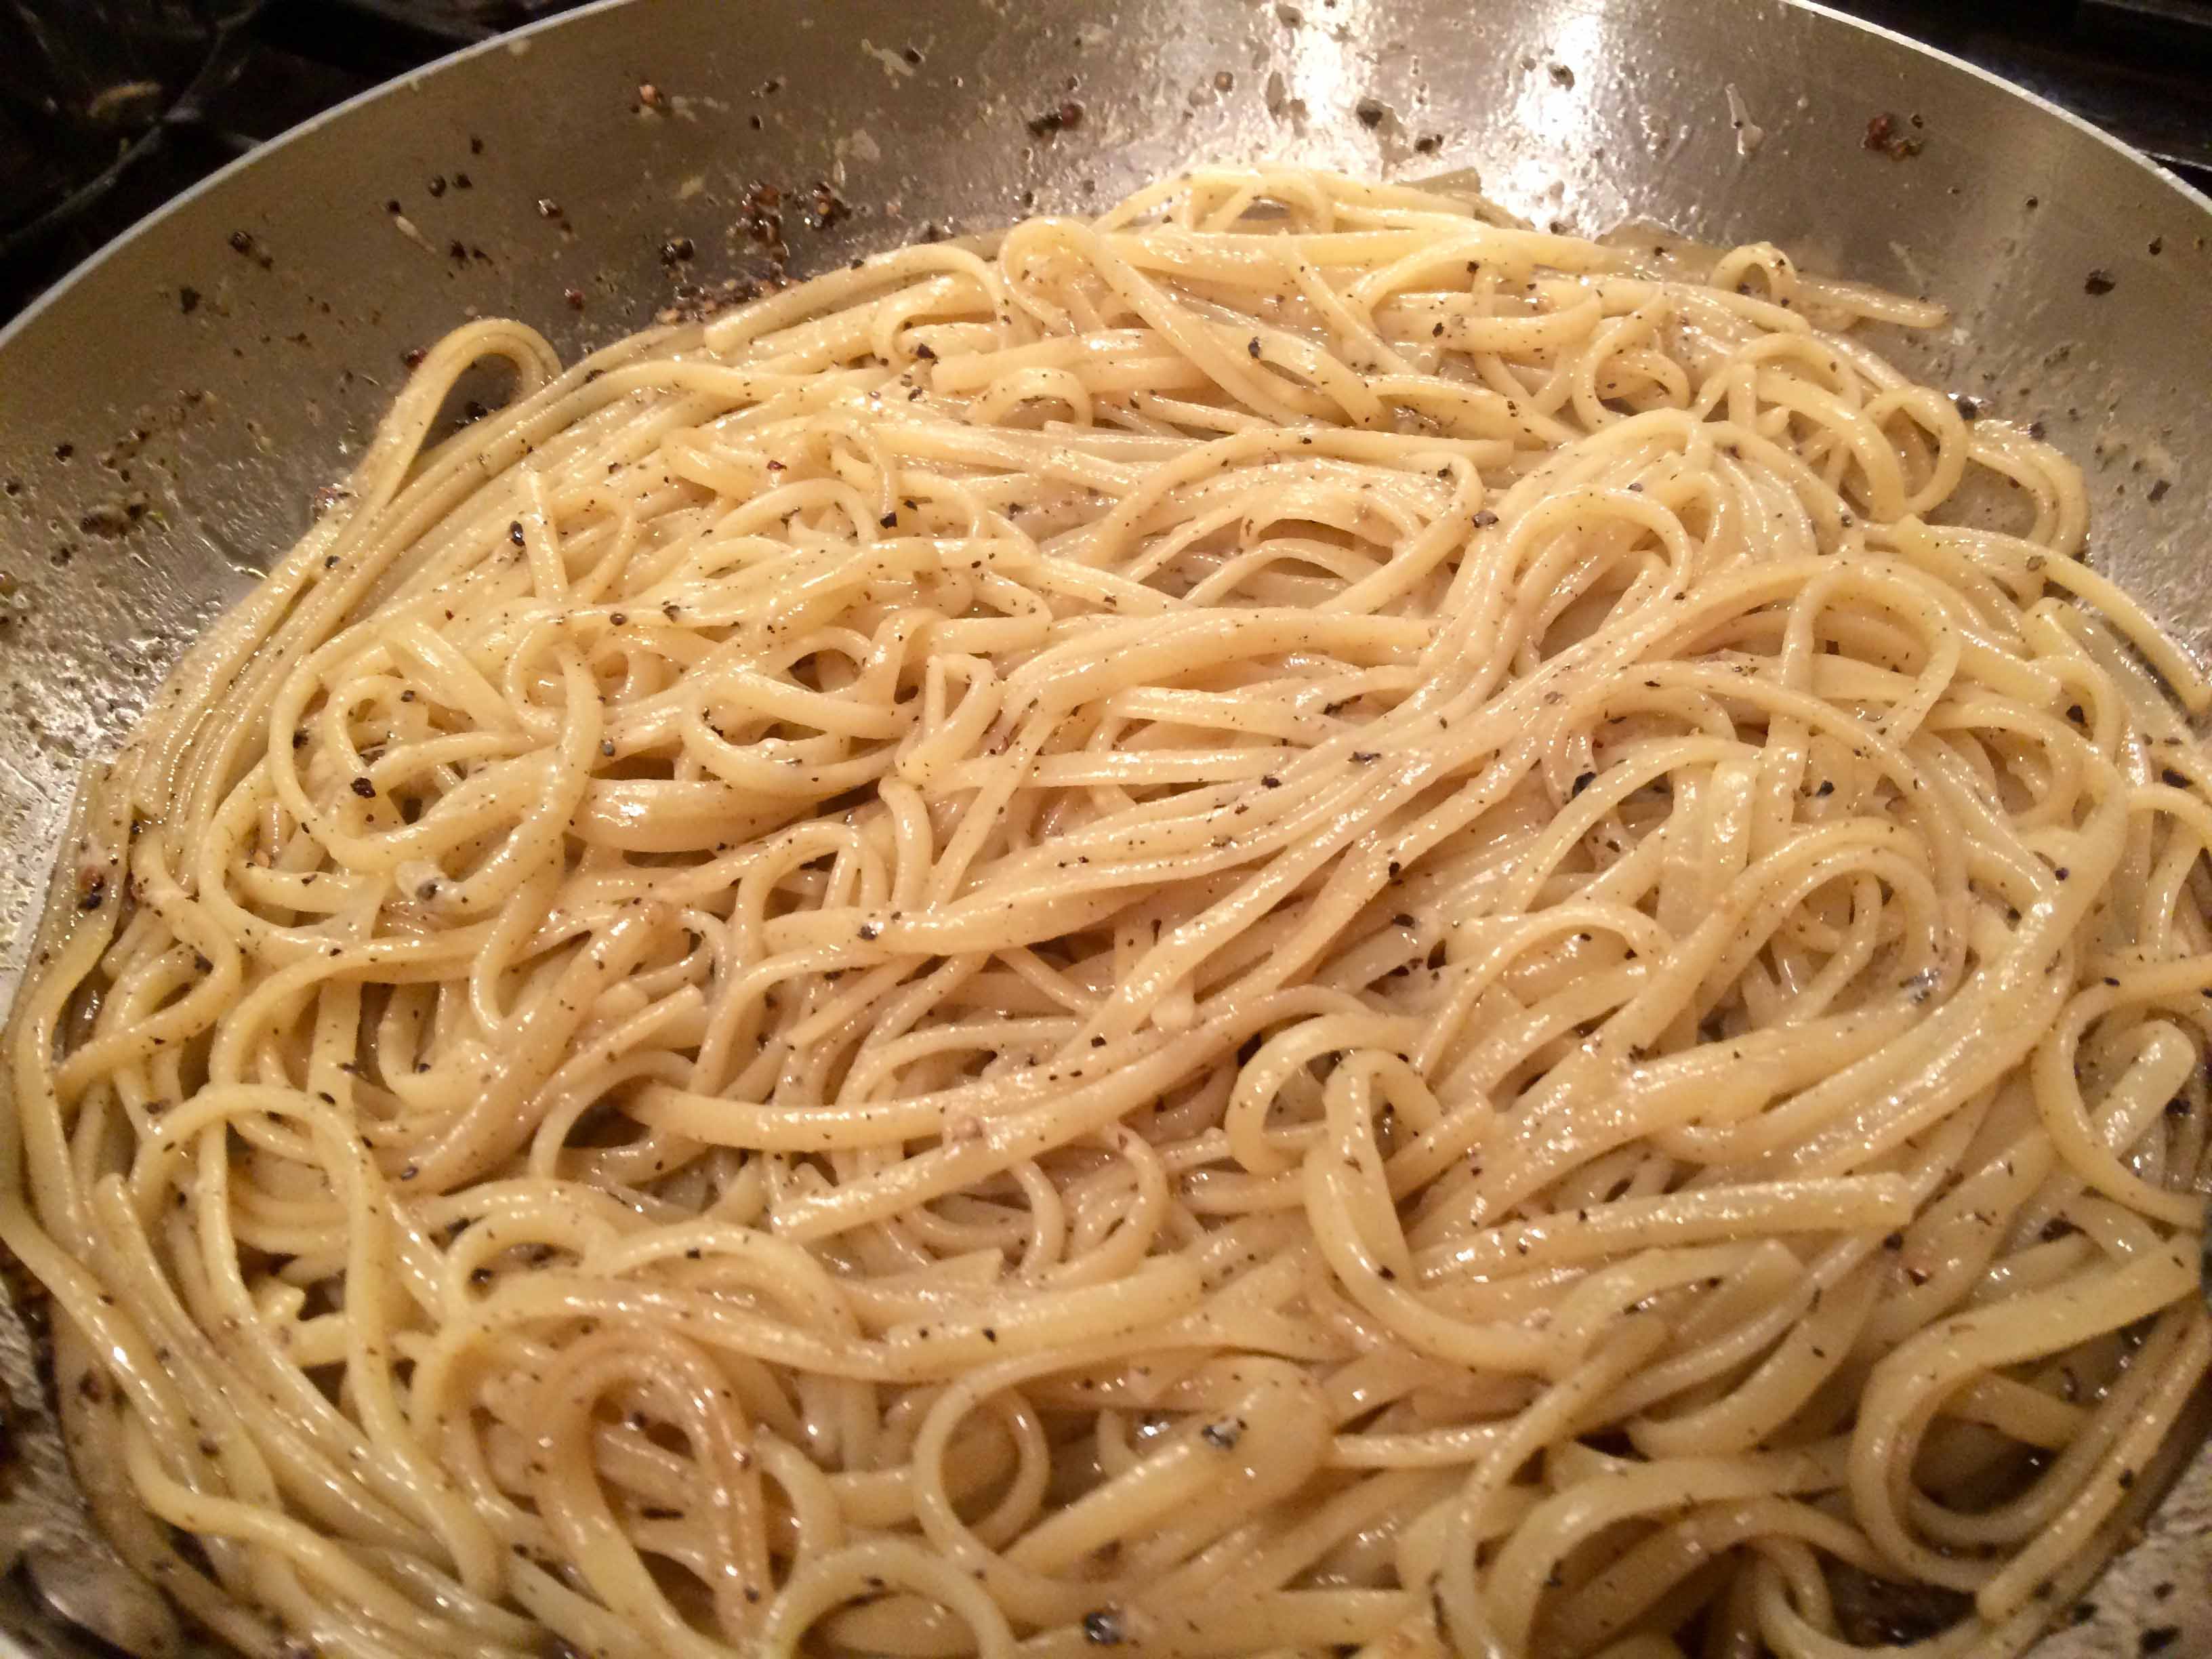
I’ve often prepared this dish at home with a modicum of success, but I’ve never really been able to achieve the texture of the sauce that I’ve enjoyed while abroad, where the cheese smoothly melts as it’s tossed with the pasta and forms something like a creamy emulsion with the pasta water and the pepper that seems to coat the spaghetti. Recently, however, I saw a New York City chef prepare his version of the dish on morning television and was amazed to see how closely he came to achieving this texture.

Later that day, I went to the show’s website, which had a video of the chef as well as his recipe. Interestingly, the recipe was for one serving. So, when I prepared it for two, I simply doubled the ingredients. As the pasta came together with the cheese, I was ecstatic; there it was: the cheese and pepper smoothly clinging to the spaghetti. But when we sat down and tasted it, the pepper was so strong and pungent that the dish was more like caciOWWWWWW! pepe.

I’m providing a link here to the recipe and video online, but should you decide to follow it, I advise using your own taste to determine the amount of pepper of you use. 

Ingredients
Ingredients

Ingredients
10 quarts water
Salt
3 ounces linguine pasta, dried (85g)
2 teaspoons freshly ground coarse black pepper (10g or 30 turns from a pepper mill)
Olive oil
4 tablespoons Pecorino cheese, finely grated (60g)

Preparation
1. Bring 10 quarts of water to a boil and season liberally with salt. Cook the pasta for 7 minutes.

2. While the pasta is cooking, toast the black pepper in oil in a large sauté pan until fragrant.

Toasting the pepper
Toasting the pepper

3. Ladle 4 ounces (two small ladles full) of pasta water to stop the cooking.

With the pasta water

4. Keep the heat off until the pasta is done.

5. Once the pasta is cooked, drain and add to the sauté pan.

6. Turn the heat on medium high and slowly sprinkle in the Pecorino.

Spaghetti tossed with cheese and pepper

7. Toss the pasta while you add the cheese to emulsify. Once all the cheese is added, adjust your sauce with some more pasta water so it’s not too thick. Serve immediately, top with some freshly grated cheese and a few cracks of pepper.

Wine Pairing: Frascati, Sauvignon Blanc

Meatloaf Stuffed Peppers

IMG_6282sm

I’ve always enjoyed meatloaf. Even as a kid, I looked forward to my aunt’s polpettone, with its caramelized onions, raisins, and parsley gently mixed in with the more traditional meatloaf ingredients. When I asked why we never served meatloaf to company, I was told it was a family dish.

Well, the other night, I made a dark-meat-turkey version of this family fare with feta and raisins. As is often the case with preparing dinner for two, we had almost half of it leftover. But rather than making sandwiches from it or serving it at room temperature topped with a fried egg as I usually do, I thought I’d try something different.

I searched the internet and found plenty of ideas ranging from meatloaf hash to meatloaf lasagna. However, the one that appealed to me most was stuffed peppers. Almost all of the recipes for them involved adding bread or rice along with eggs to the meat as a binder and additional seasonings, but I thought my meatloaf already had plenty of these. So I decided simply to crumble it up and add just a few tablespoons of tomato passata to moisten the meat. I also used the passata mixed with some olive oil and fresh basil for the cooking sauce in the bottom of the baking dish.

As for the peppers, I sliced off their tops, seeded them, and par cooked them for 3 to 4 minutes in lightly slated boiling water along with their tops. I left them to drain and cool while I prepared the stuffing and preheated the oven to 350°F.

After lightly drizzling the cooled peppers with some olive oil, I generously stuffed them and topped them with some fresh mozzarella. I then placed them in a baking dish to which I added about a half cup of the passata sauce together with some chunks of the meatloaf, the pepper tops, and some fresh basil. They cooked in the oven for about 50 minutes until the peppers were cooked through and the cheese was nicely browned.

Before cooking
Before cooking

The results exceeded my expectations. The peppers were perfectly cooked, the stuffing moist and flavorful, and the sauce succulent. It was a dish that may even be fit for company.

Wine Pairing: Pinot Noir

Pollo all’Arrabbiata

IMG_6251sm

I love steak. Until recently, I could eat it five times a week—pan roasted, basted with butter, cooked medium rare, served with a drizzle of olive oil. Just thinking about it makes my mouth water. Unfortunately, given my age and my doctor’s recommendations, my steak indulgence is now limited to once a week. I’m now dining more healthfully, albeit less rapturously, with at least one vegetarian and one fish meal a week, and eating more chicken than I want to admit.

One chicken recipe that’s become a weeknight favorite is Pollo all’arrabbiata from Louie Werle’s book on Italy’s cucina povera, Italian Country Cooking. As the recipe’s name implies, the chicken is cooked in a tomato sauce with hot chili peppers. Starting with a soffrito of garlic, fatty pancetta, and fresh rosemary makes this dish even more flavorful.

As was recommended in the recipe, I served the dish with polenta. Given my time constraints on a weekday night, however, I opted for an “instant” polenta, which I prepared with chicken broth, butter, and Parmigiano Reggiano.

I’ve always  followed the recipe closely, but the next time I prepare it, I’ll probably cut the tomatoes into halves to extract more of their flavor.

Ingredients
Ingredients

Pollo all’arrabbiata
1/4 cup extra virgin olive oil
1 red onion, cut into 8 wedges
4 whole chicken legs (thighs and legs), about 3 pounds
1 garlic bulb, cloves peeled
1/2 cup plus 2 tablespoons dry red wine
2 hot red chilies, chopped (I substituted dried Calabrian chilies, crushed.)
1 pint cherry tomatoes

Soffrito
2 large cloves garlic, peeled and coarsely chopped
2 ounces fatty pancetta, cut into cubes (I used slightly more than 2 ounces.)
1 teaspoon fresh rosemary leaves

To make the soffrito, combine the garlic, pancetta, and rosemary in a small food processor and pulse until fairly finely chopped.

The soffrito
The soffrito

Transfer the mixture to a heavy-based pot, add the oil and cook over moderate heat until the pancetta is golden, about 5 minutes, stirring frequently.

The browned soffrito

Turn the heat up to high, add the onion, chicken, and garlic cloves and brown the chicken well on both sides, about 8 minutes.

Browned chicken
Browned chicken

Stir in the wine and cook 1 minute. (I used this time to scrape any browned bits from the bottom of the pan.)

Adding the wine
Adding the wine

Then add chili and tomatoes, and season with salt.

The tomatoes and chilies

Bring to a simmer, cover with a lid, and cook gently for 40 minutes. The chicken is cooked when the juices run clear when a skewer is inserted between the thigh and leg. Check seasoning. Serve on deep, heated plates with polenta.

The finished dish
The finished dish

Serves 4. (Like most braised dishes, this chicken is even better when re-heated a day or tow later.)

Wine Pairing: Montepulciano d’Abruzzo

Stuffed Artichokes

IMG_6198sm

Elsewhere on this blog, I’ve written about facing some of my culinary fears like calamari and risotto. Well, last night I faced yet another of them: stuffed artichokes. As I was growing up, they were a frequent side dish at my family’s table, one of my Neapolitan aunt’s favorites. Stuffed with a mixture of dried breadcrumbs, pecorino-Romano cheese, garlic and parsley all moistened with olive oil, they were slowly cooked, over low heat, covered in a pot just large enough to hold them upright, with a modicum of water and a drizzle of olive oil.

As a child, I would simply lick the savory stuffing off the leaves until my aunt admonished me for leaving the best part behind and then proceeded to demonstrate how to eat them properly. She plucked off one of leaves, carefully balancing the stuffing that was on it, placed it between her teeth, closed her mouth, and slowly pulled it out scraping off the edible part of the leaf. After a few tries, some of which left me with a mouthful of leaf threads, I mastered the art of eating these delicious green globes of goodness. They became one of my favorite vegetables growing up, and I often requested that my aunt prepare them when I would return to my childhood home as an adult.

Yet for some reason, I’ve always shied away from cooking them on my own. Yesterday, however, when I saw some beautiful artichokes on sale at the market, I decided to confront my fear. Upon returning home, I searched through some cookbooks for a recipe and was startled when I found one that was identical to my aunt’s in Michele Scicolone’s The Italian Vegetable Cookbook. While I closely followed her clear instructions for preparing the artichokes, I did take some liberties with the measurements of the ingredients, and was a little heavy handed with the cheese and the garlic. The results, however, were superb and made a perfect accompaniment to a chicken sauté with green olives, capers, onions, and diced lemon.

IMG_6194sm

As I didn’t plan on writing this dish up, I don’t have any photographs of its preparation. But the internet has plenty of instructional videos on preparing artichokes as well as a version of Scicolone’s recipe on the Williams-Sonoma website adapted from of her earlier books, which can be accessed by this link.

Author’s Note: This is my first posting after a long hiatus from blogging. I can only attribute my absence to teaching a Saturday writing course to college-bound high-school sophomores. The course, which comes to an end next week, although most rewarding, took far more of my time than I thought it would when I signed up for it. Now that’s it’s over, you can expect postings from me on a more regular basis.

Lasagna with Meat Ragu

IMG_1443sm

My aunt, being Neapolitan, always made a southern-Italian style lasagna. Her’s was more restrained, with fewer fillings, than others I’ve had or read about, but it followed the classic formula of a long-simmered meat sauce, mozzarella, ricotta beaten with egg, parsley, and pecorino, and dried pasta noodles. In a 9” x 13” baking pan, she’d spread a thin layer of sauce, then laid down a layer of boiled noodles, coated that with a layer of ricotta and a few slices of mozzarella, followed by a coating of sauce, a sprinkling of cheese, and then on to the next layer, until she reached a total of four or five layers. The hardest part was waiting the 20 minutes after it was baked so that the lasagna could be cut more easily and served in slices. Just the thought of it is making my mouth water. Never served on a weekday, my aunt’s lasagna was reserved for holidays (even Thanksgiving), some birthdays, and once in a while for a Sunday dinner.

It wasn’t until the 70s, when northern Italian cooking swept the US, supplanting familiar Italian-American dishes with their northern counterparts, that I encountered Marcella Hazan’s classic Bolognese version of lasagna. It replaced the tomato dominated sauce with a more complex, meat-centric one and the beaten ricotta with a creamy béchamel sauce. Gone too were the pasta noodles superseded by thin sheets of fresh pasta; nutty Parmigiano-Reggiano took the place of the saltier pecorino; and mozzarella didn’t even make its way into the mix. Given the time it took to make this version, however, I found myself preparing lasagna far less often than my aunt had.

But recently, I came across a recipe for a weeknight lasagna by television’s Rachael Ray. Her version uses a 30-minute meat ragu, a classic béchamel, and no-boil pasta sheets as an alternative to home-made egg pasta. So on a Wednesday night, I though why not give it a try.

To give her relatively quick-cooked ragu more intense flavor, she uses tomato paste and chicken stock as the base of her sauce, which begins with the traditional soffritto (sautéed onion, celery, and carrot). Veal and beef, mixed with rosemary, sage, and bay leaf, are then lightly browned in the same pot, followed by a splash of dry white wine. A good amount of tomato paste is then incorporated into the meat, followed by three cups of chicken stock. The sauce is then simmered for about 30 minutes, or until thick.

While the sauce is cooking, you can prepare the béchamel, which starts with a light roux and ends with the addition of warm milk, whisked and cooked gently until it thickens.

The baking pan gets a thin coating the cream sauce, which is then topped with the no-boil pasta sheets. These get thin coatings of béchamel and ragu and a sprinkling of Parmigiano. These steps are repeated until you have four layers.

The lasagna is baked in a 375°F oven for an hour, or until browned and bubbling. (If using fresh pasta, the cooking time is 30-35 minutes.)

The finished lasagna

Although I was skeptical at first, (the reason for so few photos) I was more than pleased with the results. Nevertheless, I did make some changes. I added some canned San Marzano tomatoes, about a cup, to the sauce to give it a slightly brighter tomato flavor. To achieve what I thought was the appropriate thickness for a ragu, I cooked my sauce for almost an hour. In place of some ground cloves to be added with the herbs to the meat, I substituted the more traditional freshly ground nutmeg.

Purists among my readers may cringe, as did I, at some of the elements of this recipe. And while it may be a far cry from my aunt’s as well as from Hazan’s classic Bolognese version, it makes a wonderful baked-pasta dish for a weeknight supper.

Here’s a link to her recipe, which is accompanied by a video of her making the dish.

Wine Pairing: Nebbiolo, Vino Nobile di Montepulciano

Pork Roast Braised in Milk Bolognese Style

IMG_6093sm

One of my fondest memories of my years as a young academic in Boston was spending Friday evenings with a couple of colleagues, cooking dinner, and watching “Dallas” and “Falcon Crest.” As we dined and intermittently glanced at the television, we’d offer a running, often cynical, commentary on the show’s lack of any redeeming social value and eventually wind up discussing politics and thus missing the end of the show.

Since I was often the guest, my friends typically prepared the meal, which more often than not was a roast beef. One evening, however, I offered to cook at their apartment. During these years, the late 70s, Marcella Hazan was my go-to authority on authentic Italian cooking; her two volumes of The Classic Italian Cookbook provided me with many recipes that would stun my friends with their simplicity and flavor. So the night I cooked for our Friday get-together I chose Hazan’s Bolognese-style pork roast braised in milk. I could start at 6PM and it would be ready just in time for “Dallas.”

This recipe may be one of her most popular; versions and tales of it abound on the Internet. I believe it first appeared in her the first volume of her classic series. It was so simple: brown a small pork roast in olive oil and butter; season with salt and pepper; add milk, cover the pot with the lid slightly ajar and braise for about 3 hours. When finished, remove the roast, skim the fat from sauce, and serve. The roast was moist and succulent and the milk turned into a sauce of creamy brown nutlike clusters.

I noticed that in Essentials of Classic Italian Cooking, which is a compendium of the earlier two volumes, the procedure for cooking the roast is more complicated, calling for adding the milk at three intervals, in varying quantities. I chose, however, to follow the original method, adding all of the milk at the beginning, but followed her advice of having the butcher remove the bones from the roast to enable a more thorough browning of the meat and of cooking the bones along with the roast to maximize flavor.

Note that the size of the cooking vessel is essential to the success of this dish. The pot should be no bigger than is necessary to, in Hazan’s words, “snugly accommodate the pork,” which allows about 2/3 to 1/2 of the roast to be submerged in the milk while braising. I used a small 2.5 quart Le Creuset dutch oven.

My only real variation from her recipe is the addition of some fresh nutmeg after adding the milk. I guess this comes from following Hazan’s recipe for béchamel sauce.

Pork Loin Braised in Milk Bolognese Style Adapted from The Classic Italian Cookbook by Marcella Hazan

The ingredients (missing the olive oil)

2 tablespoons unsalted butter
2 tablespoons olive oil
21/2 pound pork loin roast. (Have the ribs detached from the loin and split into two or three parts. Do not removed any fat from the meat. The roast should be tied. See picture below.)
Salt
Freshly ground black pepper
2 1/2 cups whole milk (You may need a little more in the unlikely event that the milk evaporates too much.)
1/4 teaspoon freshly ground nutmeg

The roast with bones separated and cut
The roast with bones separated and cut by great butcher at Dickson’s Farmstand Meats in NYC

1. Heat butter and oil over medium-high heat in a heavy-bottomed pot that that can later snugly accommodate the pork.

The browned roast
The browned roast

2. When the butter foam subsides, put in the roast fat-side down. Brown the meat evenly on all sides. If the fat is becoming very dark, lower the heat. Season the roast with salt and pepper. Add the milk slowly to avoid it boiling over. Add the nutmeg.

The roast in the milk

3. Bring to a boil, then reduce the heat to a simmer, and set the lid slightly ajar. Cook slowly for about 21/2 to 3 hours, occasionally turning and basting the meat. If before the meat is fully cooked, you find that the liquid in the pot has evaporated, add another 1/2 cup of milk.

Roast simmering in the milk

4. When the pork has become tender and all the milk has coagulated into small, brownish clusters, transfer the roast to a cutting board and tent with foil.

The finished roast
The finished roast

5. Tip the pot and spoon off most of the fat, being careful to leave behind all the coagulated milk clusters. Add 2 or 3 tablespoons of water and boil away the water over high heat using a wooden spoon to scrape loose cooking residues from the bottom and the sides of the pot.

IMG_6089sm
The skimmed sauce

6. Carve the roast into 3/8-inch slices and arrange on warm platter. Spoon all the pot juices over the pork and serve immediately.

Wine Pairing: Dolcetto d’Alba, Dry Lambrusco

Baked Farro and Butternut Squash

IMG_6034sm

Late fall, an unusually cold day, and farro in the cupboard. This was the setting that set me off looking for a recipe for a comforting weekday-night dish. My search uncovered several appealing recipes for farro “risottos,” but, wanting to do a little less work, I eventually settled on a recipe from Ina Garten’s Make It Aheadcookbook that bakes farro with onion, butternut squash, thyme, bacon, and Parmigiano Reggiano. The previously browned bacon and grated cheese top the casserole for the last 20 minutes of baking, and the aroma makes waiting for this dish torture.

The nutty flavors of the farro combined with the sweetness from the squash and the savoriness of the bacon and cheese made for a perfect fall or winter main course or even a side.

Although we thoroughly enjoyed this dish the first night, it was too much for two to finish. A few night later, I decided to reheat what was left over by putting it in a sealed freezer bag, which I then simmered in hot water for about 20 minutes. While the texture may have suffered some from reheating, the flavors were still exquisite.

Baked Farro and Butternut Squash from Make It Ahead by Ina Garten
Serves 6 to 8

The ingredients
The ingredients

6 thick-cut slices applewood-smoked bacon
2 tablespoons good olive oil
1 tablespoon unsalted butter
1 ½ cups chopped yellow onion (1 large)
2 teaspoons chopped fresh thyme leaves
Kosher salt and freshly ground black pepper
1 ½ cups pearled farro
3 cups good chicken stock, preferably homemade
3 cups (¾ -to 1-inch-diced) butternut squash
½ cup freshly grated Parmesan cheese

Preheat the oven to 375 degrees.

Place the bacon on a baking rack set on a sheet pan and bake it for 20 to 30 minutes, until browned (it won’t be crisp). Cut the bacon in very large dice.

The cooked bacon
The cooked bacon

Meanwhile, in a small (9-inch) Dutch oven, such as Le Creuset, heat the olive oil and butter over medium heat. Add the onion and cook for 6 to 8 minutes, until tender and starting to brown. Add the thyme, 2 teaspoons salt, and 1 teaspoon pepper and cook for one minute.

The onions and the thyme

Add the farro and chicken stock and bring to a simmer. Place the squash on top of the farro mixture, cover, and bake in the same oven with the bacon for 30 minutes, until the squash and farro are tender. Check once during cooking and add a little chicken stock if it’s dry.

IMG_6003sm
The stock, farro, and squash

Sprinkle the bacon and Parmesan on the squash and faro and bake uncovered for 15 to 20 minutes, until most of the liquid evaporates, the farro and butternut squash are tender, and the cheese has melted. Serve hot directly from the pot.

The finished dish
The finished dish

Note: Peel butternut squash and cut it in half so it doesn’t wobble while you dice it.

MAKE IT AHEAD: Assemble the dish, including the bacon and Parmesan, and refrigerate for up to 2 days. Bake before serving..

Reprinted from Make it Ahead. Copyright © 2014 by Ina Garten.

Wine Pairing: Pinot Noir, Chardonnay

Meatless Pecorino Meatballs

IMG_5960sm

Sometimes a recipe is enough to make me purchase a cookbook. So when I saw a recipe for polpettine di pecorino, pecorino meatballs, in Bastianich’s Lidia Cooks from the Heart of Italy, I had to have this book.

I’m not sure why I was so intrigued by this dish. On one hand, I was skeptical that cheese, bread crumbs, eggs, garlic, and basil would come together and then be fried to make a satisfying alternative to the classic meatball. But on the other hand, I have a weakness for pecorino; having a Neapolitan heritage, I was brought up on it. It was the cheese of choice for sprinkling on pasta, flavoring stuffings, adding to a frittata, or topping carne pizzaiola.

A few nights ago, I tried the recipe for the first time and we thoroughly enjoyed a most satisfying meatless dish. Richly flavored, they had a pleasant saltiness and meaty texture. A simple marinara provided the perfect complement to their savoriness.

My aforementioned skepticism is to blame for not having photos of preparing this dish. But I think the two I’ve provided of the finished meatballs should entice you to make them. I’ll try to add more photos the next time I make these.

As we were only two at the table, I halved the original recipe, which makes 60 small meatballs.

Meatless Pecorino Meatballs Adapted from Lidia Cooks from the Heart of Italy
8 large eggs
3 cups fine dry bread crumbs
3 cups freshly grated pecorino
2 teaspoons kosher salt
4 tablespoons finely chopped fresh basil
2 plump garlic cloves, peeled and finely chopped
1 cup vegetable oil, or more as needed (I used extra virgin olive oil.)
6 to 7 cups tomato sauce (I used Marcella Hazan’s classic tomato, onion, and butter sauce.)

Beat the eggs well in a large mixing bowl. Heap the bread crumbs, cheese, salt, basil, and garlic on top of the eggs and mix everything together well, first with a big spoon or spatula and then with your hands. (Be careful not to overwork the mixture.) The “dough” should come together in a soft mass, leaving the sides of bowl. If it is very sticky, work in more bread crumbs a bit at a time.

Break off tablespoonful pieces of dough, and one by one roll them in your palms into smooth balls. Place them on a board or tray covered with wax paper or parchment–you should get about 60 balls total.

Pour 1/8 inch oil into the skillet, and set over medium flame. When the oil is hot enough that a test ball starts sizzling on contact, lay in as many balls as will fit into the pan without crowding–about 20 or 30. Adjust the heat as you fry so the heat stays hot and the balls are sizzling and browning nicely, but not burning. Turn them frequently, so they fry on all sides.

When the balls are evenly browned and crispy, lift them from the pan with a slotted spoon or spider, letting excess oil drip back into the pan for a moment, and then lay them on paper towels to drain

Fry the balls in batches this way, adding more oil if needed. You can serve these as is as an hors d’oeuvre while hot and crispy.

To serve with sauce, heat the sauce to a simmer in a large saucepan. Drop in all the balls and return the sauce to a simmer, gently turning the balls so all are submerged and coated. Cook for about 5 minutes, or just until the balls are heated all the way through.

Finished meatballs in the sauce

Serve with sauce on the top, sprinkled with grated cheese, and garnished with basil.

Wine Pairing: Montepulciano d’Abruzzo


Calamari in Cassuola

IMG_5942sm

For some reason, I really don’t know why, I’ve always been afraid to cook calamari. As I was growing up, it was always one of my favorite meals on a Friday, when meatless meals were still mandatory for Catholics. More often than not, my aunt would prepare them stewed in a simple marinara sauce. They were either whole, stuffed with softened white bread that she combined with the chopped tentacles, eggs, and parsley, or cut up into rings. The stuffed version were usually served with pasta; the rings, with friselle, which might best be described as thick, rectangular, twice-baked bread biscuits, which were used to sop up the sauce. Once in a while, my aunt would also serve them cut into rings, lightly battered, and deep-fried, accompanied only by lemon wedges—but never with tomato sauce.

Wanting to recreate these dishes at home, I eventually confronted my fear of cooking these delectable creatures and started to deep fry calamari with, I might add, considerable success. Cooking them in sauce, however, continued to remain a challenge—until last Friday. That morning, I had intended to buy some Manila clams, which I intended to cook with Sardinian fregola. But when I got to the fish market, I spotted some beautiful calamari, glistening a lustrous white interlaced with light purple from the tentacles. I decided that it was time to take the plunge and stew them in tomato sauce.

Although I was confident about the sauce, I wasn’t quite sure how long I needed to cook the calamari. Almost every source I consulted warned against overcooking them, which would make them rubbery. Indeed, I knew this from my experience with frying. In fact, the majority of recipes I read suggested preparing the sauce separately and then adding the squid and cooking them for two minutes. Somehow, I wasn’t comfortable with this method, as I really wanted my sauce to be deeply flavored with the calamari and vice versa. I was certain that my aunt simmered her calamari slowly, but I wasn’t sure for how long.

Finally, I turned to one of my go-to books on Neapolitan cooking, Naples at Tableby Arthur Schwartz. It was here that I found a recipe that resembled closely my aunt’s preparation. It called for preparing a classic marinara and adding the calamari to the sauce after the first five minutes of cooking. The fish and the sauce are then gently simmered uncovered for about 30 minutes or until the sauce has thickened and the calamari are tender.

This was the recipe I used, and with some only minor variations (adding some salt and increasing the amount of tomatoes), I came very close to replicating my aunt’s stewed calamari. I served them over pasta. Next time, however, I’ll stuff them.

Calamari In Cassuola (Squid Stewed with Tomatoes) adapted from Naples at Table by Arthur Schwartz

The ingredients
The ingredients

3 tablespoons extra-virgin olive oil
2 large cloves garlic, lightly smashed
¼ teaspoon or more hot red pepper flakes
1 28-ounce can imported whole peeled tomatoes, preferably San Marzano, with their juices
¼ teaspoon dried oregano
Salt to taste
1½ fresh, cleaned calamari cut into ¼-inch rings, tentacles cut in half
¼ cup finely cut flat-leaf parsley

The cut calamari
The cut calamari

1. In a 2½ – to 3-quart saucepan or stovetop casserole, over low heat, combine the olive oil, the garlic, and the hot pepper. Cook until the garlic is soft and beginning to color on all sides, pressing the garlic into the oil a few times to release its flavor. Remove the garlic.

The cooked garlic
The cooked garlic

2. Add the tomatoes, the oregano, and the salt to taste and, with a wooden spoon, break up and coarsely crush the tomatoes. Increase the heat to medium high and simmer briskly, uncovered, for 5 minutes.

The sauce after 5 minutes

3. Reduce the heat to low, stir the calamari into the sauce and continue to simmer steadily, uncovered for about 30 minutes, or until the sauce has thickened and the calamari are tender. Some calamari may take longer to cook, in which case you may need to add a tablespoon or as many as a few tablespoons of water so the sauce doesn’t become too reduced.

The cooked calamari
The cooked calamari

4. Add the parsley and cook for another 15 seconds.

Cooked calamari with the parsley

Note: I added the parsley after transferring the calamari to a skillet for tossing with the pasta.

5. Serve very hot, as is, with bread, or over freselle, or, as I did, tossed with pasta.

Wine Pairing: Lacryma Christi del Vesuvio Rosso

Lamb Shanks with Sweet and Sour Onions

IMG_5854sm

You’ve probably been counseled by other food bloggers or cooking enthusiasts to let what looks good on any given day at your market determine what you’ll cook that night. I more or less agree with this advice, but I must admit that it definitely helps to have high-quality markets nearby. Fortunately, I live in downtown New York, where I’m surrounded by some of the city’s finest fish mongers, green grocers, and butchers, which makes being inspired by their offerings relatively easy.

Such was the case the other day when I went to my butcher, Dickson’s Farmstand Meats located in Chelsea Market, looking for inspiration. They’re know for locally sourced, humanely raised meats, and I wasn’t there long before I espied and bought some meaty lamb shanks.

As I walked home, I started to consider how to prepare them. For me, braising was the obvious choice, but I wasn’t quite sure what to braise them with. So when I got home, I looked through some of my go-to books for braising and found an appealing recipe in Michele Scicolone’s The Mediterranean Slow Cooker: “Lamb Shanks with Sweet and Sour Onions.”

The recipe calls for just a few ingredients with which to cook the lamb: red onions, garlic, rosemary, red wine, and balsamic vinegar.

The Ingredients
The Ingredients

The minimal prep also made the recipe attractive: browning the onions and then combing them with the garlic (minced), the rosemary (chopped), the red wine (dry), and the balsamic vinegar. Since the vinegar plays a leading role in flavoring this dish, I recommend using a good quality balsamic.

IMG_5838sm
Browning the onions
Onions with the wine, balsamic, and rosemary

Cooked on low for 8 hours, the shanks become tender and succulent and their distinctive meaty flavors are perfectly complemented by the sweet-and-sour onions and braising liquid.

I served the shanks with polenta, made creamy with butter, cream, and Parmigiano Reggiano.

Wine Pairing: Montepulciano d’Abruzzo