Ratatouille

ratatplatedsmall

When I was at our greengrocer yesterday, I spotted some beautiful Holland eggplants, deep purple in color, firm to the touch, heavy for their size. And right next to them, were some local zucchini looking equally as good. With these in my basket, I decided it was time for ratatouille. Unfortunately, I wasn’t lucky enough to find some equally good tomatoes. Nevertheless, I stayed with my original decision and bought the other ingredients onions, bell peppers, fresh thyme.

When I got back home, I searched for some recipes and found one from Martha Stewart that appealed to me because it called for large, chunky pieces of vegetables. However, its directions included some steps, like roasting individual canned tomatoes for 30 minutes and sweating eggplant with salt, that I didn’t feel necessary.

My go-to brand of canned tomatoes always have plenty of flavor and I thought rather than turning on the oven, I could get the roasted flavor from toasting some concentrated tomato paste in my pot along with the vegetables. I also find more and more that today’s eggplants aren’t as bitter as they once were and therefore the typical salting process isn’t as necessary as it once was.

I also digressed from Martha’s recipe in the timing. I thought her suggested times for cooking the vegetables were too short. I’m old school Italian and like my vegetables a little more cooked than more trendy recipes suggest. I remember how, when nouvelle cuisine was in vogue, I once served string beans to my aunt and she took them back to the kitchen and sautéed them in olive oil and garlic. She returned them to the table and announced, “Now these are beans cooked for people not for rabbits.”

Ratatouille Adapted from Martha Stewart

4 tablespoons extra-virgin olive oil
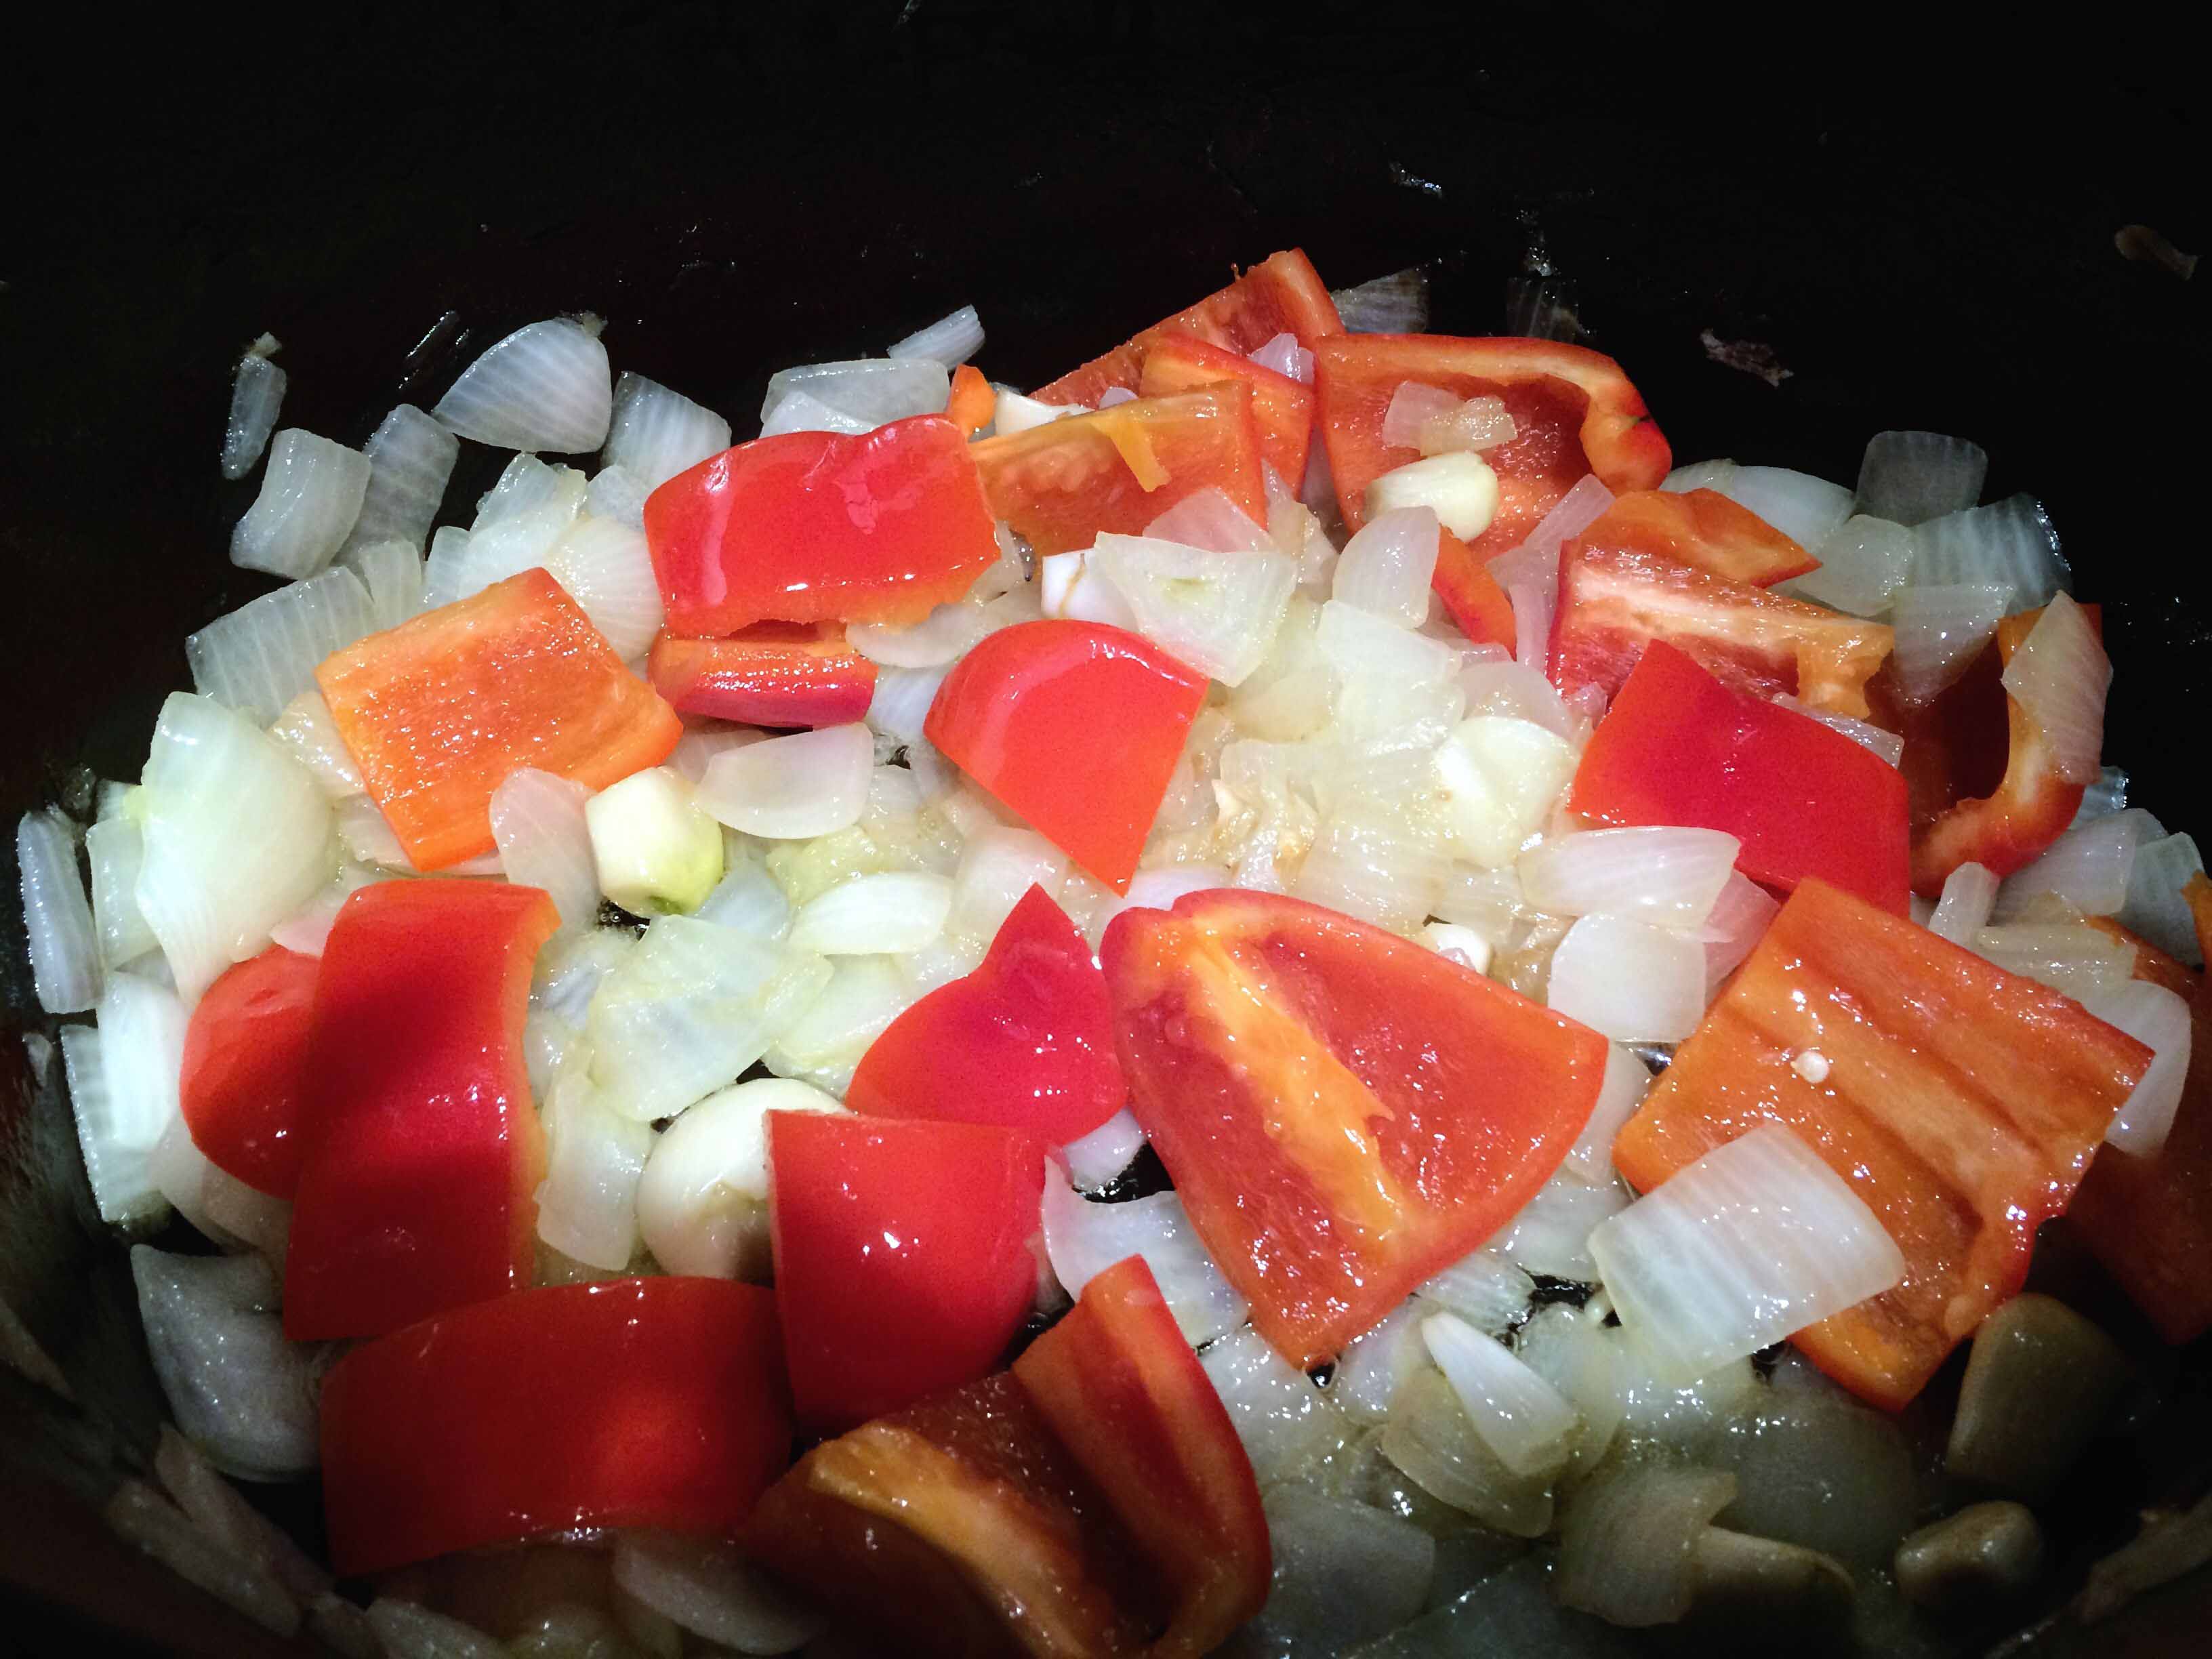
2 large yellow onions, (about 1 pound total) diced large
6 large cloves of garlic smashed and peeled
2 red bell peppers, seeded and diced large
1 tablespoon concentrated Italian tomato paste (the one in a tube)
1 can (28 ounces) crushed Italian tomatoes
2 medium sized eggplants, (about 1 pound total) cut into 1 to 1.5 inch pieces
2 large zucchini (about 1 pound total) peeled with alternating strips of peeled and unpeeled skin.
1 bay leaf
2 teaspoons fresh thyme leaves (Martha called for 1 tablespoon fresh marjoram or oregano)
3 tablespoons red-wine vinegar

Instructions

In a large non-reactive Dutch oven, preferably enameled cast iron, heat 4 tablespoons olive oil over medium heat. Add onion and cook, stirring, occasionally, until translucent. (Martha suggested 5 minutes; because of the size of the onions, I cooked mine for closer to 10 minutes.)

The onions and garlic

Add garlic cloves and cook until onions and garlic are soft. (Again, I cooked mine for about 10 minutes as opposed to Martha’s 5.)

Add peppers stirring and cook until tender. (Martha called for crisp-tender and 4 minutes; I went closer to 10.)


With the peppers
With the peppers

Add 1 tablespoon concentrated Italian tomato paste and toast briefly for about 2 minutes.


Add tomatoes, eggplant, zucchini, bay leaf, fresh thyme to the pot. Cook, stirring occasionally, until mixture come to a simmer. Reduce heat to medium low, partially cover, and cook at a gentle simmer until vegetables are cooked through, around 30 minutes. If sauce becomes too thick or starts to stick while cooking add a couple of tablespoons of water from time to time.
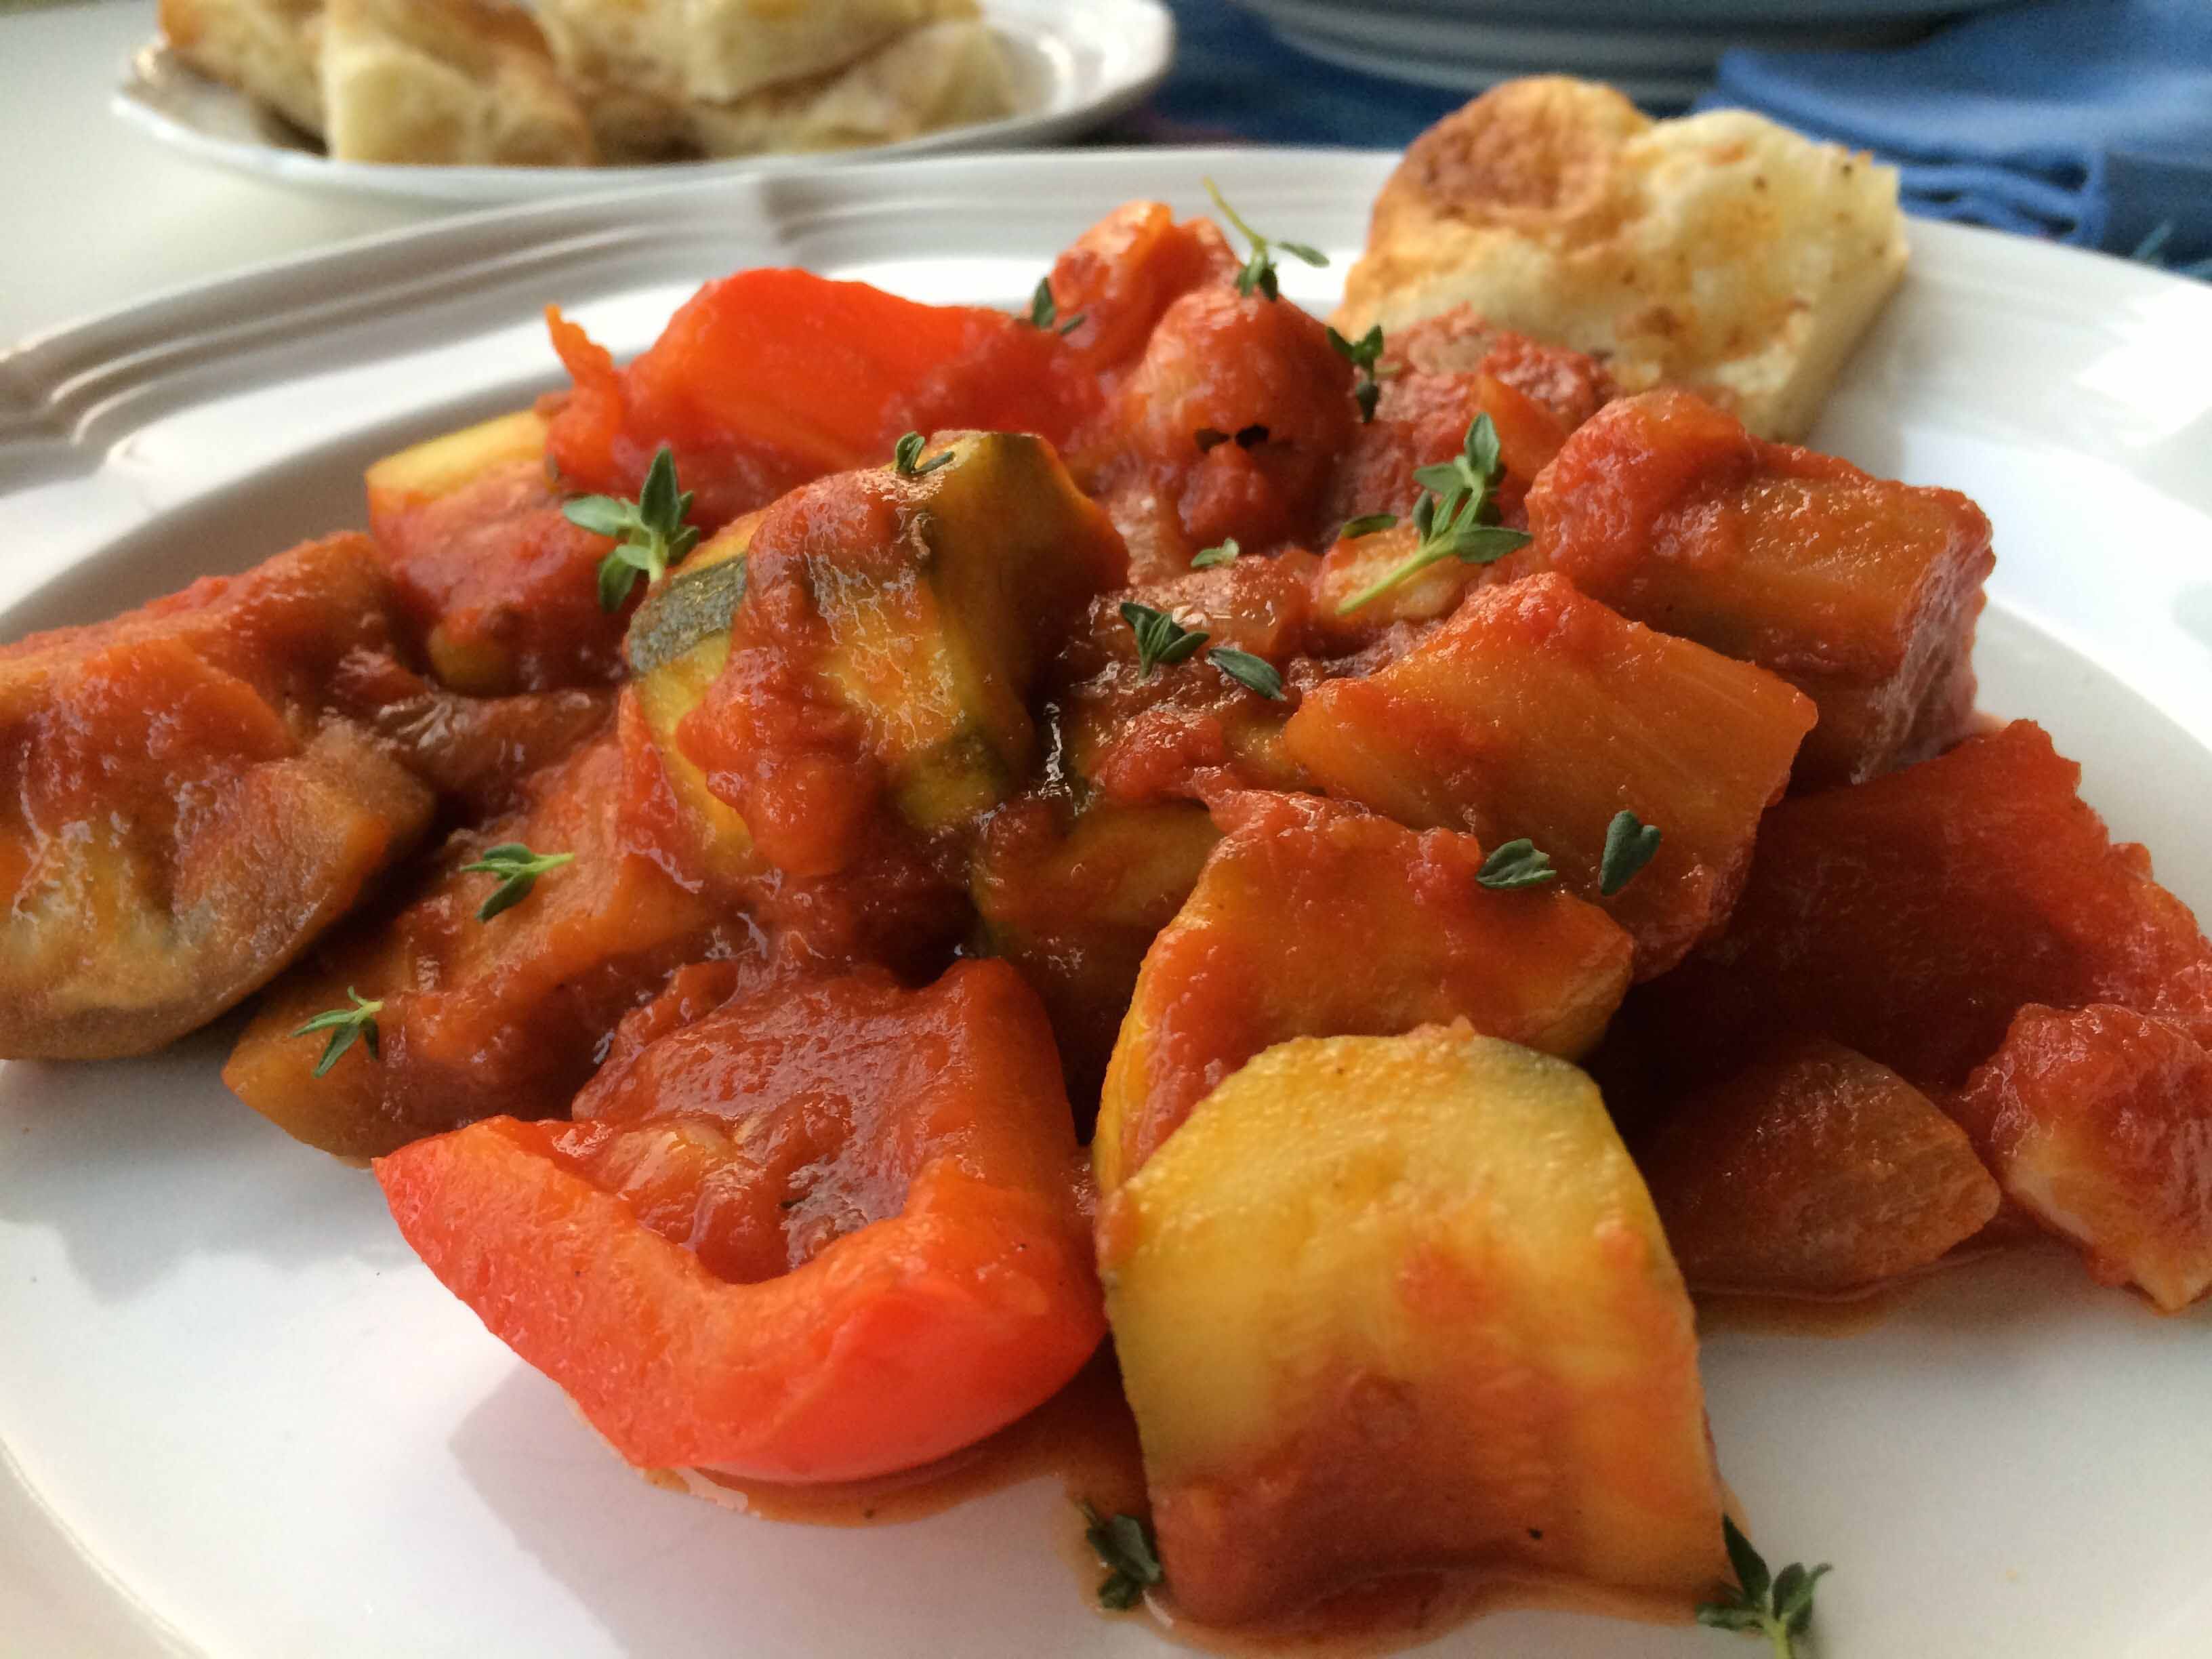
(Martha says to cook the vegetables are “tender but mushy, 15 minutes.” I almost doubled this time and my vegetables, perhaps because of their heft did not become mushy.)

Notice size of eggplant and zucchini
With the zucchini, eggplant

Season to taste with vinegar, salt, and pepper. Remove bay leaf. (The vinegar is an essential part of the seasoning, adding a lot of brightness to this dish.)

I served the ratatouille accompanied by some crusty cheese focaccia.

Here’s a link to the original recipe on Martha Stewart Living.

Wine Pairing: Dry Rose

Wild Mushroom Risotto

risoplatedsmall

Performance anxiety. It’s a terrible affliction, especially in the kitchen. I know this first hand, having experienced it for quite some time, until yesterday, when I decided to confront this fear head on.

It started about 15 years ago when on one winter’s eve, I failed at making a risotto. I had successfully prepared so many versions of this dish so many times before. It was a staple of my culinary repertoire. But on that fateful night, I just couldn’t do it; those pesky grains of rice just refused to come together and make that creamy mass of goodness. Was it hubris? Had I been over confident? All I remember now is how my guests politely smiled at my table as they strategically picked through their portions, picking out the few edible grains of rice, and waited patiently until I announced that we were ready for the next course.

To make matters worse, shortly thereafter, these same guests invited me to their home for dinner. When I asked what’s cooking, the hostess smiled demurely and said “You’ll see,” and then disappeared for about twenty minutes into the kitchen.

When we finally sat down to dinner, she appeared at the table with an oval tureen. Her eyes focused on me as she raised its lid to reveal an aromatic butternut-squash risotto. Not only was it beautiful with deeply colored chunks of squash, glowing grains of rice, it was absolutely delicious. Perfectly cooked al dente grains of creamy rice enveloped sweet roasted cubes of butternut squash. “Delicious,” I exclaimed (albeit enviously), and my friend shot me a knowing smile and said softly, with just a hint of sarcasm, “That’s how it’s done.”

After that evening, every time I wanted to prepare risotto, I thought of my failed attempt and heard my friend’s voice saying “That’s how it’s done.” I couldn’t bring myself to make one. I knew the steps, had learned the tricks. I had read so many recipes, watched so many chefs prepare their plain or fancy versions, bought so many varieties of Italian rice from traditional Arborio to Carnaroli to Vialone Nano. But I just couldn’t pull the trigger. I just couldn’t do it.

Then, yesterday, faced with a lot of left over chicken stock from a few nights ago, an abundant supply of dried porcini, and several packages of Italian rice in the cupboard, I thought it was time. Rather than going to my cookbook collection, I dug up a recipe from television chef Ina Garten that I had seen her prepare a while ago and always wanted to make.

I bought the few ingredients from the recipe that I didn’t have on hand—some fresh crimini mushrooms, a couple of shallots. I dug out my favorite, long-neglected enameled cast iron risotto pot, and opened a bottle of wine. I took a deep breath, a few swigs of wine, and started to prep.

I soaked the dried porcini, finely chopped the shallots, diced the pancetta, heated the stock, measured out the rice, the saffron, and grated the cheese. So far, so good. Maybe another sip of wine. Had I already finished a glass?

Onto the cooking. I melted the butter, sautéed the shallots and pancetta. The aromas encouraged me to proceed. It was time for the rice. One more sip of wine. The rice went into the pot and I coated the grains with the melted butter. They started to take on a pearly glow. A sigh of relief and another sip of wine. The rice was now ready for the stock to which I had added the soaking liquid from the porcini. The first two ladles. I was sweating now. Stirring (and sipping), I watched the pot as the rice started to absorb the stock. I added the soaked porcini and the saffron. “It’s smelling good in there,” I heard from the living room. Encouraged again, I proceeded, now standing erect and confident at the pot.

I continued adding the ladlefuls of stock, stirring, watching, and occasionally tasting for the next twenty of minutes. Finally, it was done. I took the pot off the heat, stirred in the grated Parmigiano, and tasted for seasoning. Perfect! One final, triumphant, swig of wine, and I announced: “We’re ready.” Seated at the table, after one taste, my spouse looked up at me, smiled, and said: “Now, that’s how it’s done.” My risotto mojo is back.

Wild Mushroom Risotto Adapted from Ina Garten
Ingredients
1 -ounce dried morel mushrooms (I used dried porcini.)
1/2 pound fresh porcini or cremini mushrooms (I opted for cremini.)
4 cups chicken stock, preferably homemade
6 tablespoons (3/4 stick) unsalted butter
2 ounces pancetta, diced
1/2 cup chopped shallots (3 shallots)
1 1/2 cups Arborio rice (I used superfine carnaroli; I prefer its texture.)
1/2 cup dry white wine
1/2 teaspoon saffron threads
1 teaspoon kosher salt
1/2 teaspoon freshly ground black pepper
2/3 cup freshly grated Parmesan cheese, plus extra for serving

Directions
Place the dried mushrooms in a bowl and pour 2 cups boiling water over them. Set aside for 30 minutes. Scoop the mushrooms from the water with a slotted spoon, reserving the liquid. You should have 2 cups; if not, add water to make 2 cups. Drain the mushrooms and rinse once more. If some of the mushrooms are large, cut into 2 or 3 pieces. Pour the mushroom liquid through a coffee filter or paper towel, discarding the gritty solids. Set the mushrooms and the liquid aside separately.

Meanwhile, remove and discard the stems of the fresh mushrooms and rub any dirt off the caps with a damp paper towel. Don’t rinse them! Slice thickly and set aside.

In a small saucepan, heat the chicken stock with the 2 cups of reserved mushroom liquid and bring to a simmer.

Mushrooms, onions, and pancetta

In a heavy-bottomed pot or Dutch oven, melt the butter and sauté the pancetta and shallots over medium-low heat for 5 minutes. Add the rehydrated and fresh mushrooms and sauté for another 5 minutes. Add the rice and stir to coat the grains with butter.

After wine and stock

Add the wine and cook for 2 minutes. Add 2 full ladles of the chicken stock mixture to the rice plus the saffron, salt, and pepper. Stir and simmer over low heat until the stock is absorbed, 5 to 10 minutes. Continue to add the stock mixture, 2 ladles at a time, stirring every few minutes. Each time, cook until the mixture seems a little dry before adding more of the stock mixture. Continue until the rice is cooked through, but still al dente, about 25 to 30 minutes total. When done, the risotto should be thick and creamy and not at all dry. Off the heat, stir in the Parmesan cheese. Serve hot in bowls with extra cheese.

After adding the cheese

Here’s a link to the original recipe on the Food Network Website.

Wine Pairing: Montepulicano d’Abruzzo, Dolcetto D’Acqui


Grilled Flank Steak

flankboard2small

After making our wills yesterday, we found ourselves somewhat dispirited. Dealing with one’s own mortality, after all, isn’t easy. So we decided it was time for some Margarita Madness, a spread of chips, salsa, guacamole, and frozen Margaritas, to restore our spirits and start the evening.

To follow this festive beginning, we opted for a simple flank steak grilled and served with a compound garlic-and-parsley butter. A visit to one of our butchers yielded one of the finest looking flank steaks I’ve ever seen.

One beautiful flank steak

Because they are somewhat uneven in thickness, grilling flank steaks can be a little tricky. I get over come this hurdle by keeping the thickest part of the steak closest to the direct heat of my grill pan.

While the pan is heating, I dry the steak with paper towels and liberally season one side with Kosher salt and freshly ground black pepper and drizzle it lightly with extra-virgin olive oil. When the grill pan is hot, I place the steak on the pan, seasoned side down, with the thickest part of the steak closest to the hottest part of the pan, which is directly over the flame.

After one minute, I reduce the flame to medium and cook the steak for about 4 minutes. During this time, I season the exposed side with salt and pepper. When I see the juices starting to appear on top of the steak, I flip the steak and continue to cook for about another 4 minutes. I test for doneness by feeling the steak with my index finger. When it bounce back to the touch, it’s the perfect medium rare, for me the perfect temperature for flank steak.

I place the steak on the cutting board and place a thick round of my parsley-and-garlic compound butter in the middle of the steak and let the meat rest, tented, for about three minutes.

To serve, I slice the steak thick on an angle and serve with steamed spinach dressed with extra virgin olive oil.

For more on grilling steaks, and cooking almost any type of food and knowing when it’s done, I highly recommend James Peterson’s recently published Done.: A Cook’s Guide to Knowing When Food Is Perfectly Cooked.

Wine Pairing: Cabernet Sauvignon, Sangiovese.

Farmhouse Chicken Noodle Soup

noodlesoup2

Soup was on the menu last night. Nothing fancy, nothing exotic, nothing international, just plain, old-fashioned chicken noodle soup. Time constraints, however, led me to my pressure cooker, which considerably reduces the cooking time and, in my opinion, turns out a tastier, clearer soup than conventional methods.

My recipe came from one of my go-to books for this type of cooking: Pressure Cooker Perfectionfrom America’s Test Kitchen. Although the recipe at first glance would lead one to believe that the soup would be ready in 20 minutes (the time under pressure), in real time, including prep and cooking the noodles, it took about an hour. One ingredient, specifically soy sauce, gave me some pause, but it actually gave the soup a deeper meat flavor. And extra-wide egg noodles cooked in the finished broth added extra body.

Farmhouse Chicken Noodle Soup Adapted from Pressure Cooker Perfection by America’s Test Kitchen

1 tablespoon vegetable oil (I used extra-virgin olive oil.)
1 onion, chopped fine (I used a large yellow onion.)
3 garlic cloves, minced
1 teaspoon minced fresh thyme
8 cups water (I had to reduce the amount of water for my pressure cooker to avoid over filling by about a cup and a half. I compensated for the difference when I cooked the noodles in the broth.)
4 carrots, peeled and sliced 1/2 inch thick
2 celery ribs, sliced 1/2 inch thick
2 tablespoons soy sauce
1 (4 -pound) whole chicken, giblets discarded (I opted for an organic bird. I think they have more flavor.)
Salt and pepper
4 ounces (2 2/3 cups) wide egg noodles (I used extra wide.)
1/4 cup minced parsley

Heat oil in pressure cooker pot over medium heat until shimmering. Add onion (and a pinch of salt) and cook until softened, about 5 minutes.

Stir in garlic and thyme and cook until fragrant, about 30 seconds. (Be careful not to brown the garlic.)

Stir in water, carrots, celery, and soy sauce, scraping up any browned bits.

Season chicken with salt and pepper and place, breast-side up, in the pot. (Putting the chicken breast side up ensures more even cooking of the chicken. After adding the chicken, be sure that the contents of the pot do not exceed the max fill level of your pressure cooker.)

Lock pressure cooker lid in place and bring to high pressure over medium-high heat. As soon as the pot reaches high pressure, reduce heat to medium-low and cook for 20 minutes, adjusting heat as needed to maintain high pressure.

Remove pot from heat. Quick release pressure, then carefully remove the lid, allowing steam to escape away from you. (Follow your pressure cooker’s manual for quick-release instructions.)

Transfer chicken to cutting board, let cool slightly, then shred meat into bite-size pieces, discarding skin and bones. (I went for big chunks of chicken.)

Using a large spoon, skim excess fat from the surface of the soup. Bring soup to boil, stir in noodles, and cook until tender, about 5 minutes.

Stir in shredded chicken and parsley, season with salt and pepper to taste, and serve.

Wine Pairing: Chardonnay


Pork Chops Smothered in Creamy Onions

porkchopsonionsaucesmall

Often my choice of what we’ll have for dinner is determined by what’s in the market. Such was the case yesterday, when I went to our butcher and found some pretty good looking heritage pork chops sourced from local farms.

Locally sourced, heritage pork chops

I wanted a recipe for them that would do justice to their juicy fat and rich flavor. It didn’t take long before I settled on one from Carol Field’s In Nonna’s Kitchen. What attracted me to the recipe was its Tuscan austerity, using essentially only one ingredient other than the meat, onions. The onions are sliced very thin and are stewed for about an hour until they become a creamy sauce for the chops.

This sauce, however, reminded me of Marcella Hazan’s Smothered Onions for pasta, which is quite similar to Field’s except that at the end of the stewing, the onions are browned on high to sharpen their flavor. I thought this would work well with the chops.

One other influence on last night’s dish was James Peterson’s new book, Done.: A Cook’s Guide to Knowing When Food Is Perfectly Cooked. It had just arrived in the mail and I thought why not see what he says about pork chops. The section on sautéed pork chops illustrates with detailed photos exactly when to turn the chops (“When juices start to form on the top and sides. . .”) and suggests an internal temperature of 130° F as opposed to the typically recommended 145° F for the perfect medium. I incorporated Peterson’s instructions for cooking the chops into the original recipe from Field.

I am happy to report the results were. . .extraordinary. The pork chops came out perfectly cooked and juicy; the sauce was sweet and piquant. It may have taken three cookbooks to turn out this dish, but the prep and cooking were minimal.

Braciole di Maiale Contadine
Pork Chops Smothered in Creamy Onions Adapted from In Nonna’s Kitchen

3 onions, sliced very fine (I used two rather large Vidalia onions sliced 1/8” thick with a mandolin.)
4-5 tablespoons extra-virgin olive oil (I used 4 tablespoons of oil and 2 tablespoons of butter.)
1-2 tablespoons of water (I skipped the water as my onions were quite moist.)
Salt
Freshly ground black pepper
6 pork chops (about 2 3/4 pounds) (I used 2 bone-in chops, about 1.5 pounds total.)
All-purpose flour with salt and pepper for dredging
1/2 cup dry red wine
1 – 2 tablespoons of unsalted butter (As I used butter when cooking the onions and did not puree the onions, I did not use it here.)

Put the onions in a large heavy sauté pan with 2 tablespoons of the olive oil, a tablespoon or two of water, salt, and pepper. (I used the oil but added 1 tablespoon of unsalted butter and omitted the water.)

Cover the pan and cook the onions at the lowest simmer over the lowest possible heat for 45 minutes to one hour, stirring occasionally. At the end the onions will be smooth creamy. (I cooked the onions for a full hour and at the end uncovered them, raised the heat to medium high and cooked them until they were deep gold in color. I then added a little dry vermouth and cooked until the wine evaporated and followed this with a tablespoon of chopped parsley.)

Set the sauce aside.

Dredge the pork chops in the the seasoned flour so they won’t stick while cooking. Drizzle the remaining oil into a heavy sauté pan large enough to hold the chops comfortably without crowding, add the pork chops, and brown them, turning so they cook evenly. (I used 2 tablespoons of oil and 1 tablespoon of butter. Following Peterson’s book, I heated the fats and cooked the chops on a medium heat about 5 minutes a side; they were about 3/4 of an inch thick. I turned them only once, when juices and blood started to appear on top of the bones and the meat—about 5 minutes and cooked the second side for about another 3 minutes.)

When they have browned, 2 to 3 minutes a side (again, note my comments about browning above) pour in the red wine and boil until it evaporates. (Before adding the wine, I drained off most of the accumulated cooking fat.)


Pork chops after adding the wine.

Put the cooked onions on top of the pork chops, cover and cook together briefly on top of the stove so the flavors meld, turning the chops several times. (I cooked the chops for about 2 minutes covered and turned them only once.)

The onions cook into a really thick sauce; at the end puree them in a processor or blender, adding a little water or a tablespoon or two of butter. (I skipped this step altogether because I wanted the sauce to have a little more texture and had already used enough butter in the sauce and in the browning of the chops.)

I know that with my commentary, this recipe may appear complicated; but trust me when I say it really isn’t difficult.

I served the chops accompanied by oven-roasted broccoli.

Wine Pairing: Morellino di Scansano, Chianti Classico


Swordfish Breaded Palermo Style

swordfishpalermosmall

For me, one of the most attractive characteristics of Italian cooking has always been its simplicity–its recipes with minimal ingredients and simple preparation. As I child, I used to watch my mother and aunt in the kitchen turn out multi-course dinners for us, night after night, without breaking a sweat. They cooked from memory the simple dishes with which they themselves grew up. One such dish was baked fish coated with breadcrumbs, which hailed from my mother’s Sicilian family.

Yesterday, when I came home from the fish market with some beautifully fresh swordfish, I thought I would try to recreate my mother’s dish and started looking for a recipe.

My search led me to one from Arthur Schwartz’s The Southern Italian Table: “Pesce Spada Impanata,” or Swordfish Breaded Palermo Style. Thin cutlets of swordfish are coated with seasoned bread crumbs and quickly baked. The savory, garlicky coating perfectly complements the subtly sweet, meaty flavors of the swordfish.

I served the fish accompanied by another of my mother’s favorites, string beans sautéed with garlic and oil.

Swordfish Breaded Palermo Style from The Southern Italian Table
Ingredients

1 cup fine dry bread crumbs
1 teaspoon salt
1 teaspoon roughly ground fennel seed
3 large garlic cloves, finely chopped (about 1 tablespoon)
3 tablespoons coarsely chopped flat-leaf parsley
2 tablespoons extra-virgin olive oil
1 pound swordfish, cut into 1/4 inch thick cutlets
Salt and freshly ground black pepper to taste
Lemon wedges

Place a rack on the highest rung of the oven. Preheat the oven to 450° F. (The position of the rack is important as it allows for a faster baking of the fish and the browning of the crumbs. RM)

Combine the breadcrumbs, salt, fennel seed, garlic, parsley, and 1 tablespoon of the oil on a large plate. Mix until all the bread crumbs are moistened with oil. (My breadcrumbs were quite dry and I needed to add a little more than the called-for tablespoon. RM)

Brush the fish slices lightly with the remaining tablespoon of oil and season lightly with salt and pepper.

Dredge each slice in the seasoned bread crumbs, pressing the crumbs into the fish so that each side is well coated. Arrange the fish slices on a baking sheet.

Bake the fish for 5 to 6 minutes.

Serve hot or at room temperature with lemon wedges.

My Note: Be sure to have your rack on the highest rung possible of your oven and to use a baking sheet without sides as opposed to a sheet pan with sides. Doing so will help the breading get more color. I did not have a baking sheet and had to put the fish under the broiler for the final minute or so to lightly brown the crumbs.

Wine Pairing: Grillo, un-oaked Chardonnay

Coq Au Riesling

coqaurieslingsmall

What attracted me to this dish when I saw Nigella Lawson preparing it on the Food Network was that the chicken did not require any browning, which definitely shortens the clean-up time. I admit, however, that I was skeptical, since I knew that without any color, the chicken might not be too visually appealing. Nevertheless, the ease of prep and minimal cooking time convinced me to go ahead.

I was more than pleased with how the dish turned out the first time and have made it several times since, making small adjustments to the original recipe. As for the esthetics, the fresh dill add a lot of color. The savory-bacon and woodsy-mushroom flavors of the broth when combined with the buttered noodles have prompted many a guest to ask for seconds.

Coq au Riesling Adapted from Nigella Lawson
Ingredients
2 tablespoons extra virgin olive oil
1 large clove garlic peeled and lightly smashed
1 cup bacon sliced into 1/4 inch strips
1 1/2 leeks (finely sliced) Slice from the white just to where the leek starts to turn green.
12 boneless, skinless chicken thighs (about 2.75 pounds)
3 bay leaves
12 oz portabello mushrooms (torn into strips)
1 bottle dry riesling, ideally Alsatian.
salt (to taste)
fresh ground black pepper (to taste)
2 tablespoons chopped fresh dill (to serve)
Buttered egg noodles to accompany.

Method
Heat the oil and garlic clove in a heavy bottomed Dutch oven and fry the bacon stripe until crisp Remove the garlic clove when it starts to take on color;

Add the sliced leeks and a pinch of salt and soften with the bacon for a minute or so.

Add the chicken thigh with the bay leaves, torn mushrooms and wine.

Season with salt and pepper to taste and bring to the boil. Cover the pot and simmer gently for 1 hour. Like all stews, this will taste even better the next day.

Serve sprinkled with dill and together with some buttered egg noodles.

Note: Do not skimp on the quality of the Riesling. It accounts for a lot of the flavor in this dish.

Here’s a link to the original recipe.

Wine Pairing: Dry Alsatian Riesling, Sauvignon Blanc

Cauliflower Sausage Gratin

cavalfioreplatedsmall

Cauliflower has always been one of my favorite vegetables, especially when simmered slowly in onions in tomato sauce, a dish my Sicilian mother would often serve during Lent. I had originally planned to make this dish last night, but with my brother and his wife coming over for dinner, I thought I needed something more substantial for a main course. I looked through my files and found the answer: a recipe from television’s Iron Chef Michael Symon came to mind: cauliflower sausage gratin.

Sausage plays a supporting role in this dish, adding a savory succulence to the mild nutlike flavors of the cauliflower. A sweet tomato sauce with Vidalia onions and a buttery Parmigiano-panko crust complete the cast.

Cauliflower Sausage Gratin Adapted from Michael Symon

Ingredients

Olive Oil
3/4 pound Fennel Italian Sausage (removed from the casings)
1 medium head Cauliflower (about 2 pounds; cut in to small florets)
Salt and freshly ground Black Pepper (to taste)
1 medium Onion (small diced)
4 Garlic cloves (minced)
28-ounce can crushed Italian tomatoes
1 cup Flat Leaf Parsley (chopped)
2/3 cup Panko Breadcrumbs
1/2 cup grated Parmesan Cheese
Unsalted butter

Preheat your oven to 375 degrees.

Place a large Dutch oven over medium high heat. Add 2 tablespoons of olive oil along with the sausage. Cook, breaking up the sausage as you go, until browned, about 10 minutes. Remove the sausage with a slotted spoon and set aside.

Add cauliflower to the pot and brown on both sides, about 2 to 3 minutes, and season with salt and freshly ground black pepper. Depending on how much fat is left in the pan from browning the sausage, you may need to add some olive oil.

To the pan, add the onion and a pinch of salt and cook until the onions become soft and aromatic, about 5 minutes. When the onions are almost done, add the garlic, stirring to make sure the garlic does not brown.

Add the crushed tomatoes with their liquid, along with the sausage and any remaining juices. Bring the mixture up to a simmer and give it a taste, adding additional salt and pepper if necessary. Mix in the parsley, minus 1 tablespoon, and then pour the whole mixture in to a 13×9 baking dish.

In a small bowl, mix together the panko breadcrumbs and parmesan cheese. Sprinkle the mixture evenly over the top of the sausage and cauliflower, dot with butter, and bake until golden brown on top and bubbly, about 30 minutes. Remove from the oven, let sit for 5 to 10 minutes, then serve.

Just from the oven
Just from the oven

Garnish with parsley.

Here’s a link to Michael Symon’s recipe from The Chew

Wine Pairing: Morellino di Scansano, Merlot

Gemelli with Tuna and Tomatoes: Act II

tunapastasaladsmall

Raised in a family who suffered through the Great Depression, I was often reminded how important it was to save money and never let good food go to waste. My mother never let me forget that “people were starving in other parts of the world.” Her words made a lasting impression.

Indeed, using one night’s leftovers for the next day’s meal helps me justify spending so much for top quality ingredients. Tuesday’s gemelli with tuna and cherry tomatoes is a perfect example. The pasta’s main ingredient, Italian tuna packed in olive oil, was quite expensive—close to $25 for the two six-ounce jars—add to this the cost of the other ingredients and we’re looking at almost$40.

The pasta was wonderful the first night; however, I’m not a fan of reheated pasta, especially when it was prepared with fish. So I thought I would serve it last night as a salad. I took the pasta from the fridge two hours before dinner so that it would come to room temperature. I then made a light vinaigrette with some extra-virgin olive oil and a little balsamic vinegar. After tossing the past in the dressing, I added the juice of one lemon, a finely minced clove of garlic, a few more quartered cherry tomatoes, a good pinch of salt (cold dishes always seem to require more salt) and some freshly ground black pepper.

I served the pasta on a bed of wild arugula dressed with a drizzle of olive oil, some lemon zest, and a pinch of slat.

Paired with a dry rosé from Provence, this repurposed pasta was the perfect dish for dining al fresco on a humid summer’s night.

Would enjoy hearing from others their thoughts about using leftovers.

Gemelli with Tuna and Cherry Tomatoes

tunapastastep3small

Last night we enjoyed one of our favorite weeknight pasta dishes: Gemelli with Tuna and Cherry Tomatoes. The source, a seven-year old recipe from Rachael Ray. The counterpoint between the unctuous, savory tuna and the fresh, sweet cherry tomatoes makes for a wonderful sauce for the twisted-twin strands of pasta.

Over the years, I’ve modified the recipe to meet our own palates, boosting the savory side with some capers, adding a little heat with some crushed red-pepper flakes, and using a touch of vinegar to brighten the dish with some acidity. If you would like to view the original recipe, here’s a link: Rachael Ray’s Original.

INGREDIENTS
3 tablespoons extra virgin olive oil
6 cloves garlic, finely chopped
pinch of crushed red-pepper flakes
2 jars solid Italian tuna in olive oil (6 ounces each), drained
1/4 cup dry white wine
3/4 pint small cherry or grape tomatoes, quartered
1/2 teaspoon sherry vinegar
2 tablespoons small capers packed in brined, rinsed and drained
Coarse salt and black pepper
1 pound gemelli pasta – short braids of pasta or other short-cut pastas, such as penne rigate, can be substituted, cooked to al dente in salted water
1/3 cup flat leaf parsley, chopped (about 3 handfuls)
20 leaves fresh basil leaves, shredded
Serves 4

PREPARATION
Add olive oil and garlic to a large, deep skillet. Place over low heat and slowly poach the garlic to extract as much flavor as possible, about 5 to 6 minutes. Do not let the garlic to take on any color.

Raise the heat to medium and when garlic starts to sizzle, add tuna and mash into oil with the back of a wooden spoon. Reduce the heat to low and let the tuna sit in the oil for about 5 minute to infuse the fish flavor into the oil and to give the tuna time to break down. Add the wine to help break down the tuna so that it almost melts into the oil. If necessary, add a little of the pasta water.

Tuna being mashed in oil and garlic

When the tuna is like a thick pasty sauce, raise the flame a bit and add the quartered tomatoes, vinegar, and capers. Season with salt and pepper. Heat the tomatoes through until they start to break down, 3 to 4 minutes, then add hot, drained pasta that has been cooked to al dente.

Tuna with tomatoes and capers added

Add the parsley to the tuna and pasta and toss to combine well and evenly coat pasta. Adjust seasonings. Top pasta with shredded basil and serve on heated plates.

Pasta plated
Pasta plated

Wine Pairing: Trebbiano d’Abruzzo, Frascati