When it comes to cooking, I react to the word “vegetarian” as a vampire would to “garlic.” Fortunately, I just purchased Michele Scicolone’s The Italian Vegetable Cookbook
This richly illustrated volume has 200 recipes for a wide variety of dishes including antipasti, soups, pasta, main dishes, and even desserts. My only regret is that I didn’t have it for the summer months, when so many vegetables are widely available and at their best.
Scicolone is a prolific writer who has produced at least a dozen books on Italian cooking and has earned a well deserved reputation for recipes that work. This weekend I decided to make one of her main course dishes for some friends: Pasta-Stuffed Peppers.
Red and yellow bell peppers are hollowed out and filled with small pasta like ditalaini that is mixed in a savory sauce of tomatoes, garlic, capers, anchovies, and olives. The peppers are then covered with their tops and baked in a moderate oven until the peppers are tender, about 45 minutes.
Here is a link to her recipe online on Food Republic. Although the recipe claims to serve 6, your guests, as did mine, may find that just one of these delicious peppers is not enough. Below is my illustrated version of the recipe.
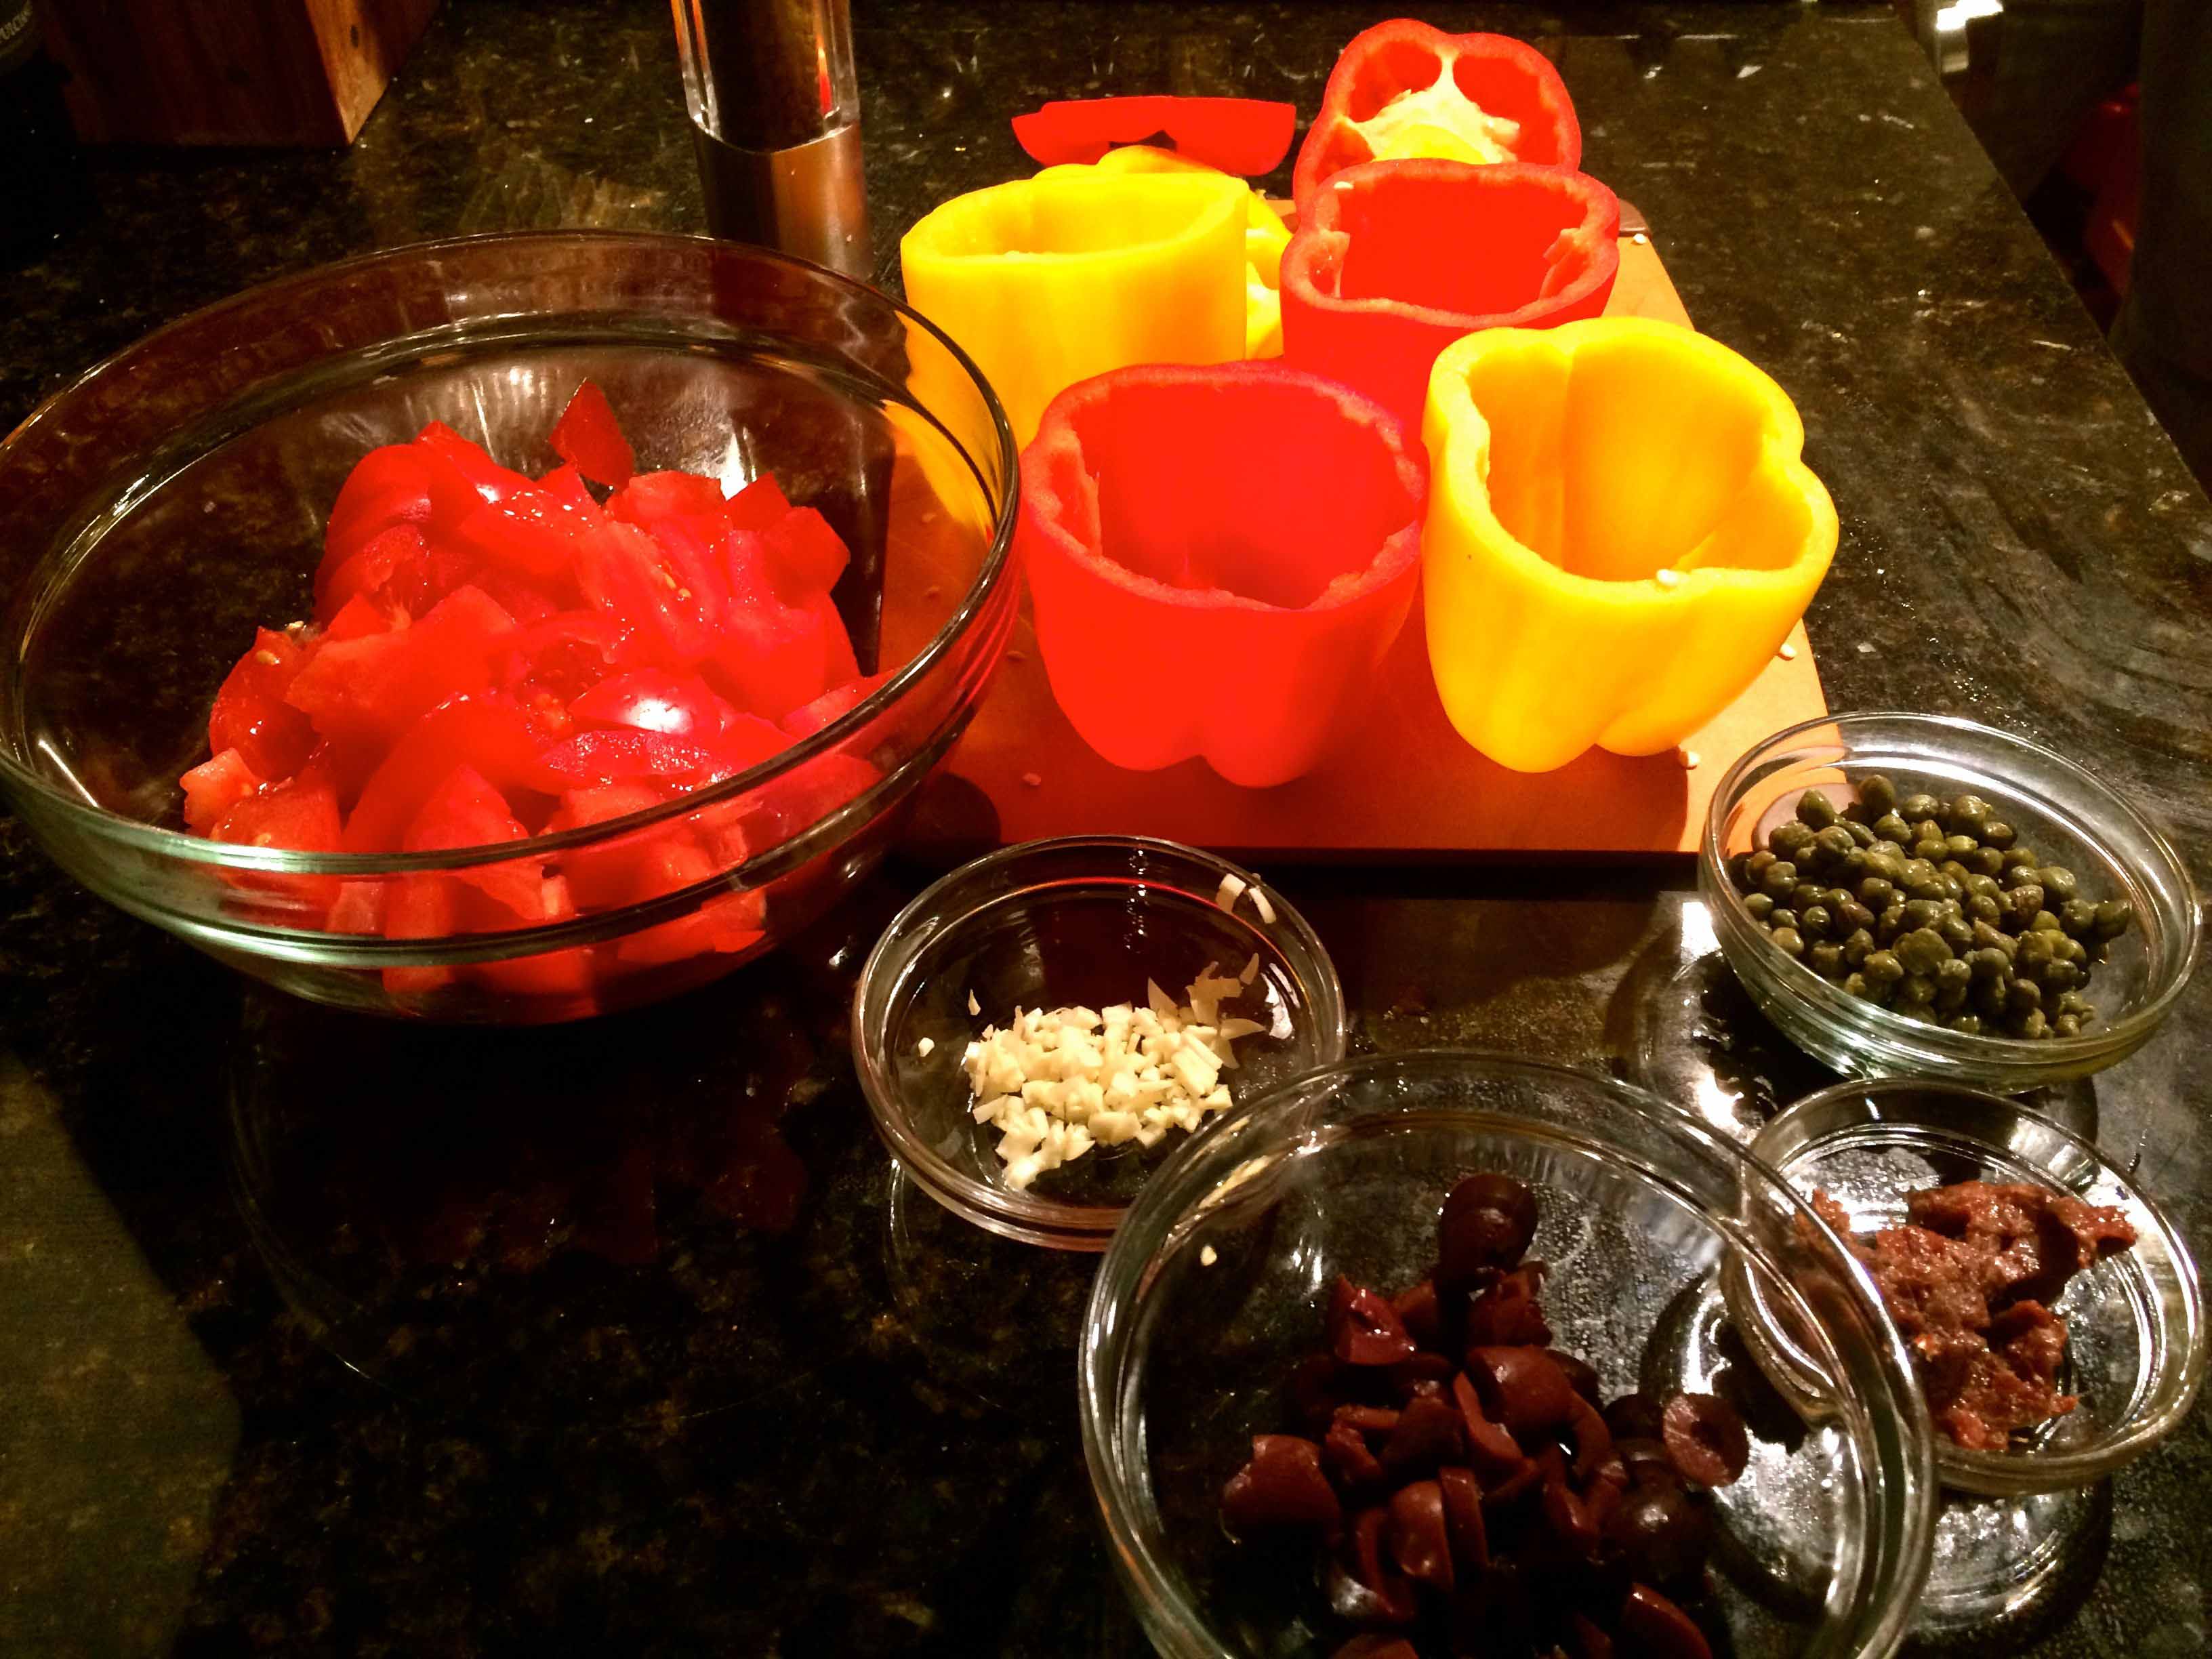
1. Prepare and assemble the ingredients: peppers, tomatoes, garlic, black olives, anchovies, capers, and dried oregano
The prepped ingredients
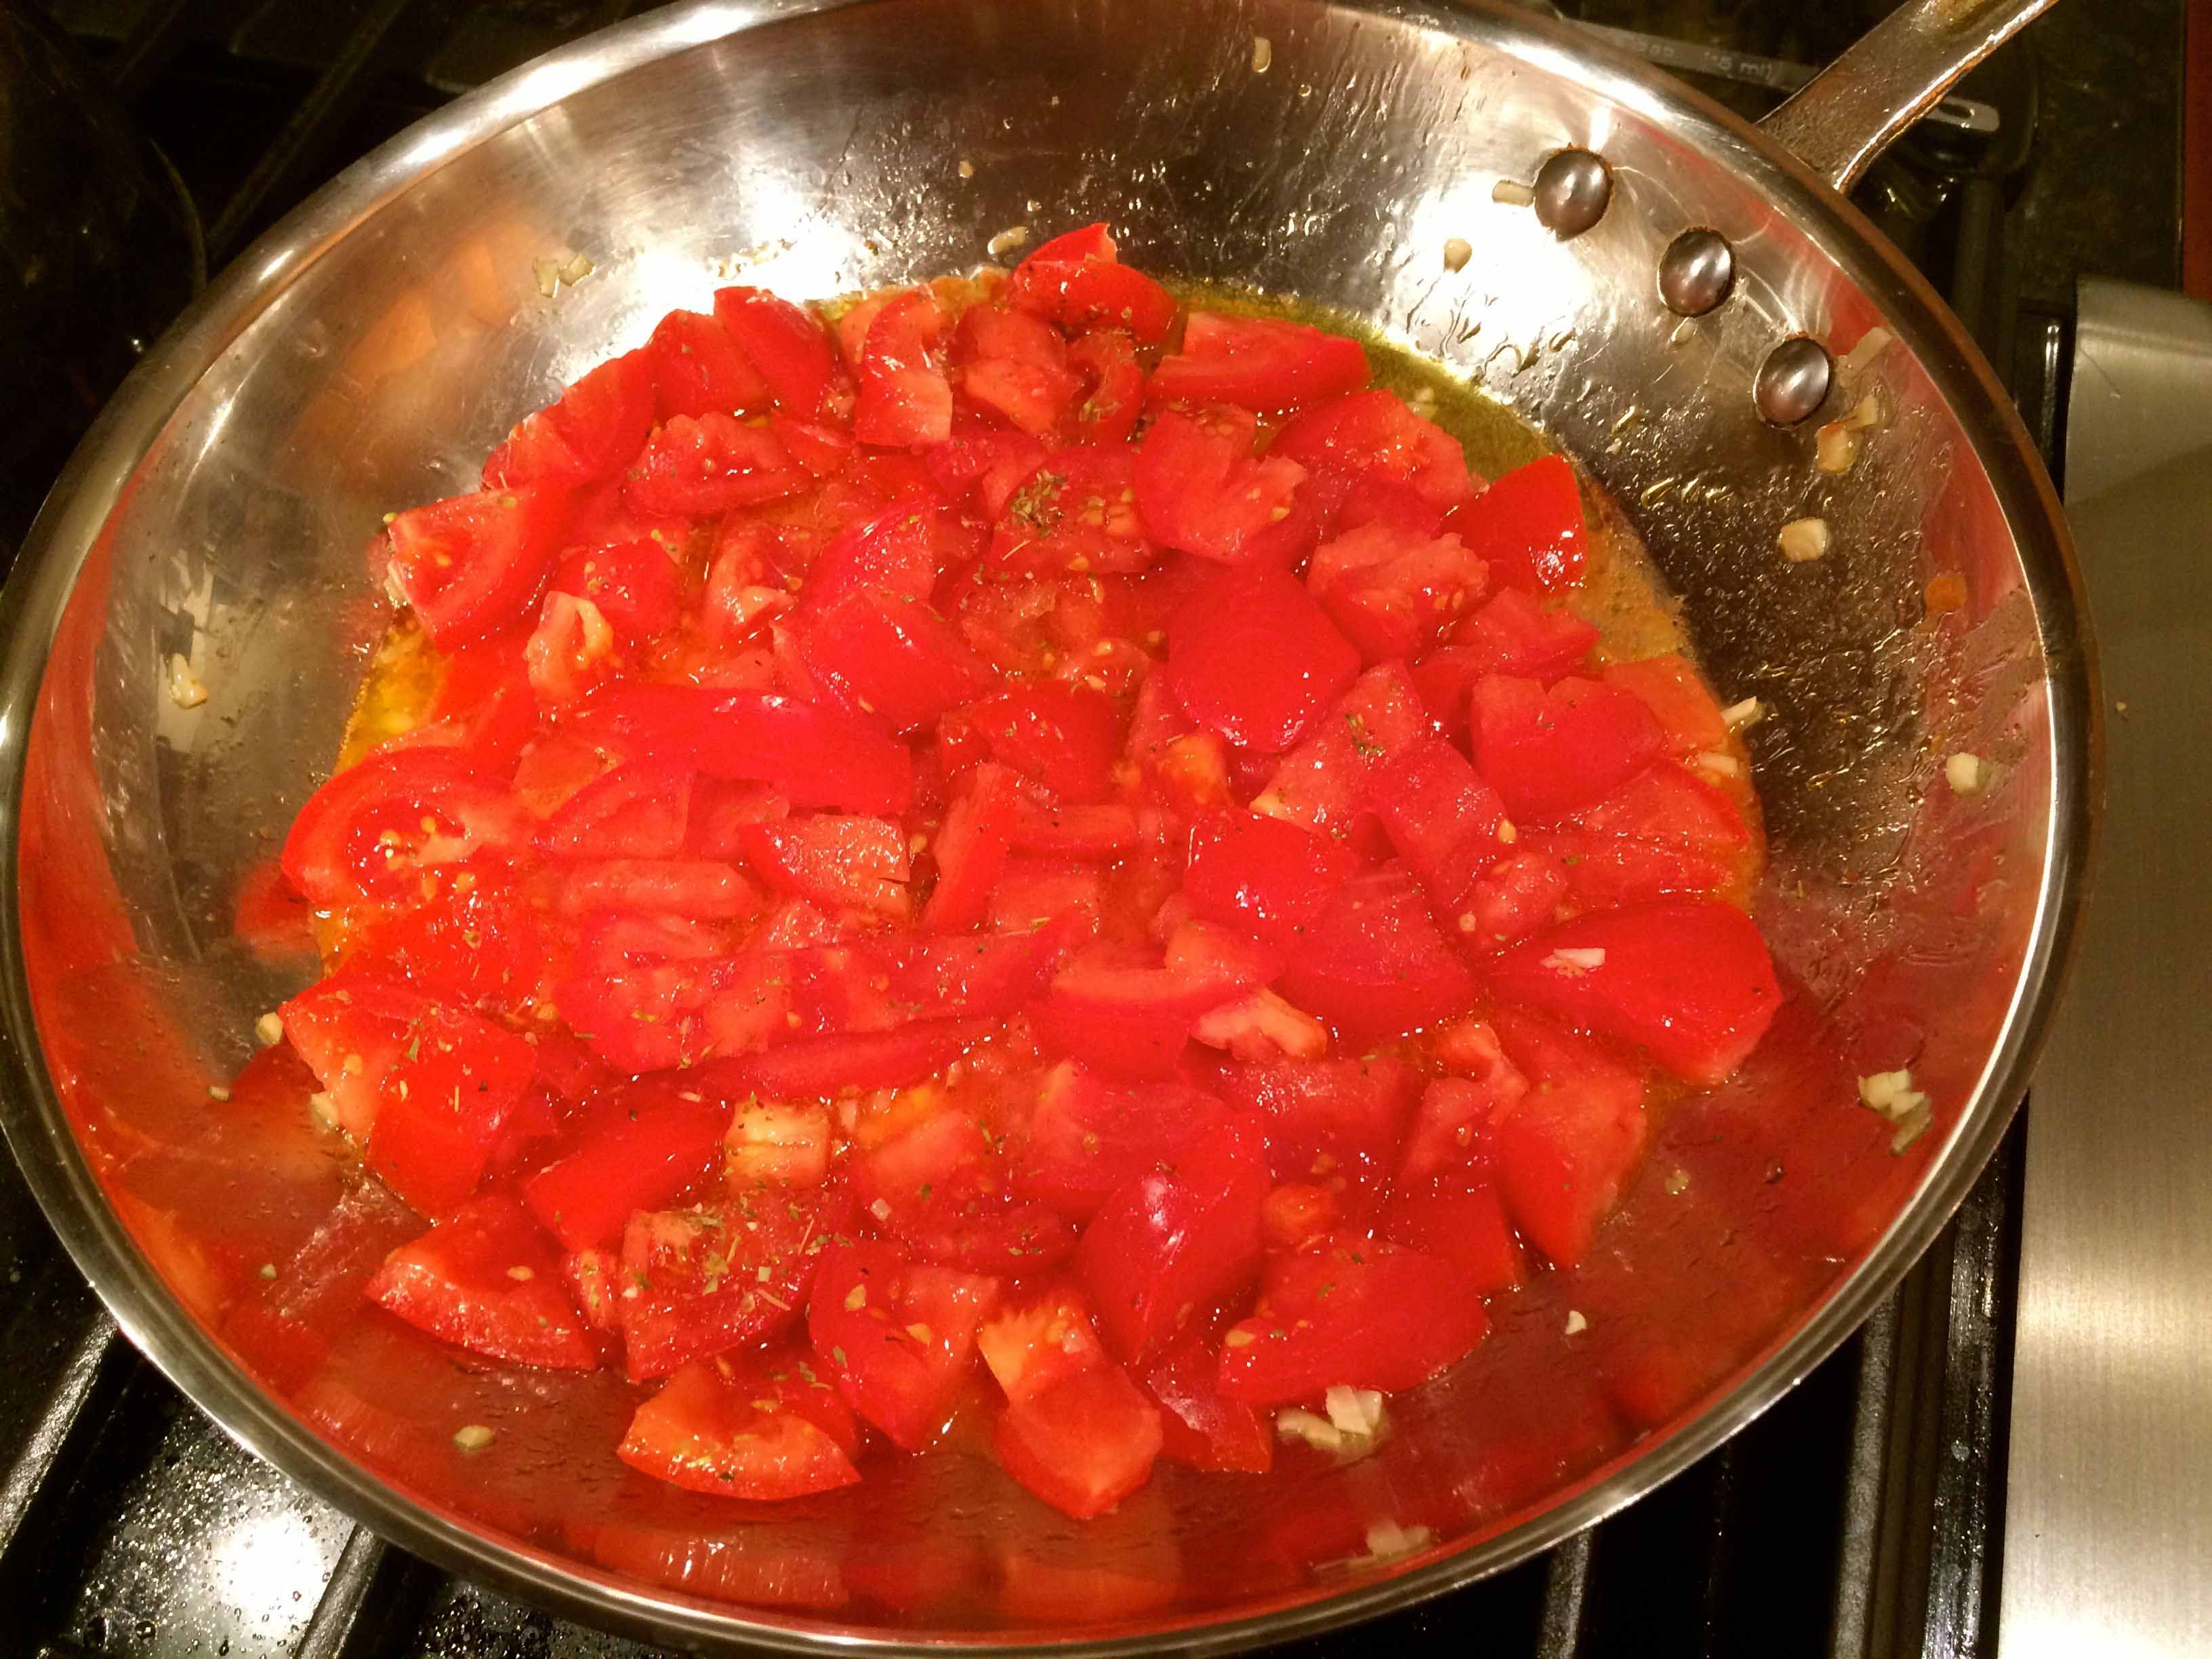
2. Heat the oil and garlic and cooke the tomatoes seasoned with oregano:
Cook the tomatoes
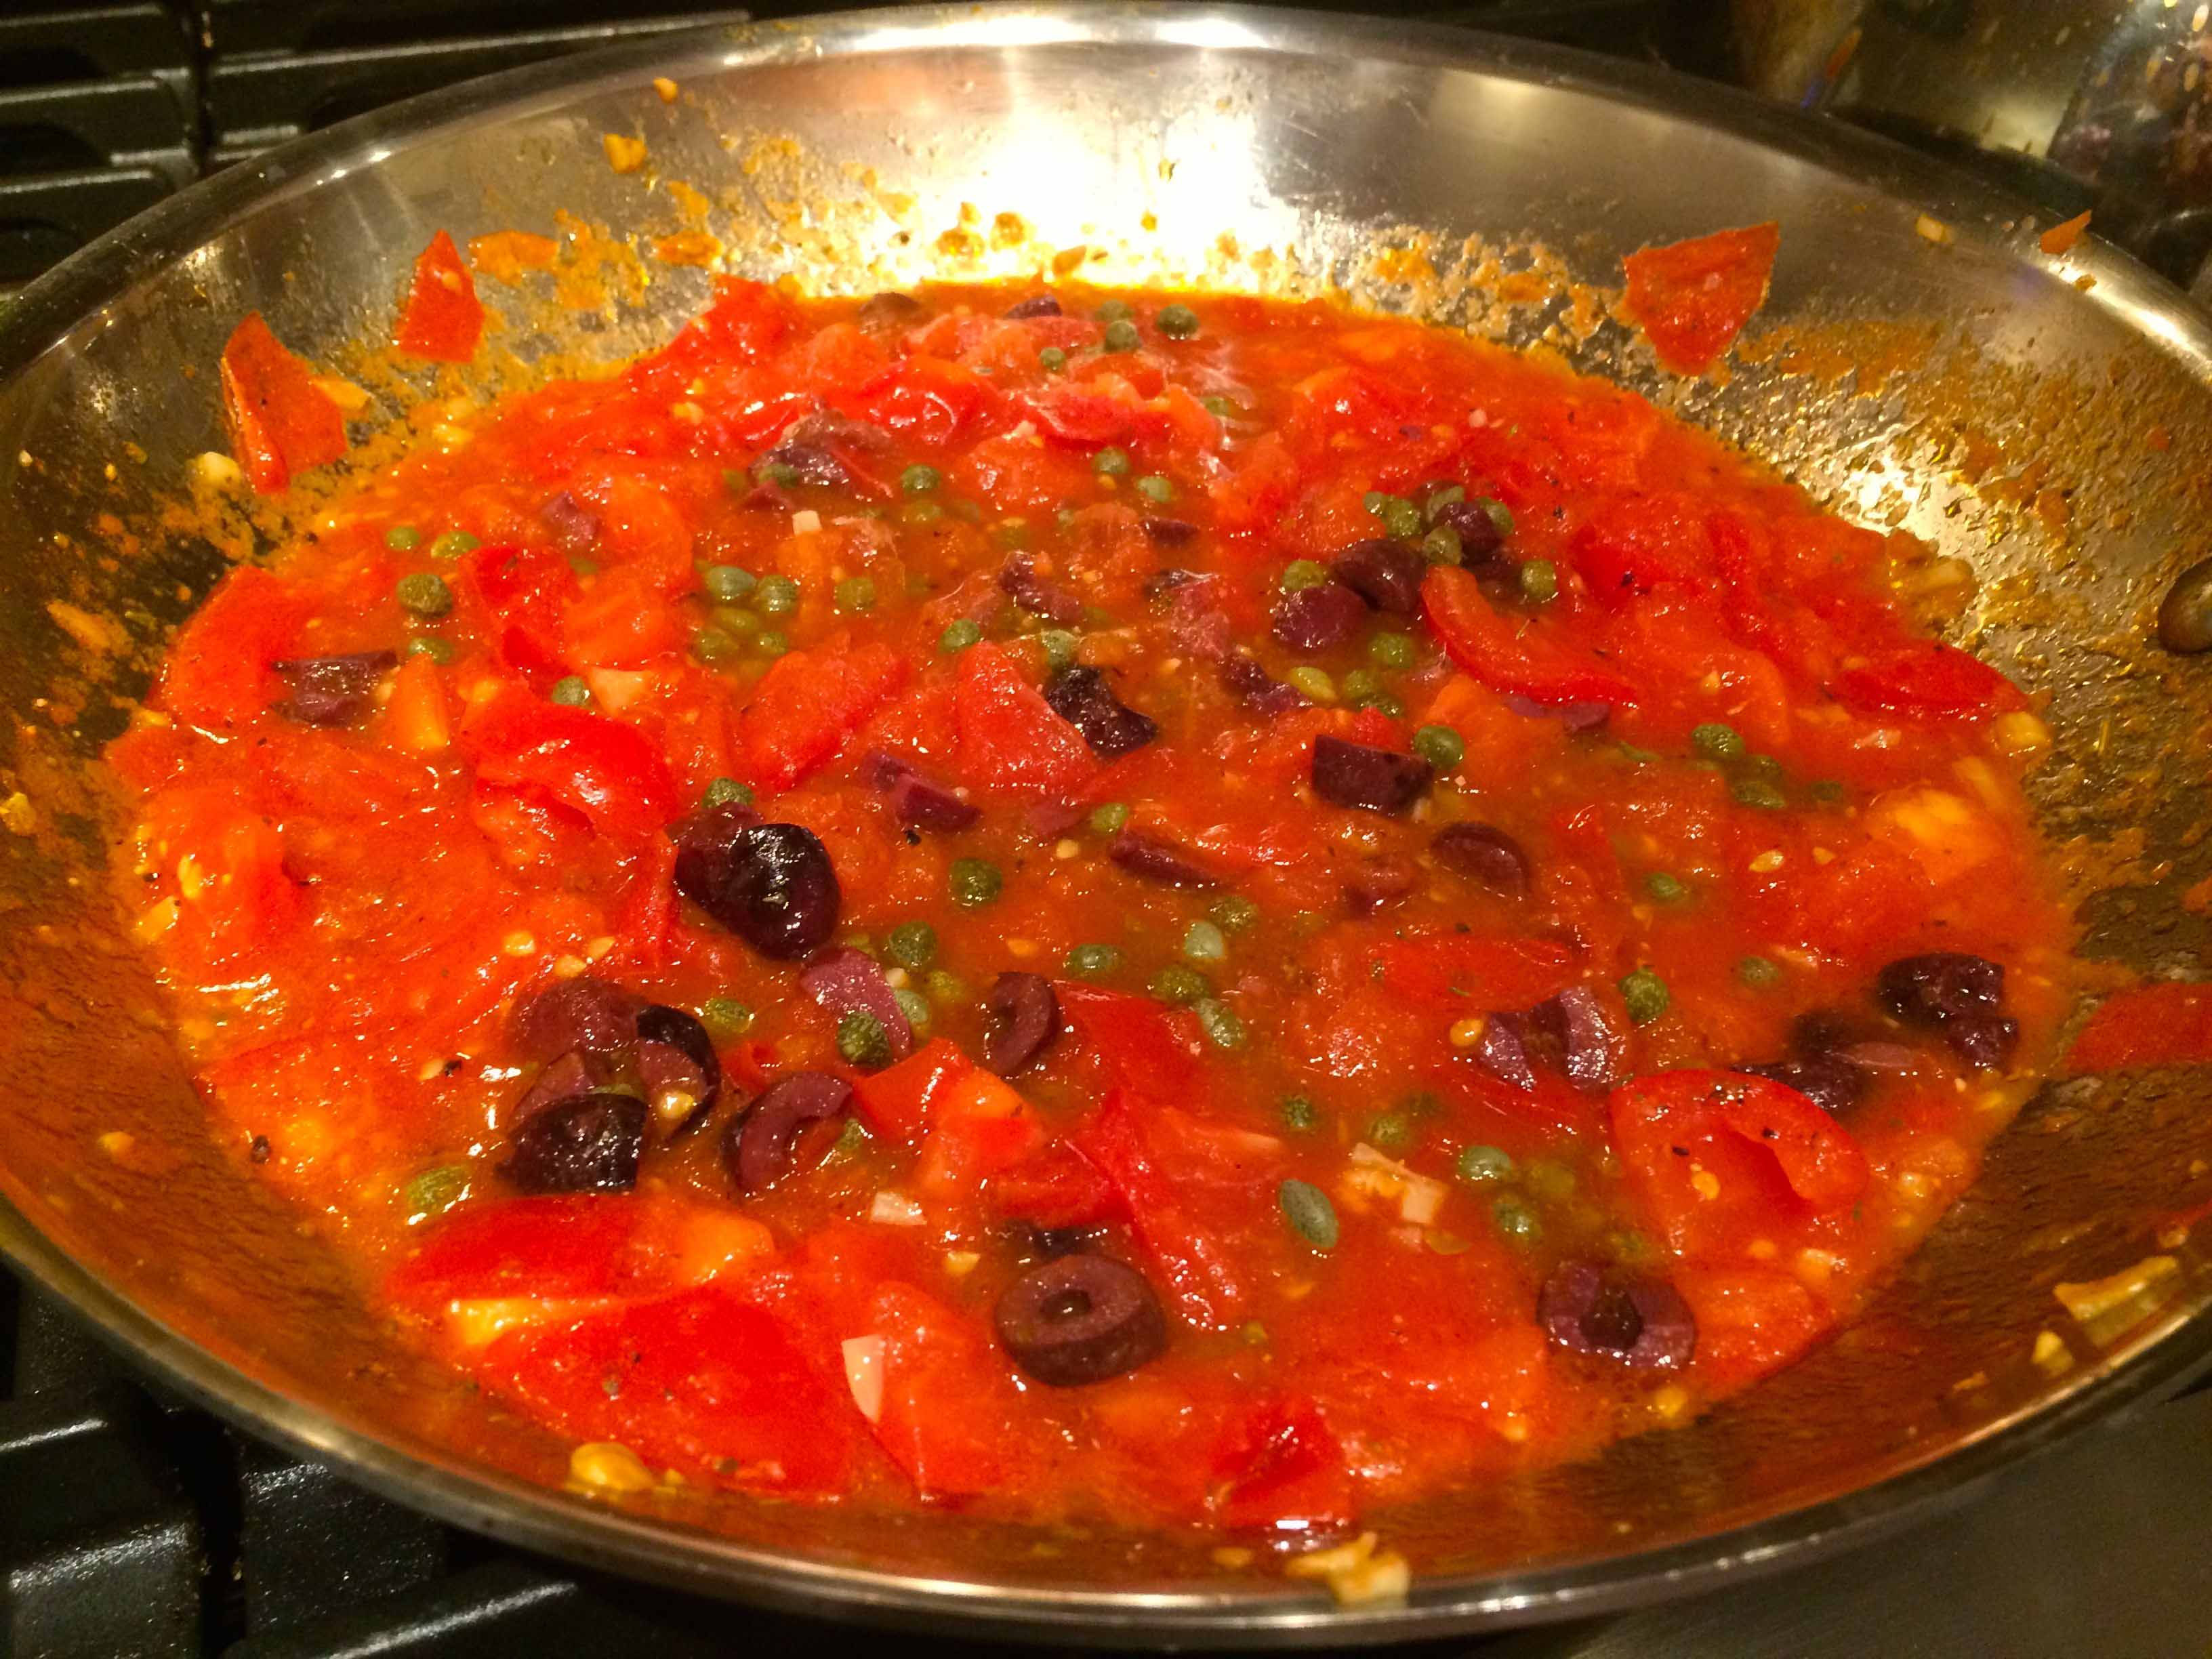
3. Add the savory components: olives, capers, anchovies and season with salt and pepper.
The savory components
4. Add the cooked small pasta to the sauce before filling and baking the peppers.
Sauce the cooked pasta before filling the peppers
5. Bake in a 375ºF oven. Be sure that your peppers are tender; it may take a tad more than the suggested 45 minutes.
Friday night, end of the week, and being tired generally lead to a quick and easy supper to linger over with a glass of wine. Since we had our share of meat, fish, and pasta this week, I looked through my cookbooks for something vegetable centric. My search eventually led me to Giuliano Hazan’s recipe for a cauliflower gratin in Every Night Italian.
Despite being vegetarian, however, this dish is definitely not “light,” given the amount of cheese and butter it calls for. Nevertheless, as a main course for a meatless supper, I guess its fat content, which, after all, contributes so much flavor, can be rationalized in one way or another.
The ingredient that initially attracted me to this recipe was the fresh sheep’s milk cheese from southern Italy known as primo sale, “first salt.” It was one of my aunt’s favorite cheeses to serve at a Saturday lunch when our family would return from its weekly excursion to the local Italian markets and salumerie. If you can’t find it, Hazan recommends substituting any white sheep’s milk cheese firm enough to slice. A Google search may help you find the primo sale locally.
Cauliflower Gratin with Tomato and Fresh Sheep’s Milk
Adapted from Giuliano Hazan’s Every Night Italian
1 large cauliflower (about 2 pounds)
1 small onion, chopped fine
3 tablespoons unsalted butter
1 (28-ounce) can of whole peeled Italian tomatoes, crushed. (You should have a total of 2 cups with some of the juice.)
3/4 cup Parmigiano Reggiano, freshly grated
Salt
Freshly ground black pepper
1/4 teaspoon ground cloves (optional)
6 ounces primo sale or other fresh sheep’s milk cheese firm enough to slice, sliced thin
Bring a pot of water large enough to accommodate the cauliflower to a boil over high heat.
Preheat the oven to 375° F.
Quarter the cauliflower, discarding the leaves, and add to the water when it has reached a boil. Do not add any salt. Cook until tender, about 20 minutes. When done, drain and rinse under cold water to stop the cooking. Cut the cauliflower into bite-size pieces and set aside.
Meanwhile, sauté the onions in 2 tablespoons of the butter in a 10 inch sauté pan over medium-low. When the onions turn a light gold, add the tomatoes and season with salt, pepper, and the optional ground cloves.
Cook the tomatoes for about 20 minutes or until they have thickened into a sauce.
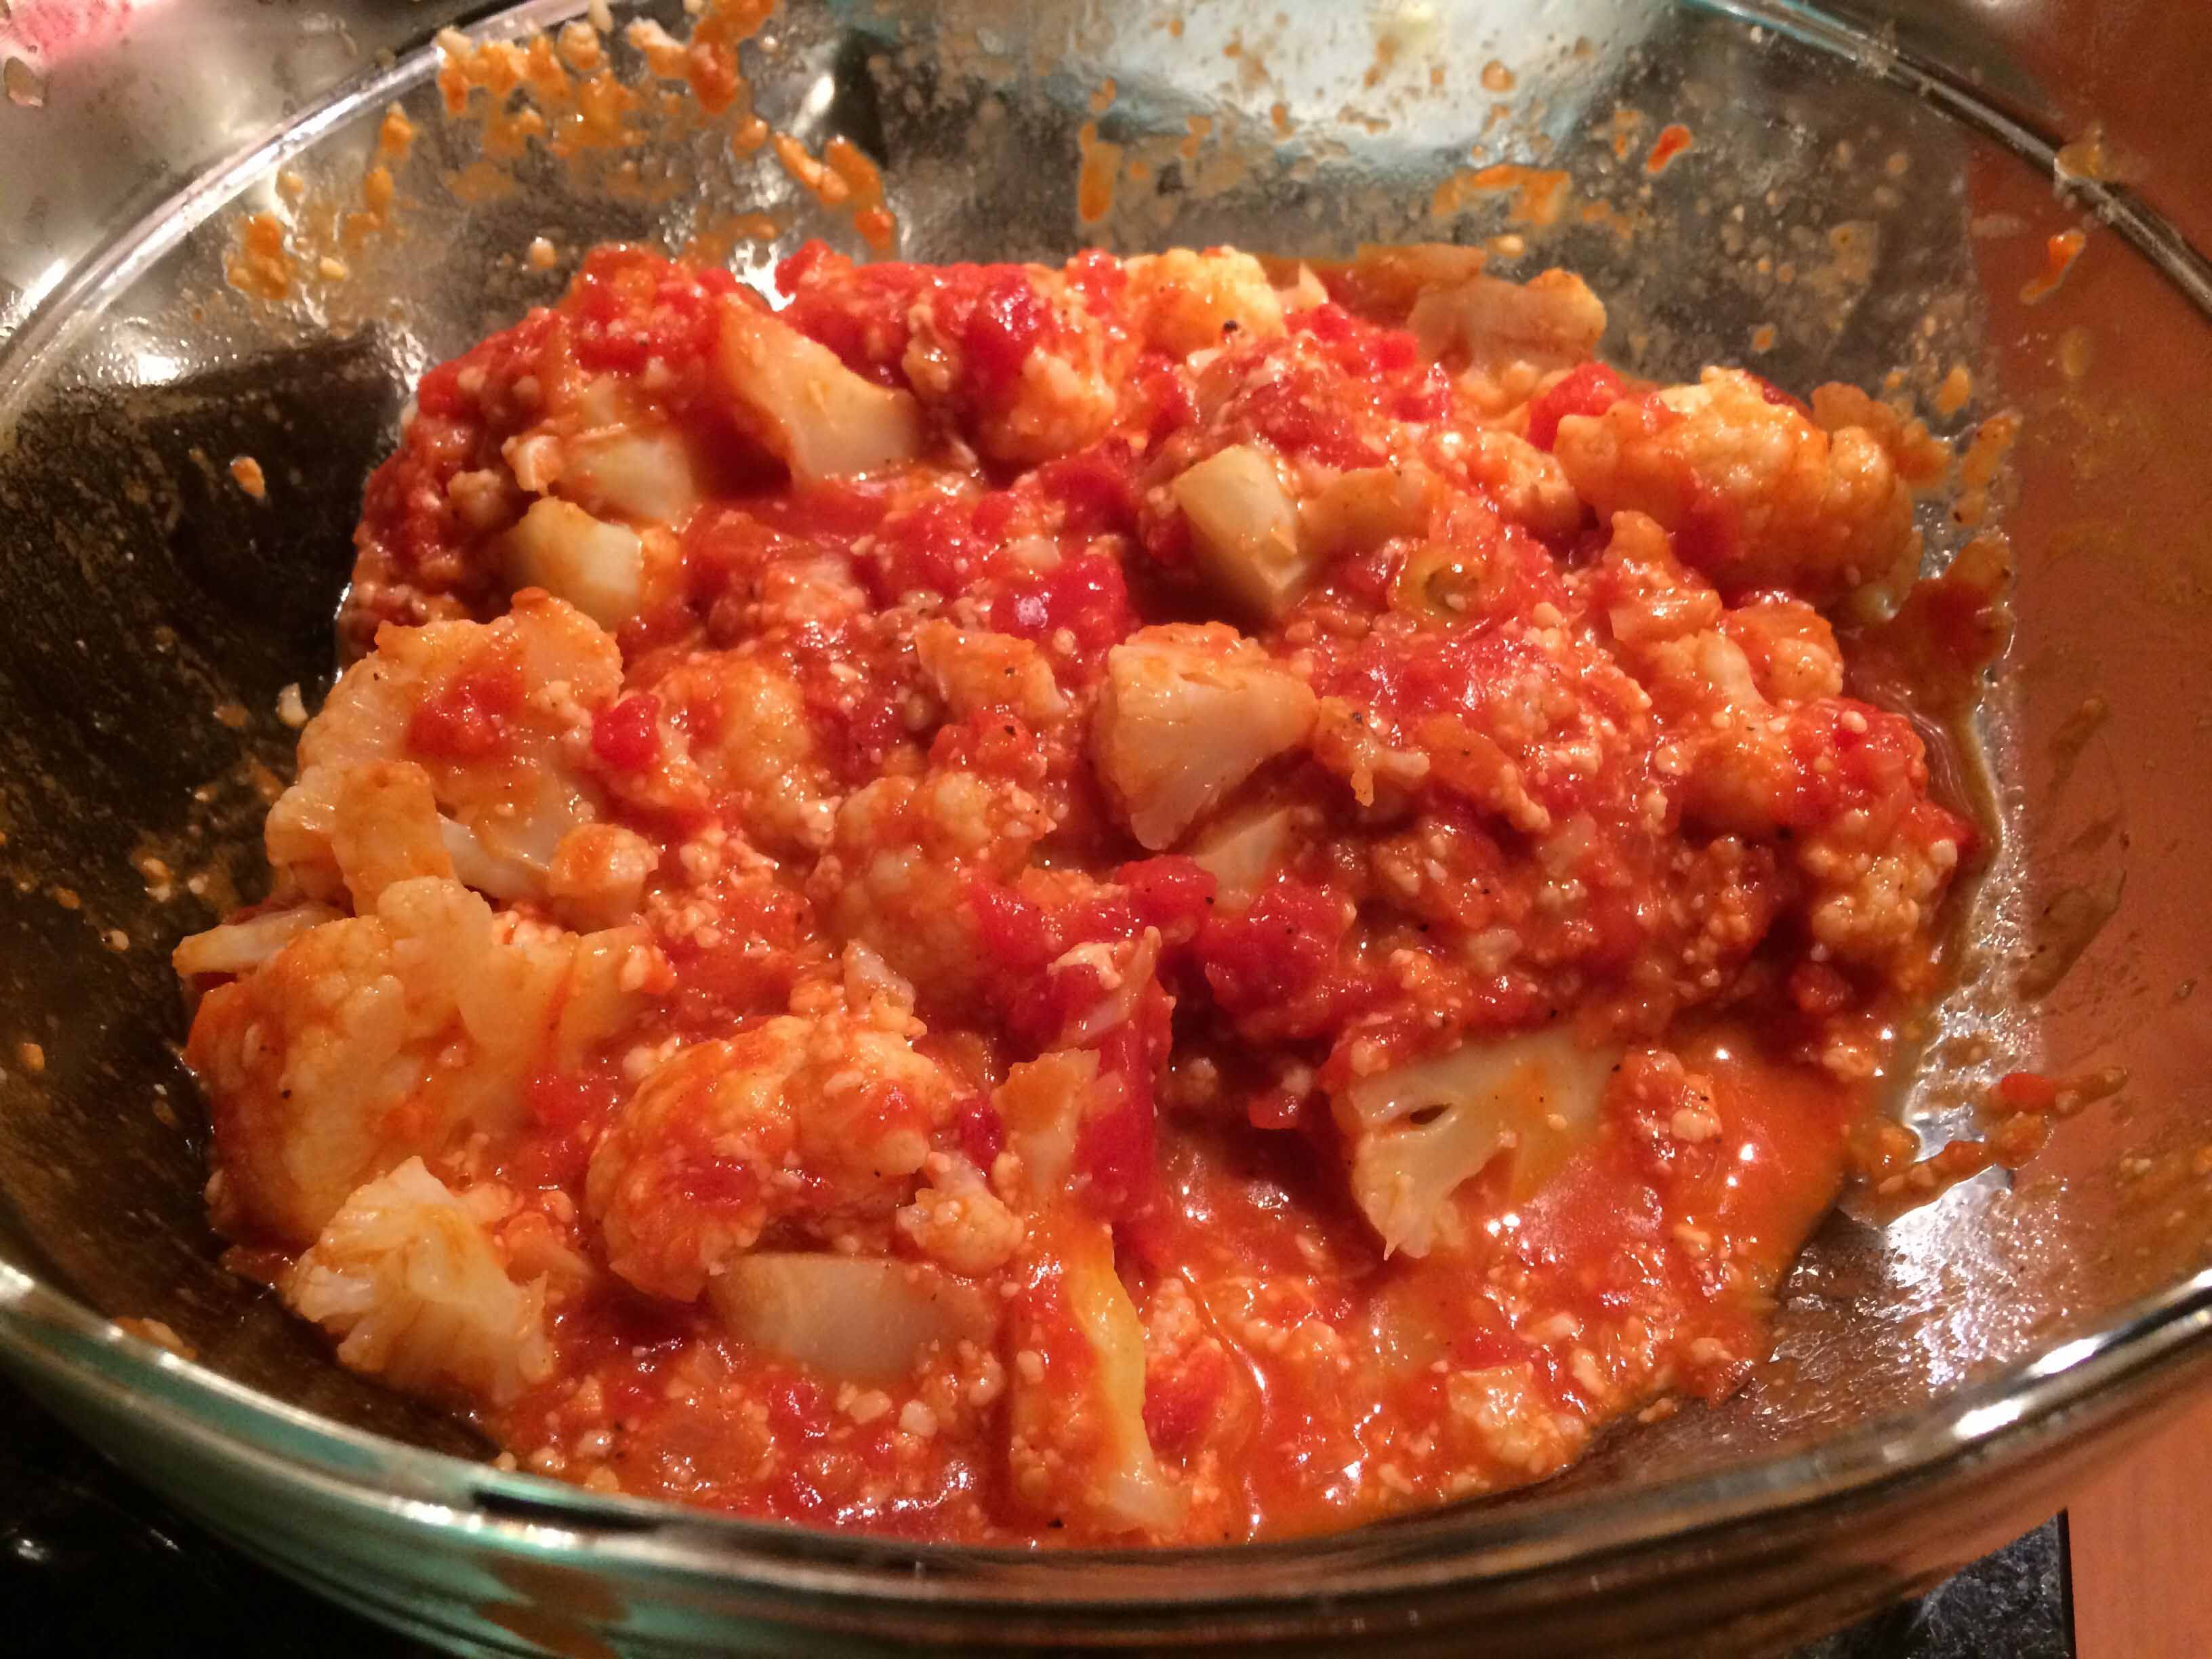
Transfer the tomatoes to a large bowl and stir in the Parmigiano-Reggiano. Gently fold in the cut cauliflower and taste again for seasoning. The cauliflower should be well coated with the sauce.
Cauliflower coated with sauce
Place half of the sauced cauliflower in an 8 by 8 inch, flame-proof baking dish. Cover with half of the sliced primo sale. Cover with the rest of the cauliflower, and top with the remaining sliced cheese. Dot with the remaining tablespoon of butter.
Top layer of the gratin
Place the dish in the preheated oven and bake until the cheese melts, about 15 minutes. If not sufficiently browned, place under the broiler for 2 to 3 minutes.
Eggplant Parmigiana was definitely not a favorite dish of mine when I was growing up. Nevertheless, it was often on our table for dinner, and I was thankful that it was there only as a side dish, so I could get away with having only a “teeny weeny” slice alongside the main course.
Today, however, in our home it’s a main dish that I have come to enjoy a lot. I attribute my later-in-life appreciation of it largely to Marcella Hazan, whose recipe in Essentials of Classic Italian Cookingyields a version that is lighter than many other renderings. The reduced weight can be attributed to the fact that, in her recipe, the eggplant is simply dredged with flour rather than being coated with flour, egg and breadcrumbs before frying. She also recommends peeling the eggplant unless using the Italian baby variety.
Over time, I’ve experimented with Hazan’s recipe and have made it even lighter by using uncooked, canned crushed Italian tomatoes rather than a cooked sauce. I also skip the peeling and salting of the eggplant. I find that today’s eggplants are not as bitter as they once were, making the salt purging unnecessary. Finally, rather than slicing the eggplant lengthwise, I opt for rounds, which let’s me fry more slices at a time.
Eggplant Parmigiana Adapted from Marcella Hazan’s Essentials of Classic Italian Cooking
Ingredients:
Extra virgin olive oil
1 large eggplant, sliced into 3/8 to 1/2 inch thick rounds
1 cup all-purpose flour
Salt
Unsalted butter
1 16-ounce can crushed Italian tomatoes
Parmigiano Reggiano
8 ounces fresh mozzarella, sliced thin
Fresh basil leaves
Directions:
Preheat the oven to 400°F.
Into a heavy bottomed skillet, pour the olive oil until it comes unto about 1 inch along the sides.
While the oil is heating dredge with flour as many slices of eggplant that will fit into the skillet without crowding. Do the dredging in batches, right before frying each batch, to keep the floured slices from getting soggy.
When the oil is hot, carefully place the first batch into the skillet and fry, turning each slice once, until lightly browned on both sides. Place the fried slices on a platter or a baking pan lined with paper towels to absorb any excess oil. Lightly salt the slices.
Fried eggplant slices
Continue frying and lightly salting in batches until all the slices are done. Do not stack the eggplant slices when they come out of the oil.
Add a pinch of salt to the uncooked canned tomatoes.
Grease an 8 x 8 inch baking dish with butter.
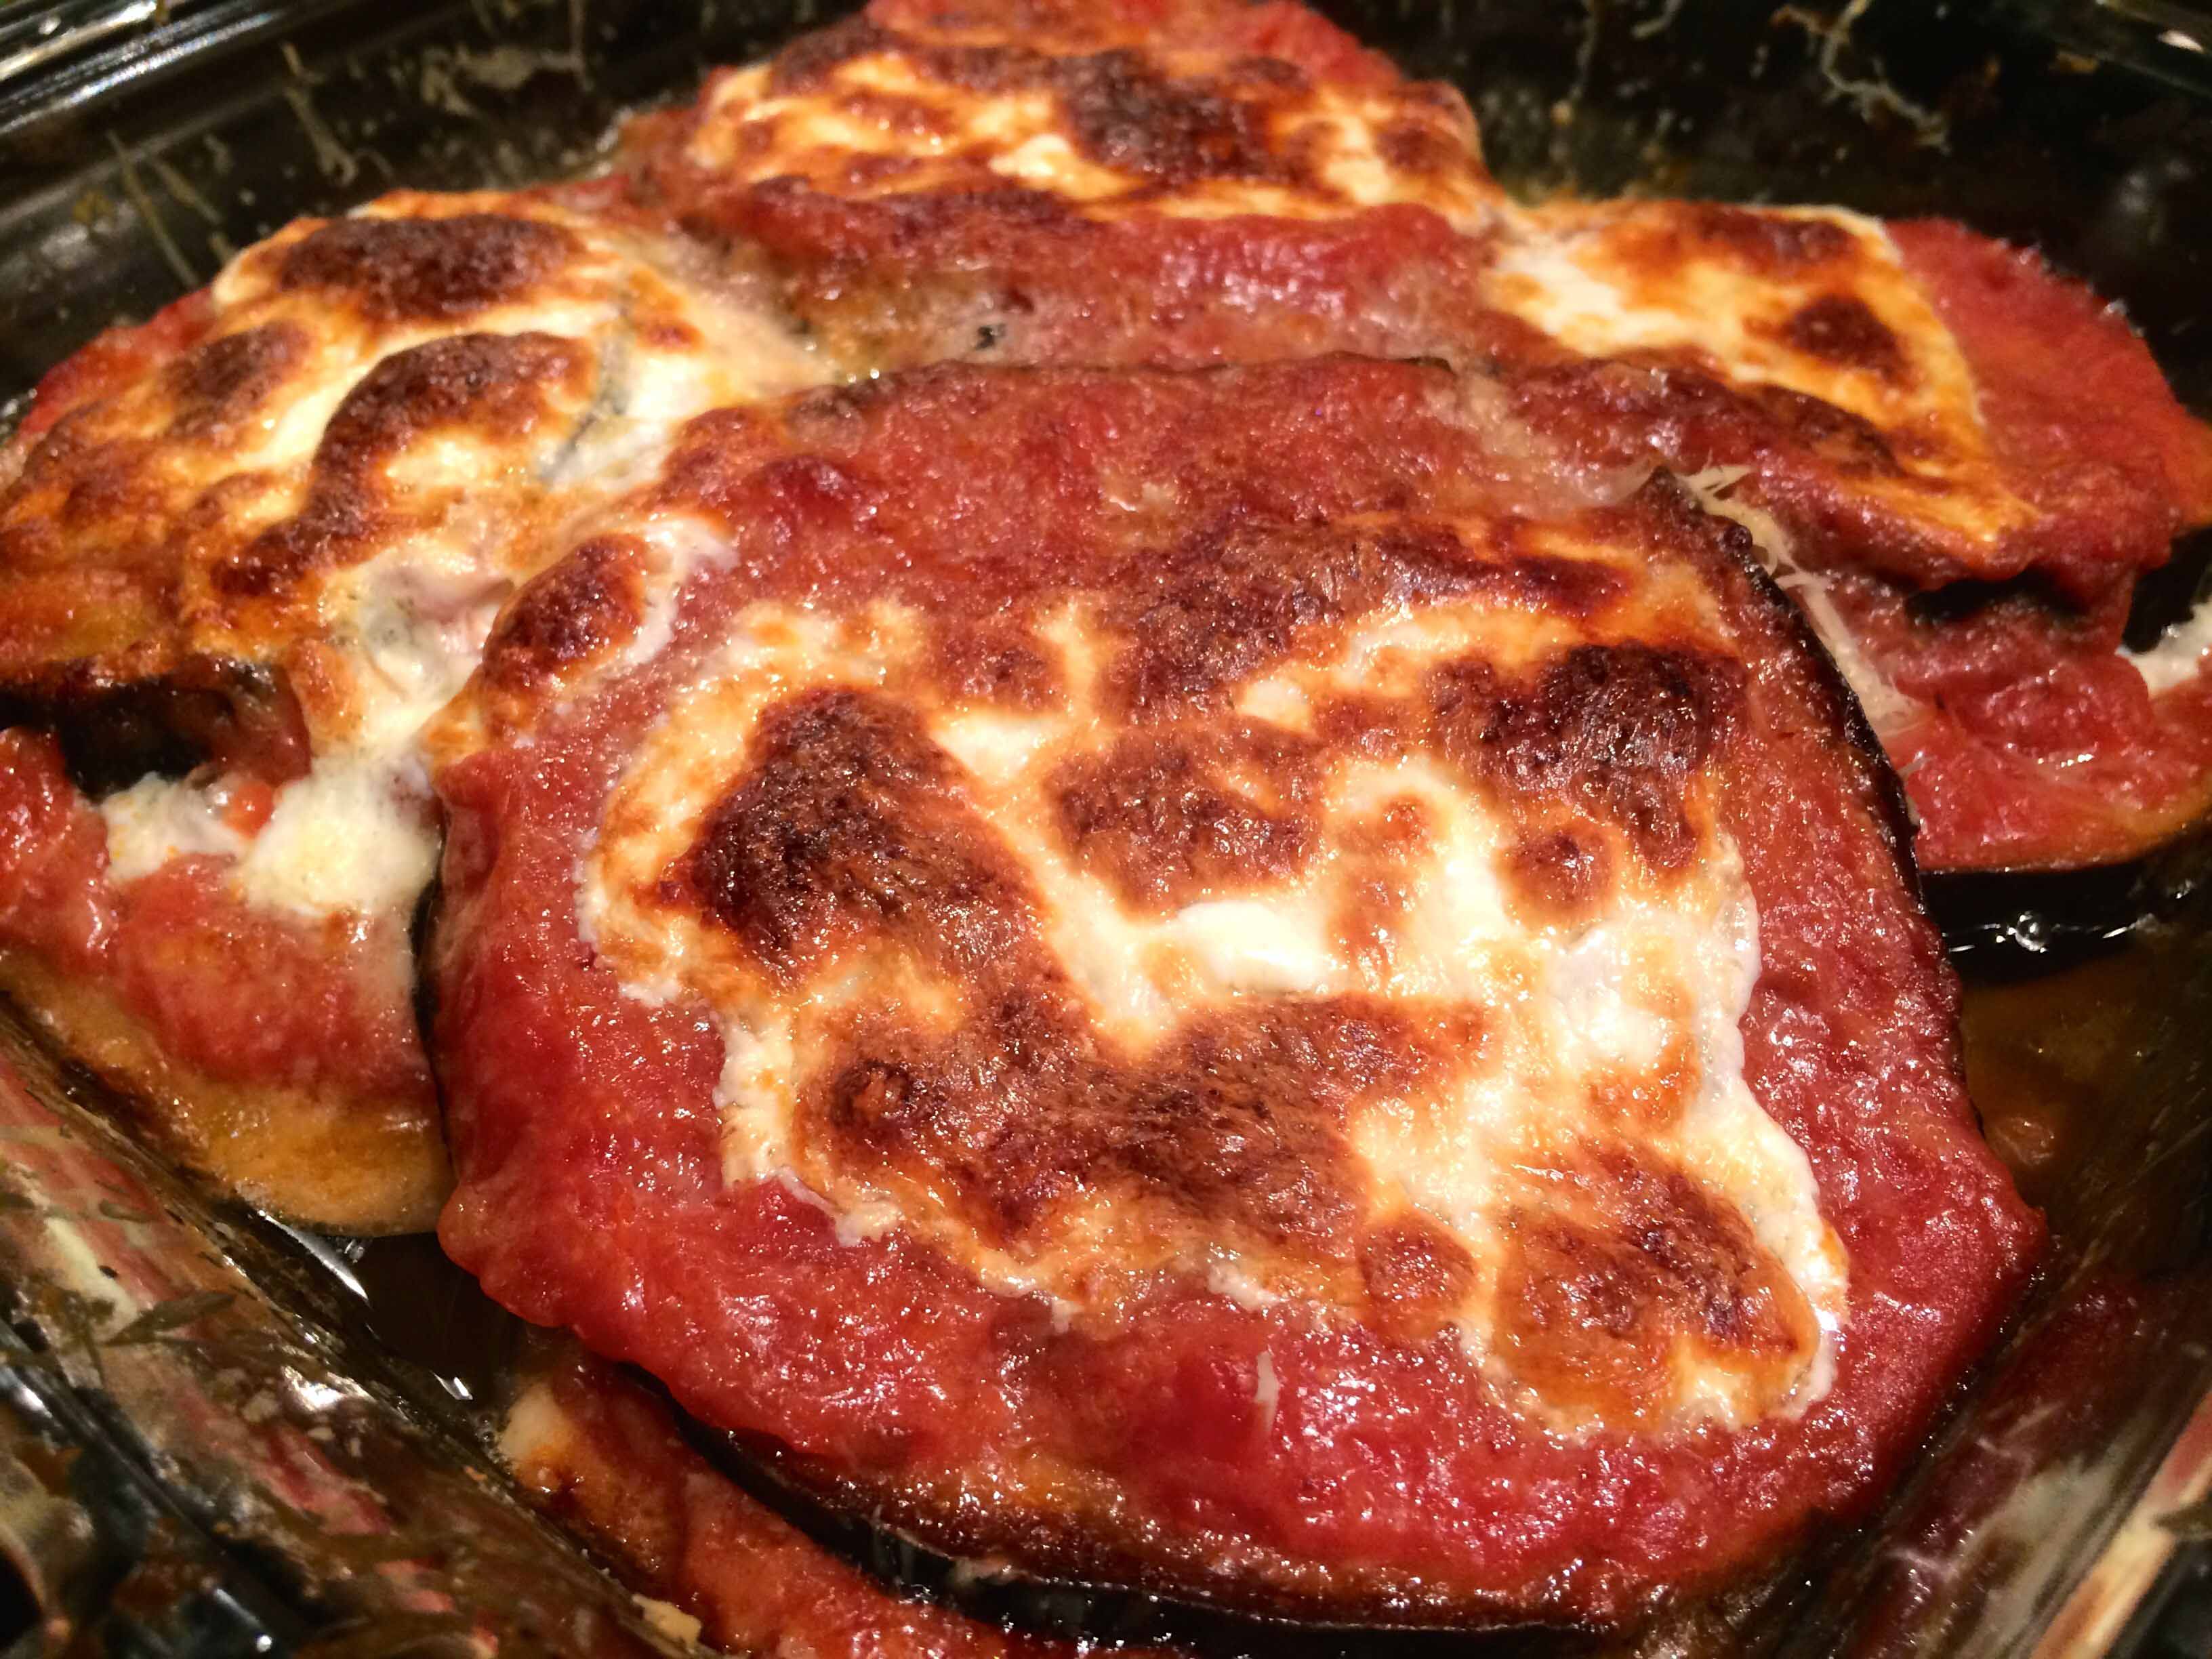
Line the bottom of the dish with the fried eggplant in a single layer. Spread a little less than 1/3 of the tomatoes over the eggplant. Make a layer of mozzarella and grate a liberal amount of Parmigiano Reggiano over it. Place a few torn pieces of basil over this layer.
Layering the eggplant
Continue making layers with the eggplant, tomatoes, mozzarella, Parmigiano, and basil until you have used up the eggplant. Skip the basil on the top layer. From one large eggplant, I get about 12 slices, which in an 8 x 8 inch baking dish makes for three layers. You will most likely have some left over tomatoes.
Dot the top layer with some unsalted butter and place the dish into the upper third of the preheated oven.
Cook for about 35 minutes. The eggplant should be bubbling and the mozzarella nicely browned.
Just from the oven
Allow to rest and settle for about 5 minutes before slicing and serving.
A surprise gift of squash blossoms from the farmers market yesterday morning evoked memories of my aunt using them either for a sauté with cubed potatoes, for a pizza topping of blossoms, garlic, parsley, pecorino, and olive oil, or more often than not for squash-flower fritters. She always called these blooms “flowers” and cursed the day when they were discovered by gourmets and earned the more formal appellation “blossoms,” which elevated their price from pennies to dollars.
The thought of these fritters led me to my aunt’s recipe box, where I found an index card with a recipe written in her own hand labeled simply “Fritter Batter.” Not having had these fried delights for at least 40 years, I thought I would make an attempt.
My aunt’s recipe card
Her recipe simply listed ingredients without any other directions, so I had to rely on my memory for their shape, size, and color. A little research on the subject also led me to allow the batter to rest for a while and allow the baking powder to play its role in the production.
While the batter rested, I gently washed and dried the flowers after removing their stamens. I ripped each flower into two or three pieces and then added them to the batter coating them lightly.
I heated about a half liter of extra-virgin olive oil in a cast-iron skillet over moderately high heat to a point at which a cube of white bread started to fry and turn color.
Using two tablespoons, I formed the battered flowers into fritters, whose shapes resembled those of my aunt’s (or at least into the shapes as I remembered them).
When they were nicely golden on both sides, I lifted them from the pan with a spider and placed them on paper towels to absorb any excess oil. While they were still warm, I sprinkled them with sea salt and served them as appetizers.
A taste of the first fritter, one of the smallest, carried me back in time. The texture and flavor were perfect. However, the thrill of this victory was soon overcome by a sense of defeat as we tasted the larger fritters. Although nicely crisp on the exterior, in their center the batter was a little runny and uncooked.
I learned a lot about fritters from this experience One thing for sure is that before attempting them again, I’ll buy a frying thermometer. I think it will help me to fry them at the perfect temperature and cook them through without over browning.
Despite any disappointment, however, I’m still happy I made these fritters. The nostalgic high made it all worthwhile.
Having survived the Great Depression, my Sicilian mother often spoke of those days when her family didn’t have much and had to make the most of what they could afford. Pasta Ceci, a simple mix of pasta and chick peas, was one of those dishes from my mother’s past that she continued to make frequently, even after her fortune improved.
Because it was so inexpensive and easy to prepare, I too made it many times when I was in grad school. I still remember when I first called my mother up for the recipe and how surprised and happy she was to share it with me. Although I have tried and enjoyed other recipes for this dish, it’s the one my mother shared with me that remains my favorite.
Pasta Ceci For the chick peas:
1/4 cup water
3 tablespoons olive oil
1 garlic clove smashed and peeled
1 bay leaf
1 can (15.5 oz) chick peas, rinsed and drained
Salt, to taste.
For the topping:
1 tablespoon olive oil
1/2 cup fine breadcrumbs
For the finishing oil:
3 tablespoons olive oil
1/2 garlic clove minced fine
1/8 teaspoon crushed red-pepper flakes
8oz farfalle, bow-tie, pasta
To prepare the beans, place the water, olive oil, garlic, and bay leaf in a small sauce pan and cook covered, over medium-low heat for 5 to 7 minutes.
Add the chick peas, cover, and cook over low heat for about 10 minutes. When finished, remove the bay leaf and taste for salt. Keep warm.
Chick peas cooked
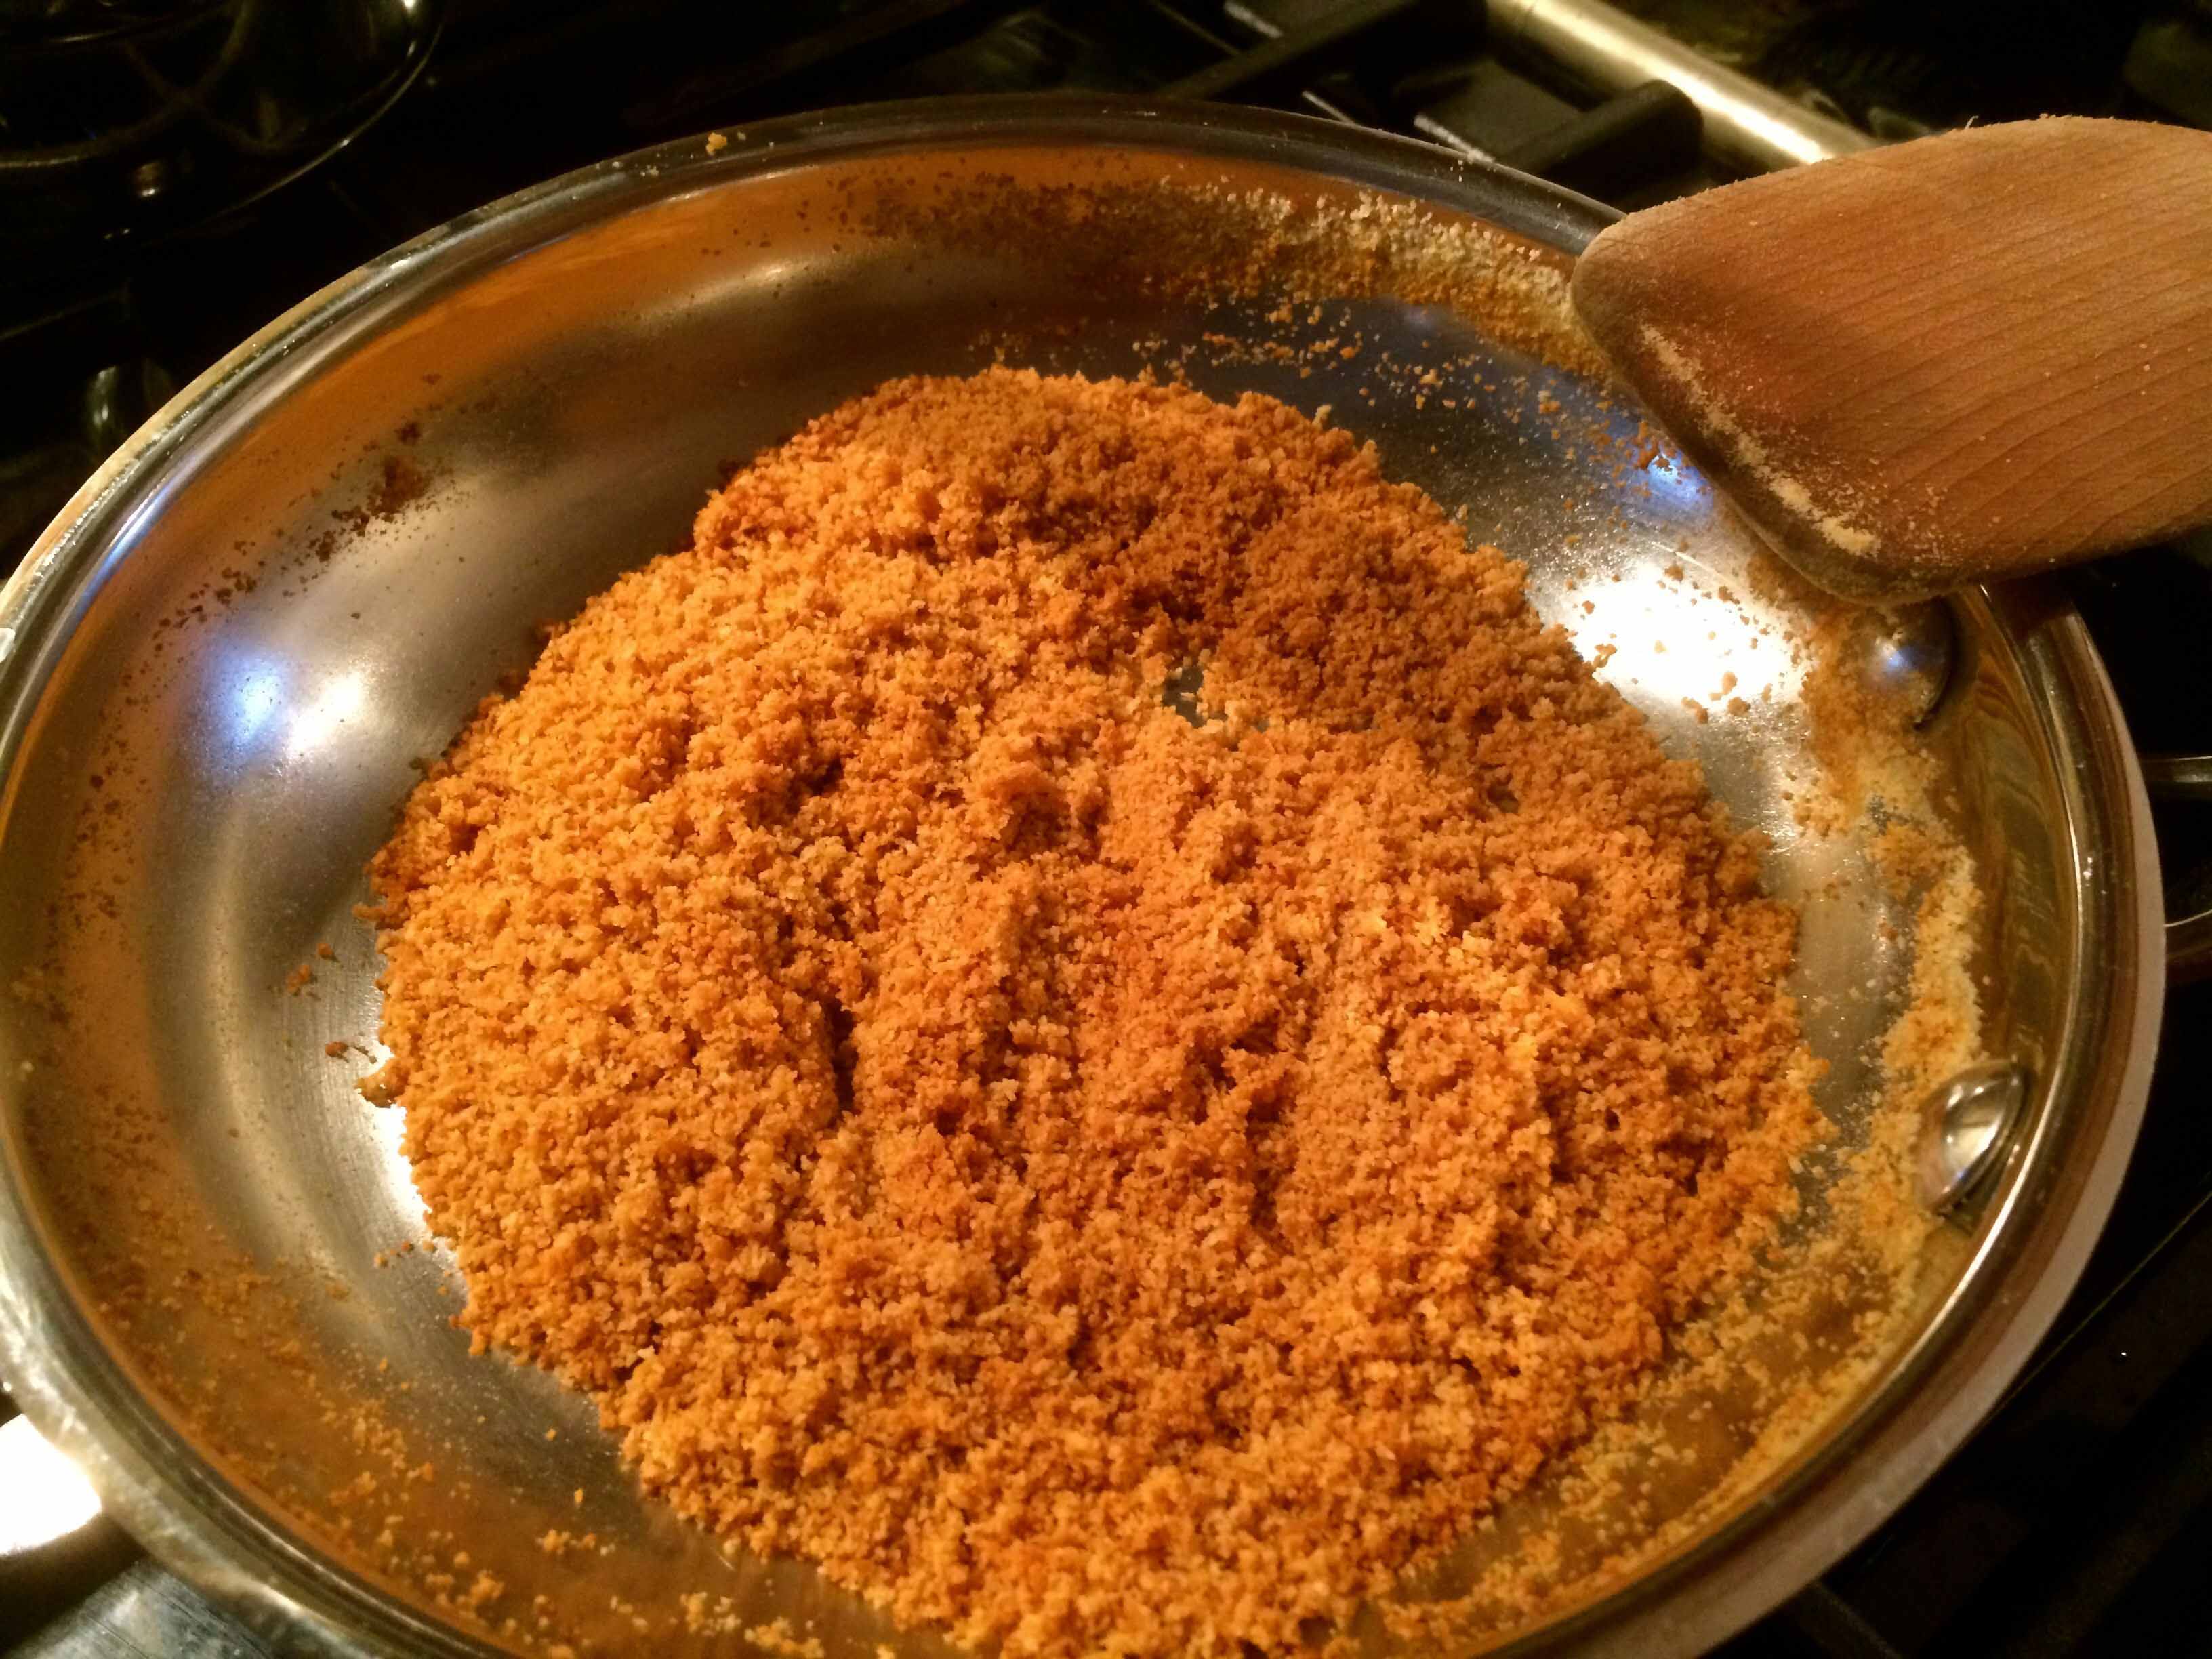
While the chick peas are cooking, prepare the the topping. In a small skillet, heat the olive oil over low heat for one or two minutes. Add the breadcrumbs and toast until light brown. Stir often, to avoid burning the crumbs. When toasted, place aside.
Breadcrumbs toasted
At the same time, prepare the finishing oil. In a small skillet, heat the oil, minced garlic, and pepper flakes over low heat for about 10 minutes. The garlic should become fragrant and take on only a minimum of color. When finished, place aside.
Finishing oil
Meanwhile, in plenty of boiling, well-salted water, cook the pasta, according to package directions, until al dente. Before draining, reserve a cup of the pasta water.
After draining, place the pasta in a warmed serving bowl, add the chick peas and their cooking liquid. Toss lightly; if too dry, add a tablespoon or two of the pasta water. Add the finishing oil, followed by half of the bread crumbs. Toss lightly and serve. Sprinkle the remaining breadcrumbs on the individual portions of the pasta.
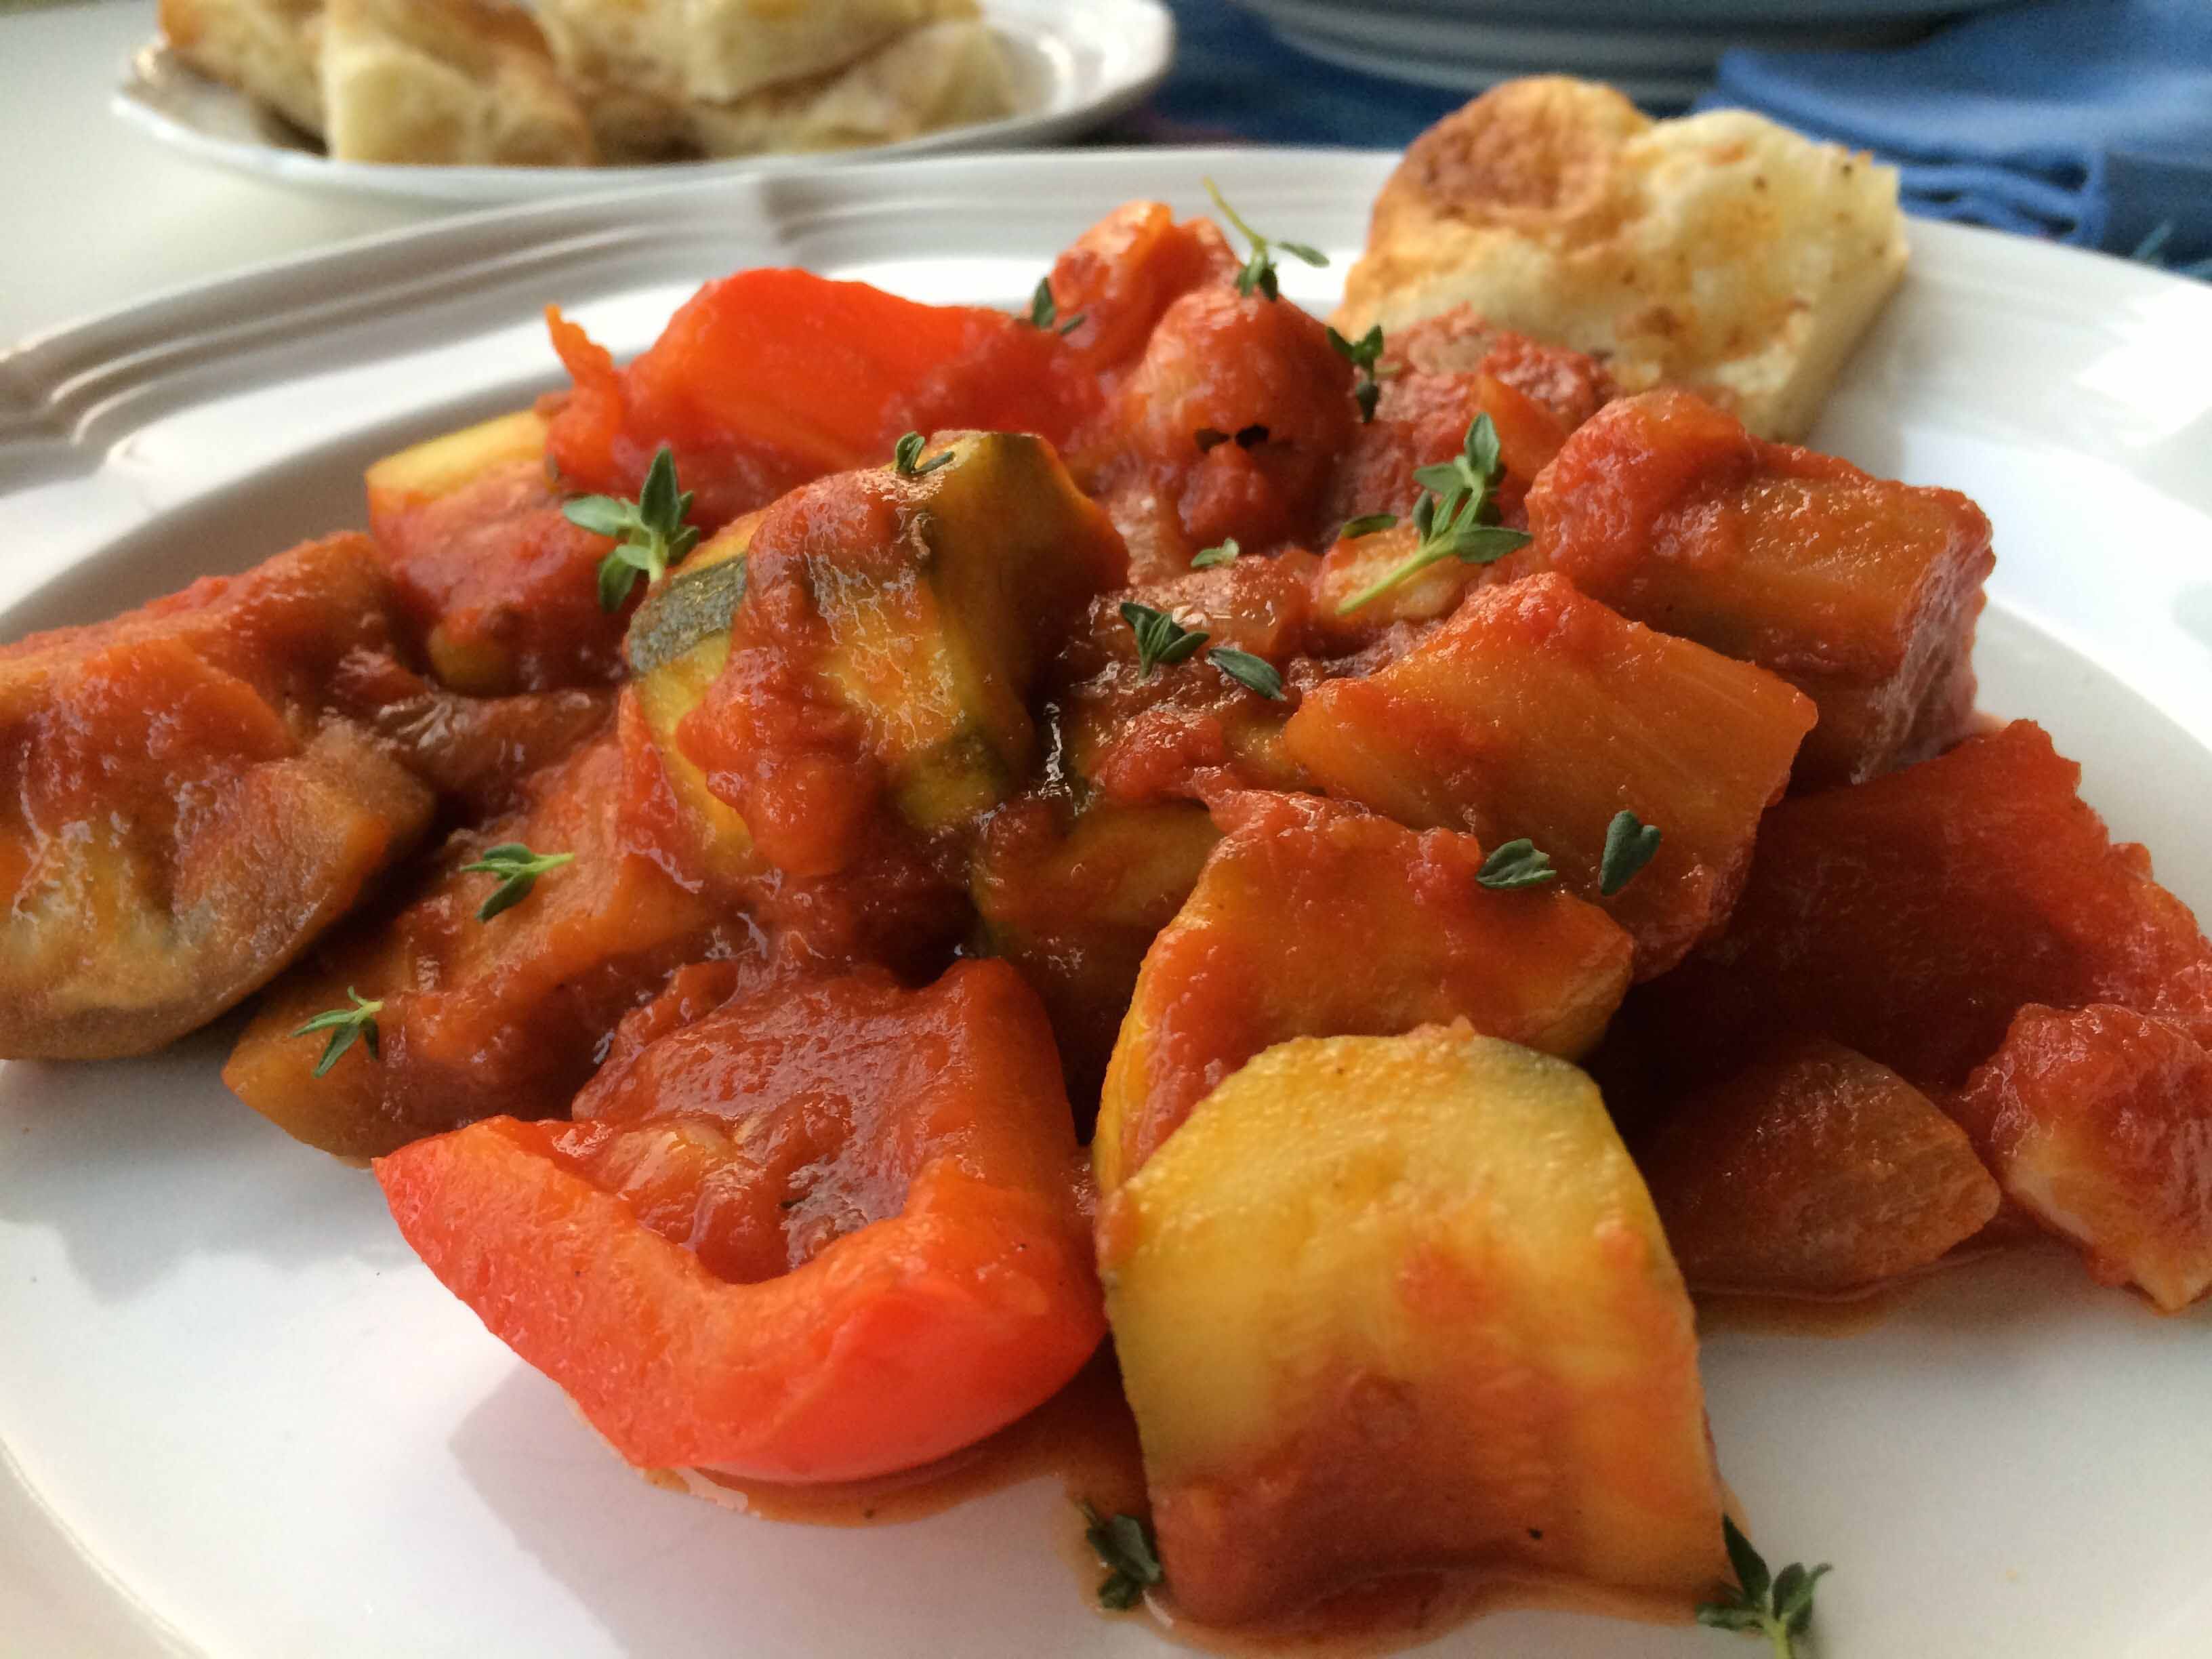
When I was at our greengrocer yesterday, I spotted some beautiful Holland eggplants, deep purple in color, firm to the touch, heavy for their size. And right next to them, were some local zucchini looking equally as good. With these in my basket, I decided it was time for ratatouille. Unfortunately, I wasn’t lucky enough to find some equally good tomatoes. Nevertheless, I stayed with my original decision and bought the other ingredients onions, bell peppers, fresh thyme.
When I got back home, I searched for some recipes and found one from Martha Stewart that appealed to me because it called for large, chunky pieces of vegetables. However, its directions included some steps, like roasting individual canned tomatoes for 30 minutes and sweating eggplant with salt, that I didn’t feel necessary.
My go-to brand of canned tomatoes always have plenty of flavor and I thought rather than turning on the oven, I could get the roasted flavor from toasting some concentrated tomato paste in my pot along with the vegetables. I also find more and more that today’s eggplants aren’t as bitter as they once were and therefore the typical salting process isn’t as necessary as it once was.
I also digressed from Martha’s recipe in the timing. I thought her suggested times for cooking the vegetables were too short. I’m old school Italian and like my vegetables a little more cooked than more trendy recipes suggest. I remember how, when nouvelle cuisine was in vogue, I once served string beans to my aunt and she took them back to the kitchen and sautéed them in olive oil and garlic. She returned them to the table and announced, “Now these are beans cooked for people not for rabbits.”
Ratatouille Adapted from Martha Stewart
4 tablespoons extra-virgin olive oil
2 large yellow onions, (about 1 pound total) diced large
6 large cloves of garlic smashed and peeled
2 red bell peppers, seeded and diced large
1 tablespoon concentrated Italian tomato paste (the one in a tube)
1 can (28 ounces) crushed Italian tomatoes
2 medium sized eggplants, (about 1 pound total) cut into 1 to 1.5 inch pieces
2 large zucchini (about 1 pound total) peeled with alternating strips of peeled and unpeeled skin.
1 bay leaf
2 teaspoons fresh thyme leaves (Martha called for 1 tablespoon fresh marjoram or oregano)
3 tablespoons red-wine vinegar
Instructions
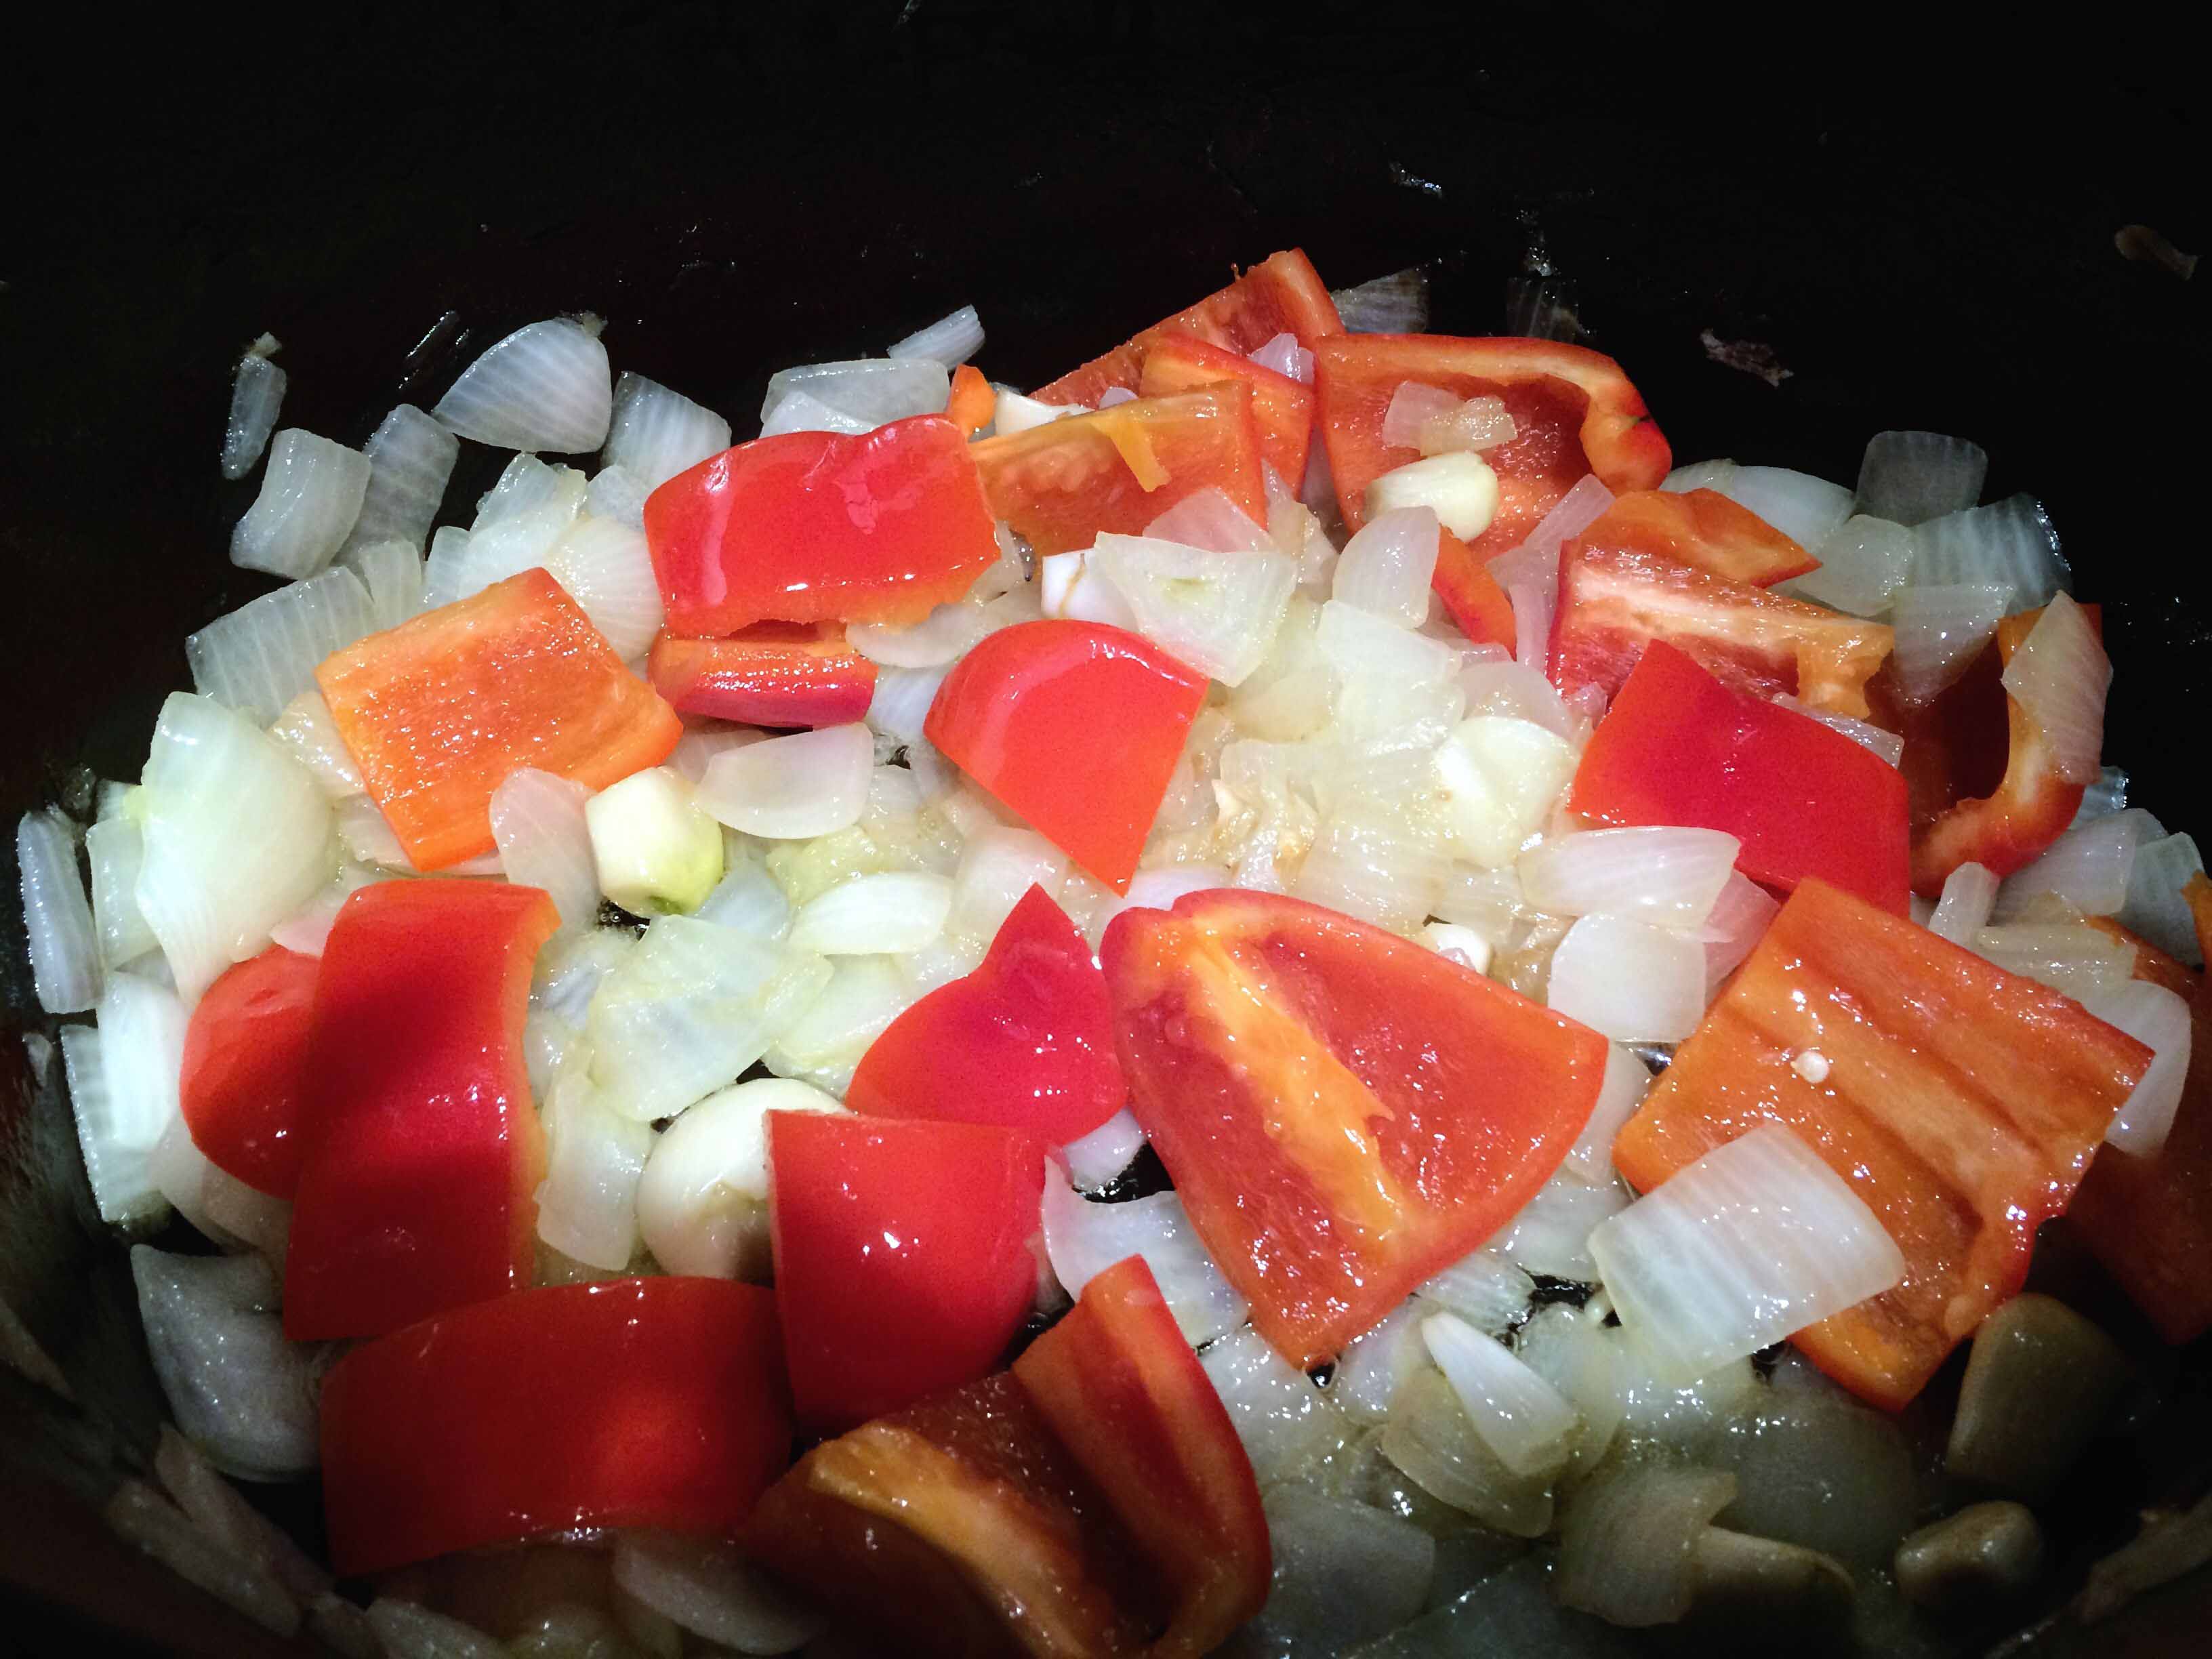
In a large non-reactive Dutch oven, preferably enameled cast iron, heat 4 tablespoons olive oil over medium heat. Add onion and cook, stirring, occasionally, until translucent. (Martha suggested 5 minutes; because of the size of the onions, I cooked mine for closer to 10 minutes.)
The onions and garlic
Add garlic cloves and cook until onions and garlic are soft. (Again, I cooked mine for about 10 minutes as opposed to Martha’s 5.)
Add peppers stirring and cook until tender. (Martha called for crisp-tender and 4 minutes; I went closer to 10.)
With the peppers
Add 1 tablespoon concentrated Italian tomato paste and toast briefly for about 2 minutes.
Add tomatoes, eggplant, zucchini, bay leaf, fresh thyme to the pot. Cook, stirring occasionally, until mixture come to a simmer. Reduce heat to medium low, partially cover, and cook at a gentle simmer until vegetables are cooked through, around 30 minutes. If sauce becomes too thick or starts to stick while cooking add a couple of tablespoons of water from time to time.
(Martha says to cook the vegetables are “tender but mushy, 15 minutes.” I almost doubled this time and my vegetables, perhaps because of their heft did not become mushy.)
With the zucchini, eggplant
Season to taste with vinegar, salt, and pepper. Remove bay leaf. (The vinegar is an essential part of the seasoning, adding a lot of brightness to this dish.)
I served the ratatouille accompanied by some crusty cheese focaccia.